
In this section, we describe the features and characteristics that are common to all or most of the drawing tools.
All drawing tools have options, which are normally shown in a dockable dialog attached to the Toolbox. If you close the options dialog by mistake, you can re-open it by selecting Image: Windows > Dockable dialogs > Tool Options or by double-clicking the tool icon in the Toolbox. No two drawing tools have exactly the same set of options, but most of the options are shared by a number of tools. In this section, we cover all the options that are common to at least two drawing tools.
Figure 15-2 shows all the options for the Paintbrush tool, which has the largest set of options.
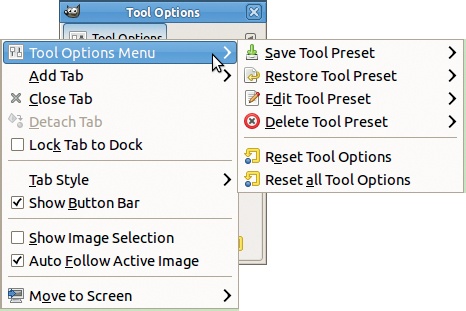
Click the small triangle icon in the top right of the dialog to open the menu shown in Figure 15-3. This menu is similar for all the dockable dialogs, but some have additional entries. The figure also shows the selections available in the Tool Options Menu. We describe them in detail in 15.10 Combining Tool Presets, Brushes, and Paint Dynamics.
Below the triangle icon is the name of the tool (Paintbrush in this case), and below that are the following options:
MODE is a selection of the 23 blending modes explained in 12.2 Blending Modes.
OPACITY changes the transparency. The opacity percentage combines with the blending mode to determine the tool’s exact effect. Opacity is also affected by paint dynamics.

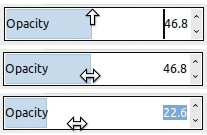
The sliders were updated with some interesting new capabilities in version 2.8. If the mouse pointer is located in the top half of the slider, its icon takes the form of a vertical arrow, as shown in Figure 15-4 (top). Click any part of the slider to get a rough approximation of the opacity factor.
If the mouse pointer is located in the bottom half of the slider, its icon takes the form of a double horizontal arrow, as shown in Figure 15-4 (middle). Click and drag horizontally to change the opacity factor with better precision.
You can use the mouse wheel to change the factor in increments of one percentage point, or you can use the small arrows on the right to do the same thing.
You can also type a value directly into the numeric field on the right. Clicking the top half of the slider places the cursor just in front of the numeric field. You can erase the value by pressing the ![]() key or add digits in front of value. Clicking the bottom half of the slider selects the whole numeric field, as shown in Figure 15-4 (bottom), and then you can type in a new value.
key or add digits in front of value. Clicking the bottom half of the slider selects the whole numeric field, as shown in Figure 15-4 (bottom), and then you can type in a new value.
Two handy keyboard shortcuts exist: ![]() decreases the opacity, and
decreases the opacity, and ![]() increases it. The step is always 1, but you can keep the key pressed to decrease or increase more. Thus you can change the opacity with one hand and paint with the other.
increases it. The step is always 1, but you can keep the key pressed to decrease or increase more. Thus you can change the opacity with one hand and paint with the other.
BRUSH changes the type of brush. This option, as well as the next six, is present only for the brush tools. Click the brush icon to see a grid of all the available brushes. You can also type the brush name in the field on the right. As soon as you start typing, brushes matching what you’ve typed appear below.
Each physical device has its own independent settings, so if you choose a brush for the stylus, it won’t affect which brush is used with the mouse or the eraser. On the contrary, if you attach a specific brush to the stylus, it stays the same whether the stylus is using the Paintbrush tool, Smudge tool, or any other brush tool. You may also associate a different brush with each of these tools by changing the settings in the Image: Edit > Preferences dialog (see Chapter 22).
SIZE changes the brush size, and although the range appears to be [1 to 1000], if you move the cursor far to the right of the slider, you can choose any size. This option is also affected by the current Paint Dynamics. The curved arrow on the right resets the size to the default for the current brush. The mouse wheel changes it by increments of one hundredth.
Two keyboard shortcuts are handy for changing the size of the brush:
 decreases it, and
  increases it. As with the opacity changes, the step is always 1, and you can keep the key pressed.
ASPECT RATIO changes the proportions of the brush in the range [–20 to +20]. This option is new in GIMP 2.8. If the value is positive, the brush is stretched vertically, and if it’s negative, the brush is stretched horizontally. Paint Dynamics can control this option.
ANGLE rotates the brush, so it has no effect if the brush is perfectly round. Again, Paint Dynamics can control this option.
DYNAMICS is where you can change the current paint dynamics (explained in Paint Dynamics). Clicking the button opens the menu shown in Figure 15-5 for choosing a specific dynamic. The bottom buttons allow you to get smaller or larger previews, to display them as a list or as grid, and to open the Paint Dynamics dialog. You can also begin typing in the field to the right, and GIMP completes the name. The button on the right opens the Paint Dynamics Editor.
If you click the small triangle to the left of DYNAMICS OPTIONS, the menu expands, and you’ll see the following options:
FADE LENGTH affects how the parameters change over the length of a stroke. Any parameter can be set to fade, and the brush fades in or out along the fade length. When REPEAT is set to NONE, the stroke stops changing after reaching the fade length. When it’s set to SAWTOOTH WAVE or TRIANGULAR WAVE, the effect repeats in various patterns. If REVERSE is checked, the way the brush changes as you paint is reversed. This option can also be assigned to pointer movement via paint dynamics.
COLOR OPTIONS does not use the foreground color to paint; it gets its colors from the specified gradient. This is true even in the case of a color brush. But this option is subject to the current paint dynamics, so the effect depends on at least one box being checked in the Color row of the Mapping matrix for the current paint dynamics.
APPLY JITTER jitters the brush stroke from side to side within the range [0 to 50]. If no box is checked in the Jitter line of the current paint dynamics, the jitter is inversely proportional to pressure. If at least one box is checked in the Jitter line of the current paint dynamics, the behavior just described is suppressed.
SMOOTH STROKE makes the stroke more homogeneous using two settings. QUALITY [1 to 100] specifies the stroke’s uniformity. WEIGHT [3 to 1000] limits the stroke’s minimum diameter.

Note that the last two options apply to all drawing tools.
Another behavior that all brush tools share is the effect of pressing and holding ![]() and
and ![]() :
:
If you press
 while using a brush tool, you can draw a straight line.
If you press
 while using the Pencil, Paintbrush, Eraser, or Airbrush tools, the pointer becomes an eyedropper, and the next color you click becomes the foreground color (or background for the Eraser).
If you press
and then , the straight line is constrained to the nearest 15°, which is helpful if you’re drawing parallel or perpendicular lines.
Every brush tool uses a general feature called paint dynamics, which is especially useful if you have a graphics tablet. With paint dynamics, you can change the parameters of the brush tool based on how you move the mouse or tablet stylus. This is part of GIMP that has been largely improved in version 2.8. Seven pointer-movement characteristics can be detected, although some of these work only with a tablet and a specialized stylus:
PRESSURE is the amount of force applied when painting a stroke and can be controlled only with a stylus and tablet.
VELOCITY is the relative speed with which you move the pointer.
DIRECTION is the direction of the movement.
TILT is the angle of the stylus. You can use this dynamic only with a tablet, and even some tablets cannot detect tilt.
WHEEL controls wheel rotation if you’re using a tablet stylus with a wheel, like the Airbrush Pen from Wacom. When used with the Intuos Art Pen, this dynamic controls the effect of the pen rotation.
RANDOM varies a parameter randomly as you draw (within the limits you set).
FADE determines how a stroke changes as you draw. After reaching the fade length, the parameter stops changing. It returns to the initial value and changes along the fade length repeatedly (like a sawtooth wave), or it can change in the opposite way (like a triangular wave). For example, if the brush size increases, it could decrease again after the fade length was reached.
These 7 movement characteristics have 11 possible tool options:
OPACITY alters the transparency of the stroke according to the tool’s OPACITY settings.
SIZE makes the brush smaller or larger based on the brush size and the tool’s SIZE settings.
ANGLE rotates the brush starting from the initial angle set in the tool’s ANGLE option.
COLOR changes the brush color along the gradient specified in Color of the DYNAMICS OPTIONS section of the tool’s options dialog. COLOR works with the Pencil, Paintbrush, and Airbrush tools.
HARDNESS alters the stroke’s edges within the limits set by the brush type.
FORCE works with all brush tools except the Pencil. Its effect is specific to each tool and is designed to mimic the tool’s physical equivalent. For example, when force is correlated with pressure, the Paintbrush paints a thicker, darker stroke when you press hard, whereas Airbrush adds more paint.
ASPECT RATIO changes the height and width of the brush within the limits set by the brush type and the tool’s ASPECT RATIO option.
SPACING makes the brush spacing smaller or larger within the limits set by the Spacing slider in the Brushes dialog.
RATE varies the speed of the Airbrush, Convolve, or Smudge tools within the limits fixed by the tool’s RATE option.
FLOW changes the flow of the paint within the limits fixed by the tool’s FLOW option. It affects only the Airbrush tool.
JITTER makes the brush spacing more or less uniform within the limits set by the Amount tool option when you check the tool’s APPLY JITTER option.
These movement characteristics are assigned to tool options based on the current paint dynamics, which are found in the Dynamics Options section of the painting tool options or in the Paint Dynamics dockable dialog, shown in Figure 15-6. Like all the resource dockable dialogs, this dialog contains a tags field, as well as five buttons along the bottom that you can click to edit, create, or delete Paint Dynamics. You’ll also find a button for refreshing the list.
GIMP comes with 17 predefined paint dynamics. Dynamics Off, the default, turns off all links between pointer movement and tool options. The other paint dynamics will be considered in 15.10 Combining Tool Presets, Brushes, and Paint Dynamics.

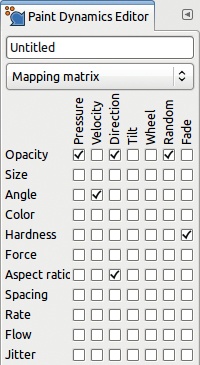
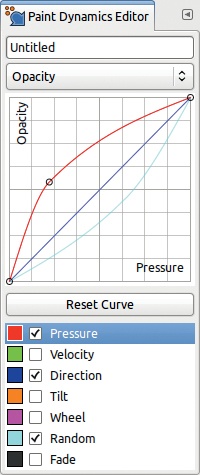
You can’t change predefined paint dynamics. If you double-click one of them in the paint dynamics dialog or click the EDIT DYNAMICS button, the Paint Dynamics Editor, shown in Figure 15-7, opens. Even though you can’t change the predefined dynamics, you can see which boxes are checked. If you create a new dynamic, you can check the boxes to link the corresponding row and column. Type a name in the box at the top of this dialog.
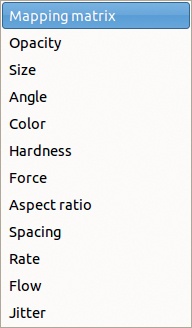
Under the name field is a drop-down menu (Figure 15-8) that lists the tool characteristics tabs. Each of these options opens a tab similar to the Curves tool dialog, showing the answer curve of the corresponding characteristic. The bottom part of the tab (Figure 15-9) contains a list corresponding to the columns of the mapping matrix. When you select one (indicated by the highlight), you can change its curve.
You can change any of the 7 answer curves for each of the 11 tool characteristics. This means GIMP has 77 different adjustable curves, but note that only the curves that are actually linked to an action (via the checkboxes in the matrix map) have an effect.
A number of dockable dialogs are useful with all of the drawing tools. These dialogs are global, which means their settings affect any drawing tool unless the PAINT OPTIONS SHARED BETWEEN TOOLS option is unchecked in the Image: Edit > Preferences > Tool Options dialog. One example is the Paint Dynamics dialog. The others are Brushes, Patterns, Gradients, and Palettes.
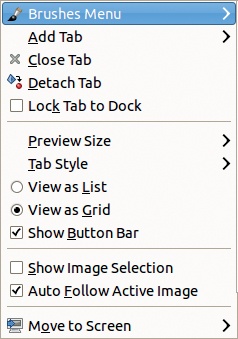
All dockable dialogs have a dialog menu, as shown in Figure 15-10. To open this menu, click the small triangular button at the top right of the dialog. In this section, we cover some of the entries that are especially helpful with the drawing tools. We cover some of the more general entries in Docking Windows and Dockable Dialogs.
Dockable dialogs can display lists of options (such as available brushes or gradients) as either a list or a grid, and you can switch between views using the dialog menu. Grid view is more compact, but the list view shows the name and some information about each visible entry. When in grid view, you can see the same information at the top of the dialog by clicking an entry.
You can change the size of the icons using the PREVIEW SIZE option in the dialog menu. Eight sizes, from TINY to GIGANTIC, are available. The large sizes are useful for certain dockable dialogs, like the Images dialog.
The first entry in the dialog menu is specific to the dialog and can also be selected by right-clicking the dialog body.
Another new feature introduced in version 2.8 is tags. As shown in Figure 15-6, most dockable dialogs now have a filter field near the top of the dialog and a tag assignment field near the bottom. Type a tag and press ![]() , and GIMP saves the tag even if you quit and restart the program. Tags are especially useful if you have a lot of choices (as with brushes, patterns, or gradients). For example, if you download a set of several hundred brushes, scrolling through the Brushes dialog in search of a brush that paints stars becomes cumbersome, but if all such brushes are tagged stars, then you can simply search in the filter field.
, and GIMP saves the tag even if you quit and restart the program. Tags are especially useful if you have a lot of choices (as with brushes, patterns, or gradients). For example, if you download a set of several hundred brushes, scrolling through the Brushes dialog in search of a brush that paints stars becomes cumbersome, but if all such brushes are tagged stars, then you can simply search in the filter field.
Tags can be simple or compound words, separated by commas. If you highlight a tag and press ![]() , the tag is deleted.
, the tag is deleted.
The Brushes, Paint Dynamics, and Tool Presets already have some tags. They are stored in subfolders of the corresponding system folders (see Chapter 22), and they automatically bear the name of their subfolder as a tag. For example, the Brushes system folder contains subfolders called Basic, Legacy, Media, Sketch, Splatters, and Texture, and these tags are attributed to the corresponding brushes.
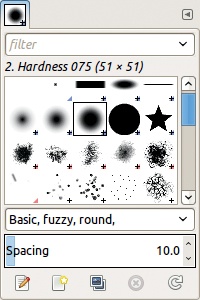
Figure 15-11 shows that the Hardness 075 brush is in the Basic subfolder and has been tagged round and fuzzy by the user.
If you set the dialog to VIEW AS LIST, then you can ![]() -click to select (or unselect) more than one object (handy for tagging multiple entries). Or if you click an entry and
-click to select (or unselect) more than one object (handy for tagging multiple entries). Or if you click an entry and ![]() -click another entry, then you select everything between the two entries.
-click another entry, then you select everything between the two entries.
Clicking the down arrow at the right of the field brings up a menu of the existing tags. Click one or more tags and press any key on the keyboard to enter the tag into the filter or tag field. While in the tags field, you can delete a tag from the current object by simply clicking it. If you ![]() -click the tags field and tap the left or right arrow, the tags are selected from right to left.
-click the tags field and tap the left or right arrow, the tags are selected from right to left. ![]() deletes all the selected tags. If you haven’t selected a tag in the tag list,
deletes all the selected tags. If you haven’t selected a tag in the tag list, ![]() selects the tag on the left, and
selects the tag on the left, and ![]() does the same on the right. If a tag is no longer used for any object, it disappears from the drop-down menu.
does the same on the right. If a tag is no longer used for any object, it disappears from the drop-down menu.
When one tag is in the filter field, only the objects with that tag are displayed. When two or more tags are listed, only the objects with all of the tags are shown. To go back to the full list, delete all tags in the filter field.
In this section, we cover six dockable dialogs that are especially useful for digital drawing and painting.
The Brushes dialog is shown in Figure 15-11. Because user-defined brushes appear in this dialog, it might look different on your screen.
Brushes are divided into four major categories:
An ordinary brush is a grayscale image painted on a white background. It paints with the foreground color (or a color from a gradient if the color paint dynamics is enabled), except for the Erase tool, which paints with the background color.
A color brush is an RGB image with an Alpha channel and a mask that’s a grayscale image of the brush. A color brush uses its own color rather than the foreground color, as long as a box is not checked in the Color row of the current Paint Dynamic. If one is checked, only the mask of the color brush—with colors from the current gradient—is used.
An animated brushcan be an ordinary brush or a color brush. It is actually a sequence of brushes, so the brush changes depending on the current paint dynamics.
A parametric brush is a resizable brush created with the Brush editor, as explained in 22.4 Building New Brushes. Parametric brushes are grayscale and use the foreground color, much as ordinary brushes do.
When the brush image is larger than its icon, you’ll see a small + sign in the bottom-right corner of the icon. Click and hold the icon to see the actual size.
Animated brushes have a small red triangle in the bottom-right corner, and if you click and hold their icons, you can view the animation.
A brush paints by repeatedly stamping the brush at regular intervals, and the SPACING slider specifies the distance between two successive stamps. Its initial value is specified in each brush’s file. If you download or create a brush, you can delete it; the delete button at the bottom of the dialog will be active.
The Patterns dialog is shown in Figure 15-12. GIMP’s set of patterns is rather small, but you can build your own, as explained in 22.5 Building New Patterns. A Google search for “GIMP patterns” also yields tons of patterns, which you can add to GIMP by saving them in the patterns folder. The three buttons at the bottom of the dialog allow you to delete the current pattern, refresh the list, and open the current pattern as an image.
Unlike the Patterns and Brushes dialogs, the Gradients dialog is viewed as a list by default, as shown in Figure 15-13. GIMP’s set of gradients is quite large. Some of these gradients are designed for use with specific filters; for instance, the gradients that start with Flare are designed for the Gradient Flare filter, described in “Gradient Flare.
The only unique feature of the Gradients menu is the option to save a gradient in POV-Ray format, used with ray-tracing software. Again, you can download more gradients, or you can build them, as explained in 22.6 Building New Gradients.

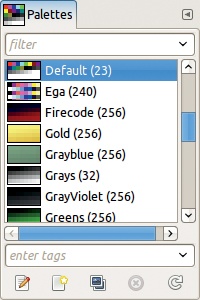
The Palettes dialog is also displayed as a list by default, as shown in Figure 15-14. GIMP comes with a large set of predefined palettes.
From the Palettes menu, you can import a palette from a gradient or an image. You can also build a new palette, as discussed in 22.7 Building New Palettes, or you can download palettes from the Web.

The Device Status dockable dialog (Image: Windows > Device status) is shown in Figure 15-15. This dialog displays information about input devices. In this figure, you see five current devices: the normal mouse (core pointer), the tablet mouse (called cursor), the tablet eraser, the tablet pad, and the tablet stylus. Assign tools and options to devices simply by selecting the tool with the device. The tool and its current settings are then set for that device. In the figure, the tablet mouse is using the Blend tool, and the tablet stylus is using the Pencil tool with a dark red foreground color and green background color. Note that you can’t change settings directly in the dialog—this dialog is strictly informative. But you can save the current device status, using the button at the bottom of the dialog.
The Tool Presets dialog (Image: Windows > Tool presets) is shown in Figure 15-16. A tool preset is a group of saved settings for a specific tool, similar to those in the Device Status dialog, but tool presets contain additional settings—the current paint dynamics and the font. They are different from the preset settings used by color tools like Levels or Curves (see Chapter 12).
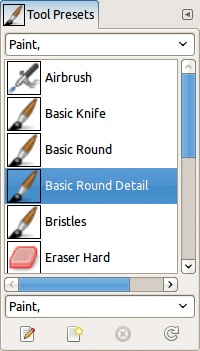
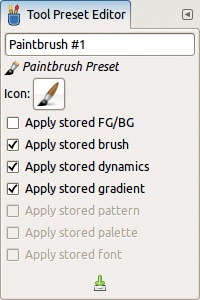
You can create a new tool preset by selecting Tool Presets: right-click > New Tool Preset or by clicking the second button from the left at the bottom of the Tool Presets dialog to open the dialog shown in Figure 15-17. Note that you can choose to save certain settings and to leave the others unchanged when you use the preset.
Tool presets are powerful, and they will be explained in detail in 15.10 Combining Tool Presets, Brushes, and Paint Dynamics.