
GIMP has four kinds of brushes:
Ordinary brushes have no specific name. They are shown in the Brushes dialog as small grayscale images called pixmaps. When painting with the ordinary brushes, the current foreground color is used, with the intensity of the color represented by the intensity of black in the pixmap.
Color brushes are represented by a color pixmap in the Brushes dialog. Internally, they are represented by this pixmap, as well as by a grayscale copy of this pixmap, which serves as a mask. When used with paint dynamics without any box checked in the Color row (see Drawing Tool Options), a color brush uses the colors of the pixmap and ignores the foreground color. If at least one box is checked in the Color row of the current paint dynamics, the mask is used, and brushes paint with a gradient.
Animated brushes (also called image hoses) apply a series of grayscale or color pixmaps to an image. (A small red triangle appears near the pixmap in the Brushes dialog.) Animated brushes paint with several different pixmaps, depending on the pointer movement. For example, when using a graphic tablet, an animated brush may change its behavior depending on the pressure and tilt of the tablet pen and the current paint dynamics settings.
Parametric brushes are created using a simple graphical interface.
To define an ordinary brush, first build a grayscale image as shown in Figure 22-37. When you’re satisfied with the brush, export it to the GIMP brush .gbr file format, and the dialog shown in Figure 22-38 opens. Once in this dialog, you can add a short description of the brush and define its default spacing. Export the brush to your personal brushes folder and refresh the Brushes dialog by clicking the double arrow at the lower right, and you should be able to use your new brush just like any other.

To define a color brush, first create an image in RGB mode, draw a new brush, and add an Alpha channel. Alternatively, you can create a transparent image and then draw the brush. The brush is drawn in color, and the new brush paints with its own colors.
Note that as soon as you copy or cut a selection, it appears in the Brushes dialog as the first brush. You can use this selection as either an ordinary or color brush, depending on the color mode of the image from which you made the selection. You can also select Image: Edit > Paste as > New Brush to immediately export the new brush.
To build an animated brush, first build an image containing all of the brush’s components. You can build a multilayer image (similar to an animation) using the same techniques described in Chapter 18 so that each layer contains one of the brush’s components. You can also build an image with only one layer, containing all components arranged in rows and columns. Finally, you can build an image that mixes these two methods, with several layers and several brush images in each layer.
When you use an animated brush with the Paintbrush tool, the brush image changes as you draw according to the direction of the stroke, the pressure applied on the graphic tablet, or simply the distance traveled. The animated brush’s effect differs depending on the tool (such as the Pencil) and its inherent properties. You can combine these conditions so the effects of an animated brush change along several dimensions.
Note, however, that this mechanism is different from and incompatible with paint dynamics: When you use an animated brush, the current paint dynamics setting is ignored.
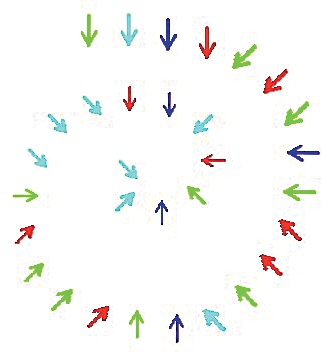
For example, say we want to build a three-dimensional brush that changes depending on three conditions:
The shape of the brush (a small arrow) changes along the direction of the stroke. The arrow points 90 degrees clockwise from the direction of the stroke, so if we draw a circle in the clockwise direction, the arrows will point to the center.
The size of the brush depends on the pressure of the stylus on the graphic tablet: The more pressure, the smaller the arrow.
The color of the brush varies randomly.
We first define eight directions for the arrow. The first direction points vertically, and the rest each rotate counterclockwise 45°.
We then define four sizes and four colors, producing a total of 8 × 4 × 4 different brushes. We organize the brushes in four differently colored layers, with each layer containing four rows of eight shapes.
First, we draw an arrow in a new 200 × 200 image, as shown in Figure 22-39. We then scale this image to 40 × 40 (the size of our brush), and by successively rotating it, we build a row of arrows in a new 320 × 40 image. To orient the arrow layers precisely, we place vertical guides separated by 80 pixels, as shown in Figure 22-40.
Now we build three more rows of arrows, with brush images of decreasing size. We scale down each layer individually so it remains in the same place in the row; in other words, we don’t scale the entire row at once. In addition to the first row with brush size 40 × 40, we build three more rows with sizes 35 × 35, 30 × 30, and 25 × 25. For each row, we delete the background layer and merge the other layers to produce a one-layer image. We also extend this layer to the image size for all but the first row.

Each layer of the multilayer image must contain a copy of the four rows that we just defined. So we create a new 320 × 160 image and copy the four rows as new layers in this image. (A horizontal guide helps us place the rows correctly, as shown in Figure 22-41.) Now we build four different layers in four different colors:
Now we repeat the final two steps for the three remaining colors; for example, choosing hue values 90, 180, and 270 to produce a green, blue, and purple. Then we build the final 320 × 160 image containing the four layers defined earlier. This image has no background layer, and the layers are red, blue, green, and purple, in order from top to bottom.

To export a brush, choose your personal Brushes folder and the .gih suffix. The dialog shown in Figure 22-42 opens. Change all fields as follows:
Push the SPACING to 100% to separate the brush images clearly. The user can change this setting when using the brush.
Add a description in the DESCRIPTION field. Brushes are listed alphabetically by description in the Brushes dialog.
Set the CELL SIZE to 40 × 40.
Change the NUMBER OF CELLS to 128. GIMP displays the organization of each layer, so you can check your work.
Vary the first dimension at random. (This brush has three DIMENSIONS.) The four layers are the first dimension, which corresponds to the brush’s color.
Vary the second dimension with stylus pressure. The four rows in each layer are the second dimension, which corresponds to the brush’s size.
Finally, vary the third dimension with the angle of the stroke. The eight brush images in each row are the third dimension, which corresponds to the brush’s orientation. You could vary this third dimension with velocity or tilt instead. Feel free to experiment with your new animated brush!
When you’re done, click EXPORT. The brush is now in your personal Brushes folder. Refresh the Brushes dialog by clicking the double arrow at the bottom right to see this new brush in the list.
To test this new brush, select it from the list, create a new 400 × 400 white image, and then draw a clockwise spiral with the tablet stylus, increasing the pressure as you move toward the center. The result is shown in Figure 22-43.
Note that you can easily change the export parameters without changing the brush itself—if the brush is saved as an XCF file. You could, for example, remove the color variations or change them incrementally according to the stylus’s tilt.
To define a parametric brush, use the Brush Editor, which appears when you create a new brush, duplicate a brush, or edit a brush. The Brush Editor dialog is shown in Figure 22-44.
Below the dialog menu, you’ll see a text field for naming the new brush. The large box shows a preview of the brush. The preview is not proportional to the size of the brush, however, because you can build brushes with a radius from 0.1 pixel to 1000 pixels.

When creating a new brush, you can choose from three SHAPES: circular, square, or diamond. The RADIUS is a measure of the distance between the center and the edge of the brush and is, therefore, half the brush size. Spikes extend from the center like flower petals; the tips of the petals are the selected shape (round, square, or pointed). SPIKES don’t appear on circles unless the ASPECT RATIO is greater than 1, but shapes with corners exhibit spikes at any aspect ratio. The ASPECT RATIO [1 to 20] controls the relationship between height and width and interacts in interesting ways with the number of spikes to determine the brush’s final shape. The minimum number of spikes is two. If you have more than two spikes, you’ll get a star polygon when the shape is a diamond. If the aspect ratio is 1 and the shape is a square, then if you have more than three spikes, you’ll get a shape with as many sides as there are spikes. Eight spikes yields an octagon, for example. Three spikes yields a bizarre polygon, shown in Figure 22-44. If the aspect ratio is greater than 1 and the shape is square, you get a star with square tips. Figure 22-45 shows a round shape with an aspect ratio of 4.5 and six spikes.

HARDNESS ranges from 0.0 (completely blurred) to 1.0 (completely sharp). ANGLE [0 to 180] allows you to rotate a brush around its center. Finally, as with other brushes, the SPACING option is the distance between two instances of the brush when you use it to draw.
Once you are satisfied with the brush, close the dialog, and your new brush is saved in your personal Brushes folder with your chosen name and the suffix .vbr.