GIMP has tools that fill an entire layer, selection, or image. The only options they share with other painting tools are MODE and OPACITY.
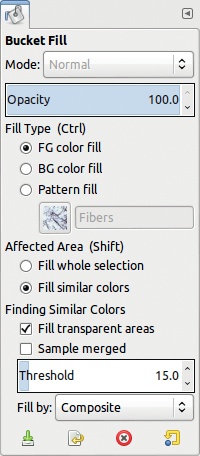
The Bucket Fill tool (![]() ) can fill a layer, a selection, or all pixels of a similar color in the layer or selection. Its icon and pointer are shown in Figure 15-18, and its options are shown in Figure 15-19. To use it, click once in the area that you want to fill.
) can fill a layer, a selection, or all pixels of a similar color in the layer or selection. Its icon and pointer are shown in Figure 15-18, and its options are shown in Figure 15-19. To use it, click once in the area that you want to fill.
Here are the options specific to this tool:
FILL TYPE determines whether the area is filled with the foreground color, background color, or a pattern. The
 key toggles between the foreground and background colors.
If you choose to fill using a pattern, the current pattern is used, but you can change the pattern in the dialog. You can also change the current pattern in the Toolbox or the Patterns dialog.
AFFECTED AREA lets you choose whether to fill the whole selection (or the layer when there is no selection) or just an area of similar color. Pressing the
 key toggles between these choices.
FINDING SIMILAR COLORS is active when FILL SIMILAR COLORS is selected. This option lets you select how similar colors are determined.
FILL TRANSPARENT AREAS allows transparent pixels to be filled, unless the Lock alpha channel button in the Layers dialog is checked.
SAMPLE MERGED decides whether GIMP uses the pixels of other layers. When this option is checked, all visible layers participate to the area definition.
The THRESHOLD option [0 to 255] determines how similar the pixel color must be to be included in the fill. A threshold value of 0 means only pixels of exactly the same color are filled. The area filled must be contiguous.
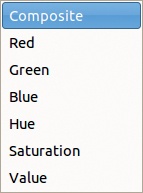
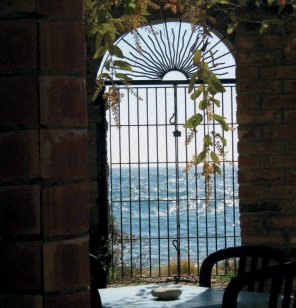
FILL BY changes how the pixel data is used when calculating what to fill based on the threshold. The choices are shown in Figure 15-20. COMPOSITE means that all the pixel’s components are taken into account. The other entries use only one component in the RGB or HSV model. For example, say we want to add a pattern fill of stone bricks to the image shown in Figure 15-21. We fill similar colors throughout the layer, first using Composite (Figure 15-22) and then using only the pixel’s Blue value (Figure 15-23). In this case, filling by the Blue value means more area is filled, but the effect is different for every image.
The Bucket Fill tool has some useful keyboard shortcuts:
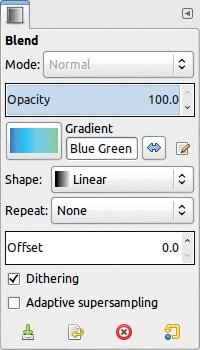
The Blend tool (![]() ) fills a layer or a selection with a gradient. Its icon and pointer are shown in Figure 15-24, and its options are shown in Figure 15-25.
) fills a layer or a selection with a gradient. Its icon and pointer are shown in Figure 15-24, and its options are shown in Figure 15-25.

To use it, click and drag to draw a segment. The gradient will span this segment, but the entire selection or image will be filled regardless of the segment length.
Here are the options specific to this tool:
GRADIENT is used to select the gradient. You can also change the gradient in the Toolbox or in the Gradients dialog.
The small button to the right reverses the gradient direction.
SHAPE is a drop-down list for selecting a gradient shape. We explain it in detail shortly.
REPEAT has three choices: no repetition (none), sawtooth wave, or triangular wave. However, these choices are active only for the first four shapes. To demonstrate the effect of repeats, we filled a blank image with the
Abstract 3gradient and a linear SHAPE. The red arrow shows where the stroke was made. With no repetition, the end color extends from the stroke to the edge of the layer or selection on both sides (Figure 15-26). With sawtooth- wave repetition, the gradient simply repeats (Figure 15-27). With triangular-wave repetition, the direction of the gradient reverses for every other repeat (Figure 15-28).The OFFSET slider [0 to 100] effectively shortens the gradient segment by moving the starting point. Again, it works only with the first four shapes.
DITHERING is designed to smooth the transition between different colors in the gradient.
ADAPTIVE SUPERSAMPLING smooths the gradient’s edges, which you may find useful with a spiral shape.


Now we describe the SHAPE options in detail. These are the available gradient shapes:
LINEAR puts the gradient in the segment you draw and fills the outer areas with either the first and last colors or the same gradient (sawtooth- or triangular-wave repeats).
BI-LINEAR mirrors the gradient at the starting point, as shown in Figure 15-29. We used a short gradient segment for this figure. (We use the same segment for Figure 15-30 to Figure 15-38.)
RADIAL creates a circle centered on the starting point with a radius that is the length of the segment drawn, as shown in Figure 15-30.
SQUARE creates a square centered on the starting point. The square is twice as wide as the segment you draw (Figure 15-31).
CONICAL makes a cone with a tip on the starting point. The effects of the symmetrical and asymmetrical shapes are shown in Figure 15-32 and Figure 15-33, respectively.
SHAPED follows the image or selection borders. The segment that you would normally draw to add a gradient has no effect. Instead, three different algorithms are used to apply the gradient within the shape, as shown in Figure 15-34, Figure 15-35, and Figure 15-36. Here, we applied the gradient to a flower-shaped selection.
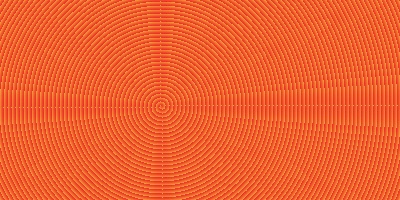
SPIRAL draws a spiral centered on the starting point, going clockwise or counterclockwise. The segment length sets the distance between two whorls. A clockwise spiral is shown in Figure 15-37. Figure 15-38 shows the interesting effect of using a very short segment.