In the previous section, we considered a very specific application of image overlaying. Now, we show you techniques for more general use.
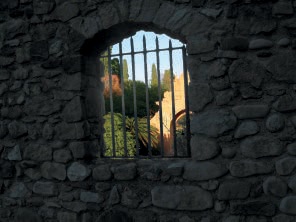
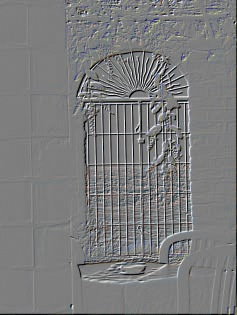
Begin with the photograph shown in Figure 5-36. We want to replace the seascape, seen through the window, with Figure 5-37. To do this, you need to make the seascape transparent. You could try selecting it with the Select by Color tool or the Fuzzy Select tool, but this time try a brand new method instead.


Duplicate the layer, and choose the Image: Colors > Threshold tool, which opens the dialog shown in Figure 5-38. Move the black triangle to the left until you see a silhouette of the window only. Invert it with Image: Colors > Invert to get the result in Figure 5-39. Use this as a mask to make the window fully transparent.
Now do the following:
Select the top layer and copy it.
Open the image shown in Figure 5-37 as a new layer by selecting Image: File > Open as Layers or pressing
 .
.Duplicate the bottom layer, and move it to the top of the layer stack.
Add to it a layer mask (Layers: right-click > Add Layer Mask).
Paste the copy made earlier, and anchor it to the layer mask (
 and
and  ).
).Arrange the layers as shown in Figure 5-40.

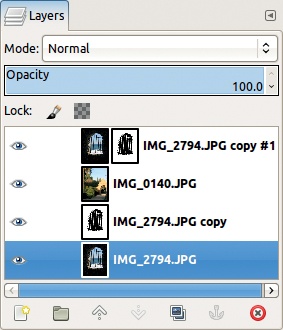

The resulting image appears in Figure 5-41. You could stop here. But the wall is so dark that its stones are almost invisible. Fortunately you can adjust this without altering the landscape seen through the window: In the Layers dialog, click the thumbnail in the top layer to select the layer and not the layer mask. Use the Levels tool (Image: Colors > Levels) to adjust the Gamma triangle until you’re satisfied. Only the layer is affected, not the layer mask or the other layers in the stack. If, on the other hand, you want to adjust the layer mask, you could select its thumbnail and then use the Brush tool to add to or remove from the mask.

The final image appears in Figure 5-42. Note the initial image is still present and unchanged in the bottom layer.
Next, use the same principles to build an image that’s slightly more complicated. The photograph shown in Figure 5-43 will serve as a frame for the portrait shown in Figure 5-44. You want this portrait to appear in the open French windows, larger than life, but with the landscape still visible behind her. You first need to remove the beige background that’s currently behind the subject, which is easy enough. Once you’ve done that, however, you can’t simply copy the portrait and paste it in because her shoulders would extend beyond the window frame.

To position the portrait properly in its unconventional frame, follow these steps:
Open the image shown in Figure 5-43. Add an Alpha channel (Image: Layer > Transparency > Add an Alpha Channel or Layers: right-click > Add an Alpha Channel).
Using the Free Select tool, make a selection by clicking the four corners of the French windows.
When the selection is complete, cut it and then paste it back into the image as a floating selection. Create a new layer from the floating selection (click the leftmost button at the bottom of the Layers dialog or press
 ). Move the new layer to the bottom of the layer stack. The image looks the same, but it’s divided into two different layers.
Open the photograph shown in Figure 5-44 as a new layer. Add an Alpha channel to this layer. Select the Fuzzy Select tool and select the beige background. Decrease the THRESHOLD in the tool options, and as usual, press
 to add to, or
  to remove from, the selection as you build. Take care when selecting the area around her hair. When you’re finished, cut the selection (
 ) and discard it (
 ).
).Select the Scale tool (
 ), choose NUMBER OF LINES in the GUIDES options, and click in the portrait layer. Enlarge the portrait, and move it into the window opening.
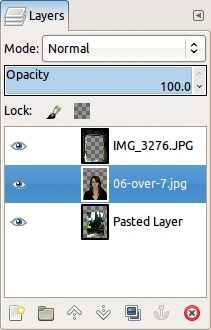
Finally, arrange the layers so the French window is on top, the portrait layer is in the middle, and the cutout landscape is at the bottom, as shown in Figure 5-45.


The final result should resemble Figure 5-46.
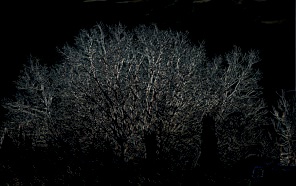
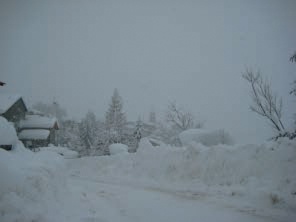
Here, begin with a photograph of a winter scene, shown in Figure 5-47, that is almost uniformly gray and flat. To transform this picture into the image shown in Figure 5-48, simply duplicate the layer and change the mode of the top layer to Hard light. By repeating this process, you can increase the contrast further, but this adds a strong blue cast to the image, as shown in Figure 5-49. Correct this effect using the Levels tool.

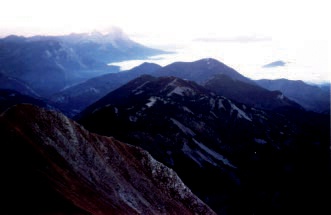
The photograph shown in Figure 5-50 (taken from an airplane) is much too dark. To lighten it, begin by duplicating the layer, as you did in the previous example, but this time use Screen mode.
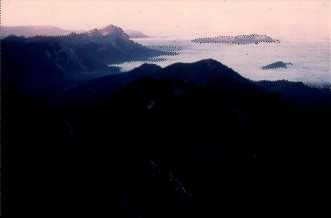
Figure 5-51 shows the result after two duplications. Now the color and detail in the foreground are visible, but some details in the lighter areas of the background have been lost.
To bring back some of that background detail, select the light areas in the image (i.e., the sky and the clouds) with the Fuzzy Select tool, but this time, forget about pressing ![]() or
or ![]() . Instead, click somewhere in the sky, and then drag the cursor down or to the right. As you do, the tool threshold increases, which increases the selected area. If you drag the cursor up or to the left, the selected area decreases. The result appears in Figure 5-52.
. Instead, click somewhere in the sky, and then drag the cursor down or to the right. As you do, the tool threshold increases, which increases the selected area. If you drag the cursor up or to the left, the selected area decreases. The result appears in Figure 5-52.
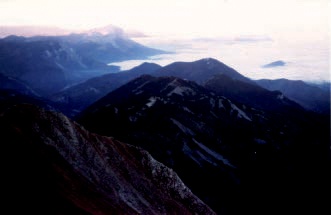
Invert the selection (![]() ), add a layer mask to the top layer, and in the dialog that appears, choose to create the mask from the current selection. Do this for the top layer only, however, to avoid creating an unnatural effect on the lighter areas of the mountains. Figure 5-53 shows the result. The image could be improved more by adjusting the Gamma pointer in the Levels tool and by removing a few minor, age-related imperfections from the photograph, as you saw in Chapter 2.
), add a layer mask to the top layer, and in the dialog that appears, choose to create the mask from the current selection. Do this for the top layer only, however, to avoid creating an unnatural effect on the lighter areas of the mountains. Figure 5-53 shows the result. The image could be improved more by adjusting the Gamma pointer in the Levels tool and by removing a few minor, age-related imperfections from the photograph, as you saw in Chapter 2.
Self-compositing photographs can also be used to create some artistic, filter-like effects. Open the photograph shown in Figure 5-54 and duplicate the layer. If you set the top layer’s mode to Difference, the resulting image will be completely black because the difference between two equal quantities is always zero. But if you use the Move tool to move the top layer a few pixels up and to the left, you get the image shown in Figure 5-55, which is a bit more interesting.


Change the top layer’s mode to Grain extract to get Figure 5-56. Then change it to Divide mode to get Figure 5-57. You can create variations on these effects by changing the amount and direction of offset or the top layer’s opacity or by adding new layers in different modes, and so on.
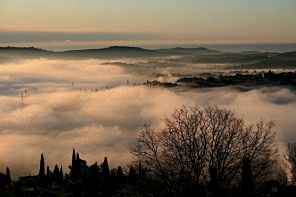
The photograph shown in Figure 5-58 was taken early in the morning when clouds partly filled in the valleys in front of Olivier’s house. He planned to use that image in a composite photography project, but he snapped the photo in a rush and the image doesn’t truly capture what he saw.


If you call the Levels tool and look at the color histograms, you see the Green and Blue channels are truncated on the right. The Blue channel, which appears in Figure 5-59, is the worst. Simply clicking the AUTO button corrects this, and you get the result shown in Figure 5-60. This landscape is now very much as Olivier remembers, so he decided to use it in the following creative project, shown in Figure 5-61.
Here’s how to create this image:
Add the image shown in Figure 5-36 to Olivier’s landscape as a new layer.
Scale this layer to the same width as the underlying image (Image: Layer > Scale Layer).
Set the top layer to Darken only mode.
Crop the image.


Similarly, add the photograph shown in Figure 5-62 to the image as another layer, and select Burn mode. You’ll get the image shown in Figure 5-63.
In the following examples, we duplicated an image layer and then coupled various blending modes with a Gaussian blur of radius 10 that we applied to the top layer. Figure 5-64 shows the result when the top layer is set to Divide mode.


To create Figure 5-65, we chose Difference mode, and we also adjusted the Levels by moving the Gamma triangle to the left.
In Figure 5-66, we removed the Gaussian blur and set the layer to Burn mode. Note how this enhances the clouds in the foreground.
You can add depth by moving the top layer 10 pixels up and to the left. The offset images in Figure 5-67 and Figure 5-68 were cropped to illustrate the effect.