
Without selections, GIMP would not be a very useful program. Because selections are so important, we begin by clarifying what they are.
The simplest definition of a selection is that it’s an outline of a region within an image that will be selected. In fact, in GIMP terminology, the term selection is used for the outline itself and for the contents of this outline (i.e., what is selected). In this chapter we refer to the outline as the selection and the region of the image inside the outline as the selected pixels.
When you make a selection in GIMP, the selection’s outline is indicated by marching ants. This is the name coined for the moving dotted line that surrounds the selected pixels. In Figure 13-1, we made a rectangular selection around the statue. All the pixels of the image inside the rectangle are selected; all the pixels outside are not.

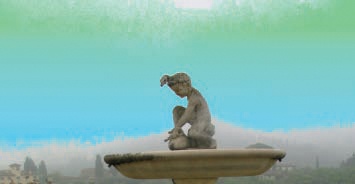
If you make some adjustment to the image, only the selected pixels are affected. In Figure 13-2, you can see the result after we called the Levels tool and adjusted the gamma triangle in the three color channels.
You can also copy the selection and paste it elsewhere, as shown in Figure 13-3. To do this, follow these steps:
Copy the selection using Image: Edit > Copy or
 . The copy is placed in a buffer called the clipboard, which can hold only one image at a time.
Paste the contents of the buffer into the same image, using Image: Edit > Paste or pressing
 .
.Because this builds a floating selection, create a new layer to place the selection into. This can be done by choosing Image: Layer > New Layer, right-clicking in the Layers dialog and choosing New Layer, pressing
 , or clicking the first button in the Layers dialog bottom row. You could also anchor the copy to the current layer, which would replace the underlying pixels with the copied pixels. This is done by choosing Image: Layer > Anchor Layer, right-clicking in the Layers dialog, pressing
  , or pressing the second button from right in the Layers dialog bottom row.
Our new layer is pasted exactly in its original place, so to make sure we’ve been successful, select the Move tool (
 ) and move the new layer to the bottom of the image.


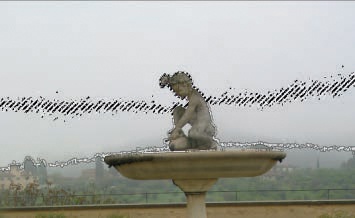
A selection made with the Rectangle Select tool is clearly defined by an outline. The delineation of a selection made with the Fuzzy Select tool (![]() ) isn’t as clear. When you click an image with the Fuzzy Select tool, all the pixels contiguous to the initial point, and those similar to it by some threshold defined in the tool options, are selected. Depending on the image and the threshold, calculating which pixels are selected and which are not is easy, but the outline is often complex and difficult to follow. If you drag the mouse pointer after clicking, you can adjust the threshold, thus increasing or decreasing the number of selected pixels. Figure 13-4 shows this process. The present selection outline appears as a thick, fuzzy line, and the new outline, which appears at the bottom of Figure 13-4, is still quite uneven.
) isn’t as clear. When you click an image with the Fuzzy Select tool, all the pixels contiguous to the initial point, and those similar to it by some threshold defined in the tool options, are selected. Depending on the image and the threshold, calculating which pixels are selected and which are not is easy, but the outline is often complex and difficult to follow. If you drag the mouse pointer after clicking, you can adjust the threshold, thus increasing or decreasing the number of selected pixels. Figure 13-4 shows this process. The present selection outline appears as a thick, fuzzy line, and the new outline, which appears at the bottom of Figure 13-4, is still quite uneven.
By moving the mouse pointer as far as possible, you can select all the sky and a part of the misty woods in the background. Although the new selection appears, from a distance, to be a wavering line along the horizon and over the statue, some segments of the selection are much too complicated to be considered an outline. Figure 13-5 is an enlargement of the left part of this selection, which shows that pixels are selected in what appears to be a random fashion.
The selection is even more complicated than it looks. The pixels in the image are not simply selected or not selected; pixels can be partially selected along a continuous spectrum from 0% to 100%. Showing this is easy if you click the Toggle Quick Mask button in the bottom-left corner of the Image window (or press ![]() ). Figure 13-6 shows Quick Mask with a similar selection that was also built with the Fuzzy Select tool.
). Figure 13-6 shows Quick Mask with a similar selection that was also built with the Fuzzy Select tool.


As you can see, the selection is similar to a grayscale image that’s been added as a layer of the current image, except the new layer appears in red (by default). Completely white pixels in this new layer are 100% selected in the current image. Completely red pixels aren’t selected at all. Pink pixels (i.e., partially red ones) are selected to a degree that’s inversely proportional to their redness—the lighter the pink of the mask, the greater the selection percentage in the image. In our example, the pixels in the middle of the sky are 100% selected, but in the upper part of the sky, they’re only partially selected. Although we’ve described the selection based on the default color of red, you can change the setting to show the selection mask in any color you want by right-clicking the Quick Mask button.
In contrast, a selection built by the Rectangle Select tool appears as a purely red and white image when Quick Mask is activated. This is because pixels in the current image are either selected or they aren’t.
The marching ants that surround a selection are simply a visual approximation of selections that contain partially selected pixels. The ants march along the average boundary of the selection. If you apply an action to a fuzzy selection, the effect on the pixels in the current image is proportional to their selection rate. Figure 13-7 shows this.
We look more closely at the mechanics of partial selections in Chapter 14.