The Image: Layer menu is shown in Figure 11-14. Some of the entries are also found in the Layers: right-click > Layers menu, but there are many new entries as well.
The first eight entries (or seven if there is no existing layer group) can also be found in the Layers: right-click > Layers menu, but in the Image: Layer menu three of these entries are accompanied by keyboard shortcuts:
This menu, and these shortcuts, allow us to make major changes to the layer stack without looking at it, which is generally not advisable. It’s much easier to make a mistake when you can’t see what you’re doing. It’s better to adjust layers in the Layers dialog whenever possible.
If the current layer is a text layer, the Layer menu will also contain four text-specific entries, described in 15.8 The Text Tool. After that are the four menus discussed next.
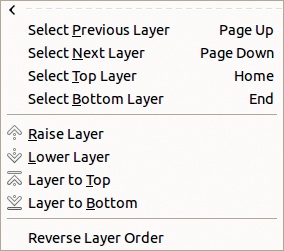
The Stack menu is shown in Figure 11-15. Within it are four commands which are most useful when dealing with an image that has a lot of layers:
SELECT PREVIOUS LAYER (
 ) is equivalent to clicking in the previous layer in the Layers dialog, with one exception: If the current layer is within a layer group, this command does not extend to layers outside of the group.
SELECT NEXT LAYER (
 ) selects the next layer, with the same exception as above.
SELECT TOP LAYER (
 ) selects the topmost layer in the stack or the topmost layer in the group.
SELECT BOTTOM LAYER (
 ) selects the bottom layer in the stack or the bottom layer in the group.
Note that the arrow keys on the keyboard can be used to select the previous or next layer, but only when the Layers dialog is active. See Keyboard Shortcuts in the Layers Dialog for other keyboard shortcuts available in this dialog.
The next four commands move the current layer in the layer stack:
RAISE LAYER moves the layer up in the stack. It cannot raise a layer outside of its current group. To move a layer out of its group, click and drag it.
LOWER LAYER moves the layer down in the stack.
LAYER TO TOP moves the current layer to the top of the stack, or of its group if it belongs to a layer group.
LAYER TO BOTTOM moves the layer to the bottom of the stack or group.
Finally, REVERSE LAYER ORDER can be called only from this menu. A layer group counts as a single layer, and there is no action to reverse the layer order within a layer group.
The Mask menu deals with layer masks and is discussed in 14.2 Layer Masks. It offers slightly more options than are found in the Layers: right-click > Layers menu.
The Transparency menu is discussed in Transparency and the Alpha Channel. Only three of its entries also appear in the Layers: right-click > Layers menu.
Using the Transform menu is the easiest way to flip or rotate the current layer. You could also use the Flip tool (![]() ) or Arbitrary Rotation, which is also accessed through the Rotate tool (
) or Arbitrary Rotation, which is also accessed through the Rotate tool (![]() ). See Transforming a Layer for more information on the Transform menu.
). See Transforming a Layer for more information on the Transform menu.

The remaining five entries in the Image: Layer menu provide the only access to their respective operations:
LAYER BOUNDARY SIZE opens the dialog shown in Figure 11-16, which is very similar to the dialog of Image: Image > Canvas Size, described in Resizing an Image. You can choose the exact dimensions of the layer, and the position of its contents within the new dimensions. Adjust the position by setting the X and Y fields, by dragging the layer preview in its window, or by using the CENTER button. If you reduce the size of the layer, the clipped contents are deleted, but if you enlarge the layer beyond the border of the image, the contents outside of the image border are retained, though invisible. This tool also works with a layer group.
LAYER TO IMAGE SIZE sets the layer to the image size, without a dialog and without moving the layer contents. Any part of the layer that’s beyond the canvas limits is deleted. This tool also works with layer groups.
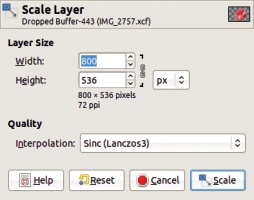
SCALE LAYER opens the dialog shown in Figure 11-17, which is the same as the Image: Image > Scale Image dialog, described in 10.1 Rulers and Units and in Resizing an Image. The only difference is that you cannot change the layer resolution, which is fixed by the image resolution. This tool also works with layer groups.
CROP TO SELECTION is active only if there is a current selection. The layer dimensions are set to the smallest rectangle that includes the selection.
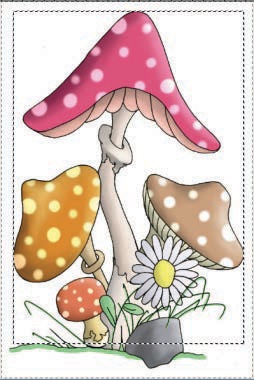
AUTOCROP LAYER crops the layer to the smallest rectangle that contains data of a color different from that of the layer border. It’s similar to Image: Image > Autocrop Image, described in Cropping an Image. This tool also works with layer groups, as demonstrated in Figure 11-18, where the current layer is the entire
Mushroom capslayer group.