
In this section, we show you two specific uses for masks and channels that cannot be accomplished by other means.
The natural mask of an image is a quick way to generate a mask that selects the subject of an image. This particular mask is not always accurate, but, in many cases, it yields good results. This concept is the brainchild of Carey Bunks, author of an excellent, early book about GIMP, Grokking the GIMP (New Riders, 2000).

Start with the photograph shown in Figure 14-35. You want to select only the girl. First, select the whole image (![]() ) and copy it (
) and copy it (![]() ). Then go to the Channels dialog and create a new channel by clicking the proper button (the second icon from the left at the bottom of the Channels dialog).
). Then go to the Channels dialog and create a new channel by clicking the proper button (the second icon from the left at the bottom of the Channels dialog).
Paste the copied data (![]() ), and anchor the floating layer to the new channel (
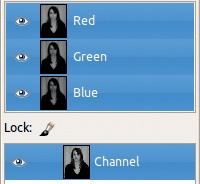
), and anchor the floating layer to the new channel (![]() ). If you leave the visibility on in the new channel and turn it off in the layer, you see a grayscale image of the photograph, as shown in Figure 14-36. The Channels dialog for this image is shown in Figure 14-37.
). If you leave the visibility on in the new channel and turn it off in the layer, you see a grayscale image of the photograph, as shown in Figure 14-36. The Channels dialog for this image is shown in Figure 14-37.
The values of the pixels in this image are used to build the selection. To do this, choose the Image: Colors > Threshold tool. The dialog shown in Figure 14-38 appears, and the image changes to black and white. The positions of the small triangles in the Threshold dialog determine which pixels are white and which are black.
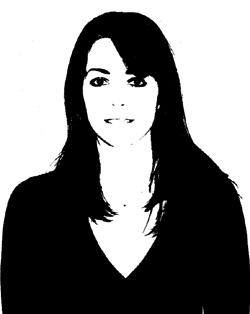

Adjust the triangles as shown in Figure 14-38, and you get the image shown in Figure 14-39. This mask selects only the lightest parts of the image.
To see what the mask actually selected, click the eye icon for the image layer, but be careful not to activate the layer. As you can see, the mask is black and doesn’t contrast well with the image. Change its color using the Edit channel button, and choose yellow and 50% opacity. The result is shown in Figure 14-40.

Touch up the mask under the chin, in the corners of the mouth, on the nostrils, and on the eyes. You can do this easily by painting directly on the mask. Choose the Paintbrush tool and a large brush, and paint the selected facial features with white. Figure 14-41 shows the improved mask. Then convert the mask to a selection, and remove the mask’s visibility. The result is the selection shown in Figure 14-42.
The Alpha channel is necessary when an image contains transparency. When an image has more than one layer, it always has a global Alpha channel. Individual layers may or may not have Alpha channels, but when they don’t, you can see the pixels in the underlying layers unless you use certain blend modes or set the layer opacity to a value less than 100%. But if a given layer does not have an Alpha channel, its name appears in boldface in the Layers dialog.
A single layer image can also use transparency. Images displayed on a website, for example, often have transparent backgrounds, which allow them to blend naturally with other design elements on the page.

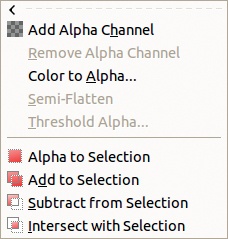
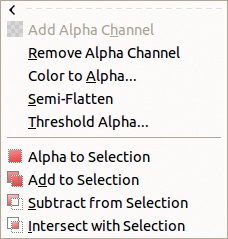
Figure 14-43 shows the Image: Layer > Transparency menu when the corresponding layer has no Alpha channel, and Figure 14-44 shows the same menu when there is an Alpha channel. A few of these entries also appear in the Layers: right-click menu.
Let’s discuss what these menu entries do.
The first two entries, ADD ALPHA CHANNEL and REMOVE ALPHA CHANNEL, add and remove Alpha channels, respectively.
COLOR TO ALPHA also appears in the Image: Colors menu. Select it to make the dialog shown in Figure 14-45 appear. Check PREVIEW, and select the color that will be made transparent. Initially this color is white, as the figure shows.
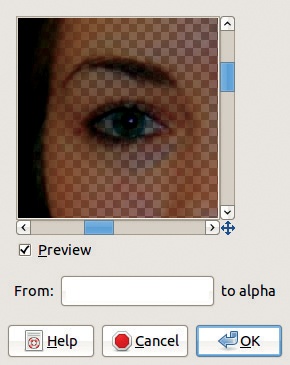
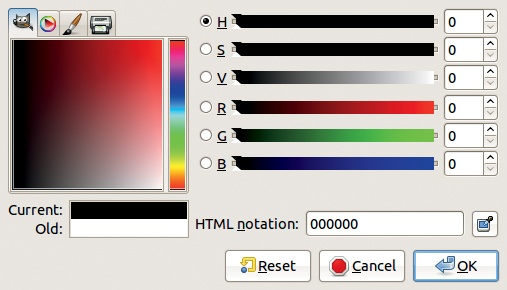
Clicking the FROM: button brings up a simplified version of the Color chooser, shown in Figure 14-46. If you click the small button to the right of the HTML NOTATION field, you can choose the exact color from the image that you want to make transparent and see the resulting effect in the Preview window.
Figure 14-47 shows a photographic portrait. To get the image shown in Figure 14-49, choose Image: Layer > Transparency > Color to Alpha and select a flesh-tone pixel near the woman’s necklace. Because all similar pixels become transparent, add a white layer under the image layer. Note that because the chosen color appears in the woman’s hair, parts of her hair will also be altered. You could avoid this if you first selected the face and then used Color to Alpha.

If you paint the underlying layer in the color you made transparent, the image looks exactly like the original portrait. This makes changing a specific color in the active layer easy. For example, Figure 14-48 shows the result when we slightly alter the underlying layer color by decreasing the hue and increasing the value in the HSV color model.
SEMI-FLATTEN is also found in the Image: Filters > Web menu. We discuss it in depth in Chapter 17, but in brief, it replaces partial transparency with the current background color. If you apply it to the image layer shown in Figure 14-49 and choose the skin tone as the background color, you get the result shown in Figure 14-48.


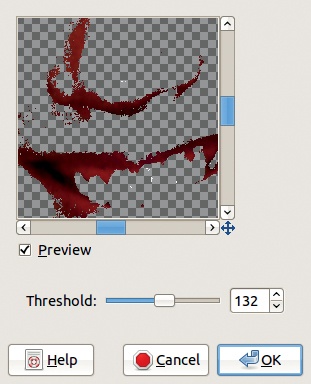
THRESHOLD ALPHA applies a threshold filter to the Alpha channel. Clicking this entry brings up the dialog shown in Figure 14-50. If you choose the value shown for the threshold, apply it, and add another layer filled with the initial skin color under the original layer, you get the result shown in Figure 14-51.

ALPHA TO SELECTION transforms the Alpha channel of the layer into a selection. Because both are represented as grayscale images, this transformation is very simple, and the new selection replaces any existing one.
The final three entries in the Transparency menu allow you to choose a different selection mode when creating a selection from the Alpha channel. You can then transform the selection into a channel, but you can’t transform an Alpha channel into a channel directly.
As you’ve seen, selections, channels, masks, and layer transparencies are strongly related. Let’s review how to convert back and forth among these.
To convert a selection to
To convert a selection mask to
To convert a layer mask to
a selection: Layers: right-click > Mask to Selection.
a selection mask: Layers: right-click > Mask to Selection and then Image: Select > Save to Channel.
an Alpha channel: Layers: right-click > Apply Layer Mask.
To convert an Alpha channel to
a selection: Layers: right-click > Alpha to Selection.
a selection mask: Layers: right-click > Alpha to Selection and then Image: Select > Save to Channel.
a layer mask: Layers: right-click > Add Layer Mask and choose LAYER’S ALPHA CHANNEL.