In this section we’ll show you how to open, scan, and save images, and we’ll introduce you to the Image window. The Image window contains the image that’s currently open in GIMP. If no image is currently open, closing the Image window quits GIMP. When GIMP begins, the Image window is empty.
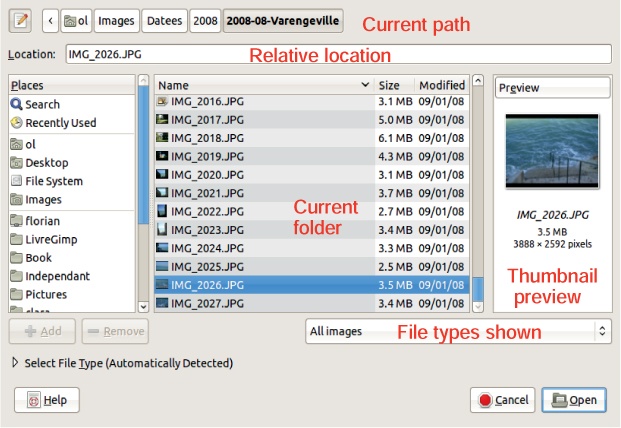
To open a saved image, select Image: File > Open or press ![]() . The window shown in Figure 1-10 will appear.
. The window shown in Figure 1-10 will appear.
This window contains three panels: Places, Name, and Preview. You choose the folder where the image was saved in Places and select the image in Names. Thumbnails are shown in Preview. The left panel, Places, is divided into three sections, as shown in Figure 1-10. The top section contains SEARCH, which searches for an image by name, and RECENTLY USED, which displays a list of the most recently used images. The middle section lists a fixed set of folders or devices, such as those that are visible on your desktop. The bottom section is a bookmark list. It’s initially empty, but you can add folders by selecting them in the Names panel and clicking the +ADD button.
Clicking a folder in the left panel opens its contents in the middle panel. You can choose to list all images, images of a certain type, or all visible files. If the selected image is smaller than a certain threshold (defined in Preferences), a thumbnail preview automatically appears in the right panel. If it doesn’t appear, you can manually display it by clicking on the file in the right panel.
The current path is displayed at the top of the window. You can type the image name directly into the LOCATION field, which can be toggled on and off using the button in the top-left corner of the window. The image type is normally determined automatically by GIMP, but it can also be manually selected.
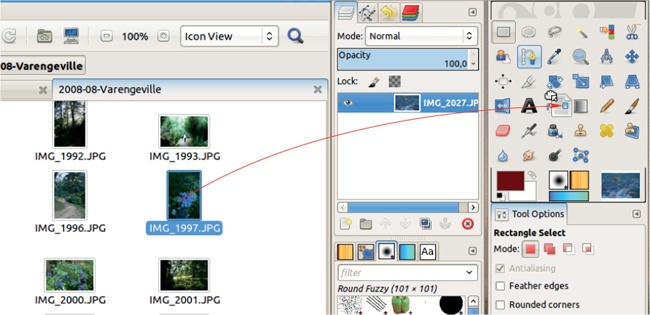
Tip: You can drag an image thumbnail to the GIMP Toolbox to open it. This works with files on the computer, as shown in Figure 1-11, and with images from the Internet. Just drag the file from your browser to the GIMP Toolbox.
If you’re working on a small screen or working on a large, detailed image, you may want the image to fill the entire screen from time to time. We recommend that you use Fullscreen mode via Image: View > Fullscreen or by pressing ![]() . This is not the same as maximizing the window with the window manager. When you use Fullscreen mode, all window decorations are removed, and you can even remove the menu bar, rulers, sliders, and status bar. You can even hide the Toolbox and dock windows (using
. This is not the same as maximizing the window with the window manager. When you use Fullscreen mode, all window decorations are removed, and you can even remove the menu bar, rulers, sliders, and status bar. You can even hide the Toolbox and dock windows (using ![]() ) to have the full screen at your disposal. The menus are still available by right-clicking in the image, and all the keyboard shortcuts are functional. When you want to go back to the customary layout, just press
) to have the full screen at your disposal. The menus are still available by right-clicking in the image, and all the keyboard shortcuts are functional. When you want to go back to the customary layout, just press ![]() again (and
again (and ![]() if the Toolbox is hidden).
if the Toolbox is hidden).
The ![]() command also works in single-window mode, but the image won’t be as large, because some of the room on the screen will be taken up by the tab previews.
command also works in single-window mode, but the image won’t be as large, because some of the room on the screen will be taken up by the tab previews.
You can digitalize old photos and drawings using a scanner. Many brands and models are available, from very cheap ones to expensive models for professional photographers. The most affordable option is often an all-in-one printer, which generally includes a printer, a simple photocopier, and a flatbed scanner. Most flatbed scanners can scan standard North American letter or international A4 format. More expensive scanners are sold separately, without a built-in printer, and often have a larger scanning bed. Larger beds are useful if you want to scan photographs mounted in a photo album.
The best software tool for scanning is XSane (http://www.sane-project.org/), a graphical front-end to SANE, which is an application programming interface (API) for scanning.
XSane works well on GNU/Linux, Mac OS, and many other operating systems but not on Windows, although this might change. The following discussion focuses on XSane, but much of the information is applicable to any scanning application.
You can use XSane from within GIMP by going to the Image: File > Create > XSane menu and choosing DEVICE DIALOG. You’ll see a dialog that says “Scanning for devices,” and once your scanner is recognized, two larger windows will appear. If this doesn’t work, be sure to check that your scanner is plugged into your computer and powered up.
Figure 1-12 shows the Preview window, which will show you a preview of whatever you’re scanning. There are a lot of buttons and menus, but we’ll just cover the basics that you need to know to get started.


Figure 1-13 shows the Control window. Two very important pieces of information that are shown here are the size of the scanned area (in pixels or your preferred units) and the size of the resulting file (in megabytes). Note how changes to the selected area in the Preview window, and to the scanning resolution in the Control window, affect the file size.
Select a photo and place it facedown on the scanner glass. Don’t place it right on the edge of the glass because many scanners don’t scan all the way to the edge. In the Preview window, press the ACQUIRE PREVIEW button.
Eventually a preview of your photo appears, as in Figure 1-12. Sometimes the scan area is automatically adjusted to fit the image, but that was not the case in the figure. If you hover your mouse over the preview, you’ll see a raw, zoomed representation of the section of the picture below the pointer and the values of the red, green, and blue (RGB) channels of the pixels in that section, in octal and in decimal notation, at the bottom of the dialog.
If your preview is upside down, you can flip it using the middle button in the second row from the bottom. You can choose from 12 rotations, including a vertical flip if the angle is followed by a vertical bar and a horizontal flip if the angle is followed by a minus sign.
To select the area you want to scan, click and drag the rectangular outline around your image in the preview area. Leave a little room around the image in case of parallax errors, which are caused by the thickness of the paper. See Figure 1-14. Don’t worry if your photo is crooked. Getting it perfectly straight on the scanner glass can be tedious, and when you close the scanner, it can shift out of alignment again. You can easily rotate the image later in GIMP.
Once you’ve selected the scan area, adjust the parameters in the Control window. Select 1 for the number of pages, NORMAL for the source, COLOR, and then FULL COLOR RANGE. The ideal resolution depends on the photo’s size and how you intend to use it. If you plan to print the image, choose a resolution that lets you print it at at least 300 ppi (pixels per inch). If you plan to touch up the image, or if you think you might want to print it larger than actual size, select a higher resolution. For this example, we chose 300 ppi for a selection area of 4.3 × 6.3 inches (11.3 × 16 cm), which will generate a file that’s about 7MB before compression. Scanning at a higher resolution takes longer, and the file will be larger, but if you have the time and the hard drive space, choose a high resolution.

Choosing a high resolution allows you to make adjustments to improve the image without eroding the image quality. Later, if you want to send it in an email or post it on a web page, you can create a scaled-down copy.
Next, click the SCAN button. Scanning can take a while, and you can cancel the scan if you realize you made a mistake. First, the RGB data are received, and then the image is converted into a digital file. The image is also rotated if you selected a rotation in the Preview window. When the process is complete, the new digital image appears in the GIMP Image window.
Figure 1-15 shows the Image window with its main components labeled. You can toggle the visibility of the menu bar using Image: View > Show Menubar. If you’re using Mac OS X or the Ubuntu Unity interface, the menus will appear at the top of your screen instead, so Show Menubar won’t do anything. You can also turn the visibility of the rules, sliders, and the status bar on or off via the Image: View menu.

The Image window can be used to access some very extensive menus, including the File menu and the Edit menu. There are three ways to access these:
The menu bar, if it’s displayed
The menu button in the top left corner
Right-clicking in the window
Therefore you always have a way to access the menus, even if only a small part of the Image window is visible.
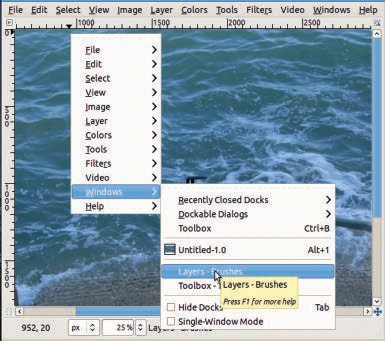
When the menu is opened with the menu button or by right-clicking, it will have a dashed line at the top, as shown in Figure 1-16. If you click this line, the menu opens as a separate window.
Most of the remaining elements of the Image window are self-explanatory. Quick Mask is a selection-editing tool. The navigation button is a way to quickly change which part of the image is visible in the window, as shown in Figure 1-17.
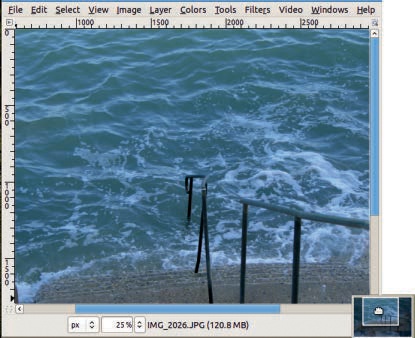

Zooming in on an image magnifies it on the screen without actually changing the image file. The level of magnification is expressed by the zoom factor. When you open an image, GIMP makes some automatic adjustments depending on the image size and the size of your screen. The zoom factor is 100% (actual size) for average sized images, less for really large files.
There are several ways to zoom in GIMP. One simple way is to use the window resize button in the top right of the Image window. By default it’s unchecked, but if you check it, the image automatically zooms to fit the size of the window.
Alternatively, you can use the zoom menu shown in Figure 1-18. You can choose one of the predefined zoom factors from the drop-down menu, you can type one in, or you can use the mouse wheel while the pointer is in the field.
If you press and hold the ![]() key, you can zoom with the scroll wheel. Scrolling up zooms in, and scrolling down zooms out.
key, you can zoom with the scroll wheel. Scrolling up zooms in, and scrolling down zooms out.
You can also use GIMP’s Zoom tool, which can be selected by clicking the magnifying glass icon in the Toolbox or by pressing ![]() .
.
Tip: You can return an image to 100% zoom by pressing ![]() on the keyboard when the Image window is active.
on the keyboard when the Image window is active.
After adjusting the zoom factor of an image, you can use
Image: View > Shrink Wrap (or press ![]() ), which resizes the window to fit the image. In single-window mode this can cut off dialogs, since the entire window shrinks.
), which resizes the window to fit the image. In single-window mode this can cut off dialogs, since the entire window shrinks.
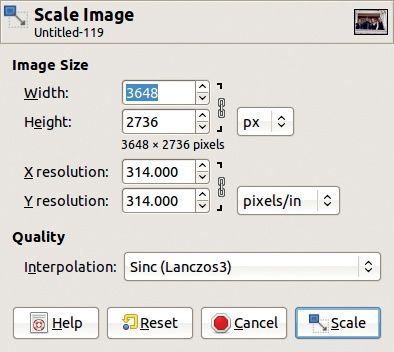
Once you’ve done work on an image in GIMP, you’ll probably want to store the file so that you can come back to it later. GIMP’s native format is XCF, and when you choose that format, all the components of your image (layers, transparency, etc.) will be retained. To save a new image as XCF, or to rename a previously saved XCF file, choose Image: File > Save As or ![]() . The dialog shown in Figure 1-19 will appear.
. The dialog shown in Figure 1-19 will appear.
This window is similar to the Open Image dialog shown in Figure 1-10, but with the following differences:

You can store your image in a wide variety of other formats by exporting it via Image: File > Export or ![]() . The dialog that opens is identical to that in Figure 1-19, but lots of additional formats are available.
. The dialog that opens is identical to that in Figure 1-19, but lots of additional formats are available.
After you name your image, choose an extension, and click EXPORT, a dialog may pop up depending on the file type you chose. For example, when exporting to JPEG format for the first time, you’ll be asked to set the quality rate and given the chance to adjust other parameters.
If you want to save an XCF image without changing its name or file type, select Image: File > Save or press ![]() . This does not open any dialog if the image is in the XCF format. If the image is in a different format, the Save dialog will open. If you want to export an image to replace a previous version, select Image: File > Overwrite.
. This does not open any dialog if the image is in the XCF format. If the image is in a different format, the Save dialog will open. If you want to export an image to replace a previous version, select Image: File > Overwrite.
The command Image: File > Save a Copy is similar to Image: File > Save As, but it creates a copy without altering or changing the name of the current image.