
Figure 11-1 shows an example of a Layers dialog for the painting created in Chapter 3. This dialog is probably the most important of all the GIMP dialogs, including the Toolbox, since the latter can be replaced with the Image: Tools menu (or keyboard shortcuts). The Layers dialog is a component of the multi-dialog window by default, and you will most likely want to keep it open. If you do close it, you can open it again by going to Image: Windows > Dockable Dialogs > Layers or pressing ![]() to bring it back. The keyboard shortcut brings up the dialog in the foreground, even if it was hidden by a
to bring it back. The keyboard shortcut brings up the dialog in the foreground, even if it was hidden by a ![]() command.
command.
Let’s examine the components of the Layers dialog. The numbers below refer to Figure 11-1.
The image name is not really a component of the dialog but rather of the multi-dialog window. If you select a different tab (the Channels dialog, for example), the image name will remain visible. You can change whether the image name is visible in the Configuration menu (opened with the button labeled 4). To show the image name, check SHOW IMAGE SELECTION. Showing the image name is very useful when you’re working with several images at the same time.
This button toggles whether the multi-dialog window always reflects the current image.
The MODE drop-down menu sets the blending mode of the current layer. For a description of the 21 blending modes available, see 12.2 Blending Modes.
This button brings up the Configuration menu, found in all dockable dialogs and shown in Figure 11-2. The first entry opens the Layers menu, which will be discussed later in this chapter. The Configuration menu also allows you to add, close, or detach tabs from the multi-dialog menu; change the preview size and the tab style; and show or hide elements in the dialog. The last entry allows you to navigate between multiple displays, if you’re working with more than one monitor.
The Opacity slider allows you to set the opacity of the current layer. This is independent of the transparency, so a layer without an Alpha channel can be made semi-transparent with the Opacity slider. The layer opacity combines with the layer blending mode to determine the interaction between the pixels of the current layer and those of the underlying layers. For example, Dissolve mode is different from Normal mode only if the layer opacity is less than 100%.
The paintbrush icon is a toggle button. If pressed, the layer pixels are locked, which means they cannot be changed. This is useful if you want to protect a layer from accidental alterations. Painting on a layer with locked pixels is very similar to painting on it in Behind mode: When the pixels are locked, the painting tools will still work in transparent areas.
The square icon, another toggle button, locks a layer’s Alpha channel, if there is one. If the Alpha channel is locked, painting tools don’t work in transparent areas of the current layer, but they do work in opaque areas, as long as the pixels are unlocked. If both locks (pixels and Alpha channel) are checked, the layer cannot be changed at all. These buttons are useful, for example, when building logos, as shown in Chapter 4. If you want to blur the logo to add relief to it, the Alpha channel must be unlocked. If you want to paint the logo, the Alpha channel must be locked.
The main part of the Layers dialog contains as many entries as there are layers in the image. The current layer is noted by an emphasis on the corresponding entry (blue in Figure 11-1, where the current layer is named
River).Always be aware of which layer is current, because anything you do to the image will be applied to that layer, which can be invisible or hidden by another layer. When the current layer is hidden, changes appear to have no effect, yet the current layer, hidden somewhere in the layer stack, is being affected by everything you do. Sometimes no layer is current, for example when a channel is active. In that case, when you apply changes to the image, the active channel is affected.
The bottom of the Layers dialog displays a row of seven buttons, which are shortcuts to entries in the Layers or Image: Layer menus. From left to right, these buttons allow you to do the following:
Create a new layer. Hold down
 to use the previous parameters. Otherwise a dialog opens to set them.
Create a new layer group.
Raise the current layer in the layer stack. Press
to move it to the top.Lower the current layer in the layer stack. Press
to move it to the bottom.Duplicate the current layer.
Anchor the floating layer.
Delete the current layer.
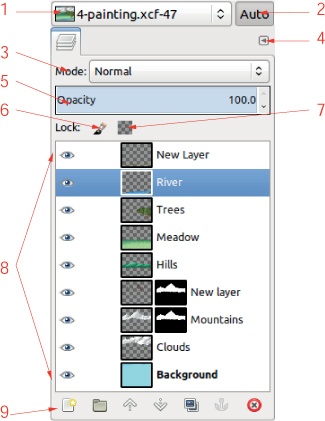
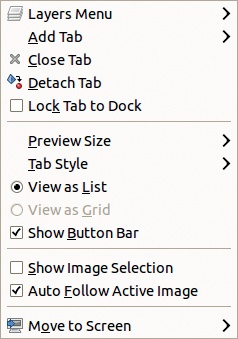
Figure 11-3 shows all the possible components of a layer displayed in the Layers dialog. From left to right, these are as follows:
The eye icon denotes the fact that the layer is visible (if no upper layer hides it). Clicking it toggles visibility. An invisible layer does not contribute to the visible image, but this does not prevent it from being changed.
The link icon denotes the fact that the layer is linked to something. This is meaningful only when it’s activated for more than one object. We can link several layers together, or we can link channels and paths, using their respective dialogs. See Chapter 14 for information on channels, and see 13.3 The Paths Tool for information on paths. When several objects are linked, the Move tool and the transformation tools (see Chapter 16) operate on the whole set of linked objects. However, each image is limited to only one set of linked objects. Clicking the chain turns the link on or off for that layer.
The thumbnail provides a miniature view of the layer contents. If its frame is white, that layer is the current layer and any modification made will affect it. Otherwise, the frame is black. Clicking on the thumbnail makes the layer active. If you click and hold, a larger thumbnail pops out. Clicking and dragging the thumbnail to the Toolbox creates a new image from the layer. Dragging it into another image copies the layer as a new layer in that image.
If the layer has a layer mask (see 14.2 Layer Masks), its thumbnail appears to the right and has the same properties as the layer thumbnail. If the mask frame is white, the mask is active, and any modifications made will be applied to the mask. If the mask frame is red, the layer mask is inactive. When the layer mask is selected, the dashed outline in the Image window changes from yellow and black to green and black.
 -clicking the thumbnail toggles the layer mask activation, and
  -clicking toggles the visibility of the layer mask.
Drag the layer mask thumbnail into another image to add it as a layer or into the Toolbox to create a copy as a new image.
The final item on the layer entry is the layer name. It is displayed in boldface if the layer does not have an Alpha channel. A name is assigned to the layer when the layer is created, but it can be changed. Double-click it, press
 , or select Layers: right-click > Edit Layer Attributes to change it.
If the layer is intended to be an animation frame (see Chapter 18), its name can be followed by text that alters the frame’s behavior: the duration in milliseconds, as in
(200ms), and the combination mode of the frame—either(combine)or(replace).
Some handy keyboard shortcuts are available when the Layers dialog is active.
The up arrow key selects the layer above the current layer as the new current layer. The down arrow key selects the layer below.
The
 key makes the top layer in the stack current, and the
  key makes the bottom layer current.
The horizontal arrow keys switch among the four (or five) components of the current layer: visibility, linking, layer thumbnail, layer mask thumbnail, and layer name.
The
 and
and  keys toggle the selected layer component (visibility, linking, activity of the layer or its layer mask, and the layer name), even if its layer is not active.
Pressing
along with the up or down arrow key moves from layer to layer without changing the current layer. You can use this in combination with the horizontal arrow keys or the or keys.The
 key erases the contents of the current layer (or the selection in this layer).
In summary, the Layers dialog allows you to do the following:
Open the configuration menu by clicking the top-right button. The first entry in this menu opens the Layers menu (covered later in this chapter).
Change the blending mode of the layer. See 12.2 Blending Modes for examples and a complete description of the blending modes.
Set the layer opacity.
Lock the pixels or the Alpha channel.
Set the visibility of the layer by clicking the eye icon. Note that this is independent of the activity of the layer. An invisible layer can still be altered.
Set the activity of the layer by clicking its thumbnail. Note that this does not change its visibility.
Set the activity of the layer mask by clicking,
-clicking, or -clicking its thumbnail image.Change the name of the layer by double-clicking its name.
Move the layer in the layer stack by clicking and dragging its thumbnail or name up or down the layer stack. This method can also be used to move a layer into, or out of, a layer group.
Open the Layers menu by right-clicking anywhere in the layer’s entry.
Use the seven buttons in the bottom row to perform common layer-related tasks.