The concept of color is a very complex one, and many books have been written on the subject. Great thinkers like Aristotle, Huygens, Newton, Goethe, and many others developed theories of color. These theories dealt with physiology, philosophy, psychology, and even physics and high-level mathematics. The modern technology of computers, display screens, and printers now relies on a well-established theory that you can read about in any text on color theory.
In this section, we begin by briefly reviewing color models, which are presented in more detail in A.3 Color Representation. We’ll then consider the three internal representations that GIMP uses to store image information while you work. External formats used to store images on hard disks or on the Web are considered in Chapter 20.
GIMP handles raster images, which are composed of pixels. A pixel is the smallest image component and represents a single color (and any associated transparency). Each color is made up of a unique mixture of components, which depend on the chosen color model. Several color models exist, and GIMP uses three of them. In all the models, a given color is represented as coordinates in some number of dimensions, generally three. The size of the coordinate range indicates the number of possible colors. Due to file size constraints, the coordinates are generally integers, at least when stored on external media. A floating number needs 32 or even 64 bits, while all color representations on files use at most 8 bits per color.
The RGB model is additive, meaning that a color with a value of zero in each of its components is black, and a color with a maximum value in each of its components is white. The three fundamental colors are red, green, and blue, and the combination of two fundamental colors is a complementary color: red + green = yellow, red + blue = magenta, and green + blue = cyan. This model can be depicted as a cube, the contents of which define the gamut (or range) of colors that can be represented (see Figure A-37).
The CMY model is a subtractive model, so a pixel with a value of zero in each of its components is white, and a pixel with a maximum value in each of its components is black. The three fundamental colors are cyan, magenta, and yellow. They are combined to create the complementary colors of the CMY model, which are the fundamental colors of the RGB model: cyan + magenta = blue, cyan + yellow = green, and magenta + yellow = red. The CMY cube (Figure A-40) is the opposite of the RGB cube but defines the same gamut.
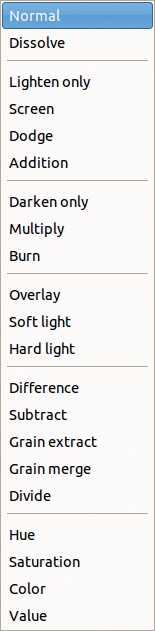
The HSV model is neither additive nor subtractive. The hue component represents an angle on a circle that goes from red to violet and purple, ending in red again. The saturation component is a percentage of color, from 0% for white (no color at all) to 100% for full saturation. The value component is also a percentage, from 0% for black (no light at all) to 100% for full intensity (maximum light). This model can be depicted as a cone or a cylinder.
Display devices generate color by combining the light of different colors and usually use the RGB model. This model also corresponds to the main internal representation in the computer, as you’ll see later in this chapter. Printing devices, which generate color by superimposing inks, use the CMY model. To reduce the cost of ink, a fourth component, black, is often added, resulting in the CMYK model. With this model, black can be represented in many ways. For example, 100% C, M, and Y with 0% K and 100% K with 0% C, M, and Y would both result in a black color, but the former would look muddier and require more ink and a longer time to dry. The CMY and CMYK models, therefore, have the same gamut, and the appropriate choice depends on the printer. The HSV model was designed to be intuitive for humans. It provides a visual interface. Rather than inputting a color as a combination of three numeric coordinates, you can choose a hue (H) component and then set the saturation (S) and value (V) components.
In GIMP memory, a pixel is always represented in the RGB model. In GIMP 2.8, each RGB component is represented by 1 byte, which means that its range is [0 to 255]. The number of different colors is thus 2563 = 16, 777, 216. This seems like a lot of colors, but in some cases, it’s not enough, as you’ll see later. A pixel requires 3 bytes if there is no transparency. If there is an Alpha channel for transparency, this component is represented by one additional byte.
When an image is stored in the XCF format native to GIMP, just the three or four necessary bytes are stored. Storage and retrieval do not require any conversion, but an image file can still be quite large. A 10-megapixel image with an Alpha channel, for example, takes up 40MB.
The mode of an image, found in Image: Image > Mode, doesn’t determine how an image is represented in memory. Rather, it determines how the image is handled. RGB mode is the most powerful because it corresponds to the stored representation of the image and allows for storage of a large number of different colors.
For a grayscale image, RGB representation is overkill. In Grayscale mode, only one component per pixel (assuming no Alpha channel) is present; this component represents the intensity of light, from 0 for black to the maximum value for white. In GIMP 2.8, a grayscale pixel uses 1 byte, so the value range is [0 to 255]. This range is not very large, and a very large grayscale gradient—for example, in the sky of a landscape photograph—can appear striped. A grayscale image is best stored in that mode in GIMP, but keep in mind, any operation dealing with color won’t work unless you change the image mode to RGB.

The third and last internal mode is the Indexed mode. In this mode, a pixel is not represented by the direct value of its color components but by an index in a table of predefined colors, called a colormap. This table can be of any size up to 256 entries, so an image in Indexed mode contains at most 256 different colors. This has several advantages and disadvantages:
A pixel takes up only 1 byte or less if the colormap is smaller than 256 entries.
By simply changing entries in the colormap, full image transformations can be done easily and efficiently.
This mode is ideal if you’re creating a tapestry or a mosaic because such designs contain only a limited number of colors.
Many image manipulations are impossible to achieve because the necessary colors cannot be represented.
The image quality that’s achievable in this mode is acceptable only in very specific or simple cases, for example, when the image is small or is a sketch.

Now, let’s consider Indexed mode in more detail.
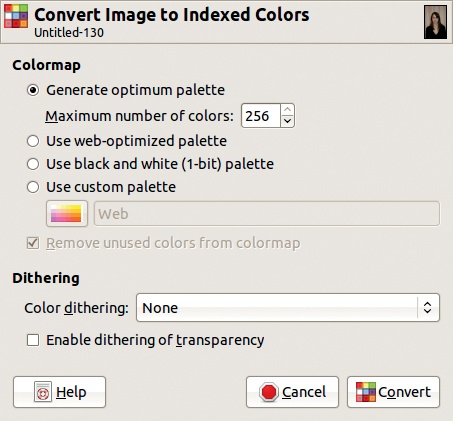
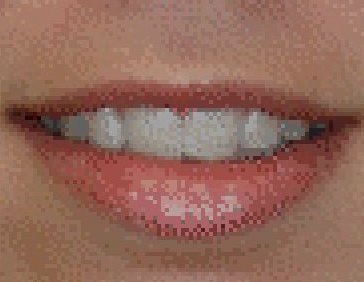
Figure 12-1 shows a part of an image in RGB mode, zoomed to show the individual pixels. To convert it to Indexed mode, select Image: Image > Mode > Indexed, which opens the dialog shown in Figure 12-2. The following Colormap choices are available:
GENERATE OPTIMUM PALETTE allows you to choose the maximum number of colors, and GIMP then attempts to generate the best palette for the image. Even with the maximum of 256 colors, Figure 12-3 shows that the conversion results in a clear decrease in image quality.
USE WEB-OPTIMIZED PALETTE uses a specific palette that’s supposed to have a consistent appearance on different screens. Unfortunately, the appearance is consistently bad, and this mode is now considered obsolete.
USE BLACK AND WHITE (1-BIT) PALETTE converts the image to black and white in the same way as the Image: Colors > Threshold tool, unless color dithering is used. With color dithering, a usable black and white copy of an image can be created, as shown in Figure 12-4.
USE CUSTOM PALETTE allows you to choose from the available palettes, which are usually not as good as the optimum palette that GIMP can generate.

The REMOVE UNUSED COLORS FROM COLORMAP checkbox is useful only when you select USE CUSTOM PALETTE.
As Figure 12-3 shows, indexing can lead to image degradation. A better result can be achieved with dithering, which uses a diffusion of pixels in available colors to approximate the colors that are not available. Four dithering algorithms are provided in the Index Color Conversion dialog, and Figure 12-5 shows the result of the first one. ENABLE DITHERING OF TRANSPARENCY can be used to help smooth boundaries in a GIF image that includes transparent areas.