Open the Preferences dialog via the Image: Edit menu. It is a large and complex dialog, as shown in Figure 22-1 (left). The menu on the left in the dialog displays the list of preference tabs; we’ll consider each in turn. Anytime you change parameters in GIMP, your work is saved to a file called gimprc and stored on your machine, typically in the main GIMP directory. The changes usually take effect immediately, unless the program says otherwise.
The first tab of the Preferences dialog deals with the ENVIRONMENT. You can set the following parameters, as shown in Figure 22-1 (left).
RESOURCE CONSUMPTION determines how GIMP uses system resources.
MINIMAL NUMBER OF UNDO LEVELS sets the number of levels of undo history for each image. Because undo requires a certain amount of memory, you are limited in the amount of history that GIMP can keep, but this parameter guarantees that at least a set number of levels are always available.
MAXIMUM UNDO MEMORY tells GIMP to delete the oldest saves when this amount of undo memory is exceeded. If you have a lot of memory on your machine, increase the default value.
TILE CACHE SIZE can affect both GIMP’s and your computer’s performance. If you intend to use GIMP seriously and to work with large images, set this parameter to something like half the size of your installed RAM. Experiment with different values. Sizes that are too small will cause GIMP to swap frequently to disk, which slows things down. On the other hand, values that are too large may prevent other applications from starting or may cause processes to fail.
MAXIMUM NEW IMAGE SIZE sets a maximum allowed size for new images. If a new image is larger than this maximum, GIMP asks for confirmation but does not prevent its creation.
NUMBER OF PROCESSORS TO USE is set automatically, due to the prevalence of multi-core processors, to the number of cores on your machine. Reduce this value if you need to use additional processors for other applications.
IMAGE THUMBNAILS appear in the Open Image, Save Image, and Export Image dialogs. You can choose between two sizes or none. If the file size is larger than the maximum specified, GIMP does not automatically generate the thumbnail, but you can click the filename to generate the thumbnail.
SAVING IMAGES should be left checked, or you will not be warned when you try to close an unsaved image.
DOCUMENT HISTORY keeps a record of all open files in the Document History dialog (generally a good idea). Access the Document History dialog from the Image: File > Open Recent submenu or via Image: Windows > Dockable Dialogs > Document History.

Figure 22-1 (right) shows the User Interface settings that deal with the system language, the small thumbnails that appear in the Layers and Channels dialogs, and the keyboard shortcuts.
LANGUAGE allows you to set the language. Like most free software, GIMP is fully internationalized. The default is to use the base language of the host operating system, but you can choose from 71 different languages, although some of the translations are incomplete. Changes are applied after GIMP restarts.
PREVIEWS are the layer or channel thumbnails, which are enabled by default. You can choose from nine predefined sizes, from TINY to GIGANTIC. The former is useful only on a very small screen, the latter only if you have severe vision problems.
KEYBOARD SHORTCUTS can help you use GIMP more efficiently. GIMP has a rather small set of predefined keyboard shortcuts, mentioned throughout this book, but you can add more or change them to suit your needs. This dialog allows you to change, add, or remove keyboard shortcuts using several checkboxes and buttons:
USE DYNAMIC KEYBOARD SHORTCUTS is unchecked by default because it is somewhat dangerous. When checked, you can define a new keyboard command simply by pressing a key combination while a menu entry is highlighted. This feature is handy for defining new commands but makes it much too easy to redefine existing shortcuts accidentally.
CONFIGURE KEYBOARD SHORTCUTS is explained in Keyboard Shortcuts.
SAVE KEYBOARD SHORTCUTS NOW is useful only when automatic saving is not specified.
RESET KEYBOARD SHORTCUTS TO DEFAULT VALUES is useful if you want to reset GIMP to its defaults.
REMOVE ALL KEYBOARD SHORTCUTS is for people who do not want any shortcuts.
As Figure 22-2 shows, the Theme tab is simple. You can choose between two themes, Default and Small (shown in Figure 22-3). Other themes are available on sites like http://art.gnome.org/.
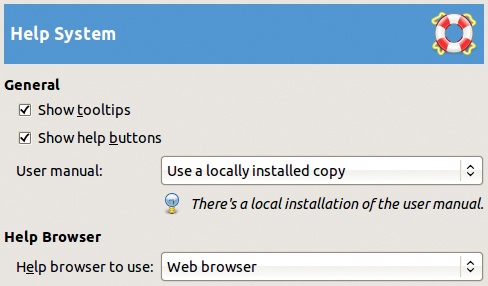
GIMP has numerous help features, as discussed in 9.6 The GIMP Help System. The dialog shown in Figure 22-4 allows you to set certain parameters that control the sort of help that you receive while using GIMP:
SHOW TOOLTIPS is normally checked.
SHOW HELP BUTTONS is also normally checked, and when it’s checked, a HELP button is added to most dialogs. When clicked, this button takes you to the help documentation.
USER MANUAL lets you choose between the locally installed or the online user manual.
HELP BROWSER lets you use your default browser or the GIMP help browser. The GIMP help browser is faster and always opens in the current desktop in a multidesktop environment.

The Tool Options tab is shown in Figure 22-5. The first checkbox and first two buttons let you save or restore tool options settings. The other options are described as follows.

GUIDE &GRID SNAPPING sets the minimum distance needed for “snapping” the pointer to the closest guide or grid in the Image window. This parameter sets the distance, but the snapping itself is determined by the corresponding parameters in the Image: View menu (see Padding Colors and Snapping).
SCALING allows you to choose among the various interpolation algorithms, from NONE to SINC (LANCZOS3). The choice you make here will be the default for all the tools that use scaling, though you are still able to change the particular scaling method for each tool in its options dialog.
PAINT OPTIONS SHARED BETWEEN TOOLS has four checkboxes that allow you to specify certain options to be shared by the painting tools (Pencil, Paintbrush, Eraser, Airbrush, and so on). By default, all the checkboxes are selected. So changing the brush used by the Paintbrush, for example, also changes the brush used by the Smudge tool or the Clone tool. But if BRUSH is unchecked, then each tool remembers its own brush.
MOVE TOOL sets the active layer or path. If this is checked, moving a layer or a path with the Move tool makes it active.
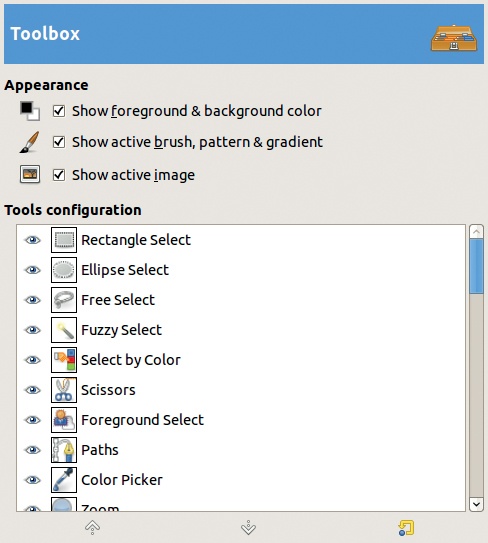
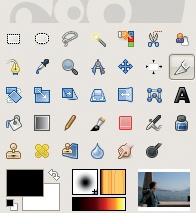
In the tab shown in Figure 22-6, you can choose to display three different objects at the bottom of the Toolbox:
The foreground and background colors, plus the small buttons for switching them or resetting them
The active brush, pattern, and gradient
The active image
The TOOLS CONFIGURATION list allows you to choose which tool icons appear in the Toolbox. The first 32 are present by default, but you can add 10 more or remove existing ones by clicking the visibility eye. When a tool is selected, you can change its position in the Toolbox with the arrows at the bottom of the dialog.
The Default New Image tab in Figure 22-7 specifies the default characteristics of the image created when you select Image: File > New or ![]() . This dialog is almost identical to the one shown in Figure 9-32 and is described in detail in 9.4 Creating, Loading, Saving, and Exporting Files. But it also contains a button for changing the default Quick Mask color.
. This dialog is almost identical to the one shown in Figure 9-32 and is described in detail in 9.4 Creating, Loading, Saving, and Exporting Files. But it also contains a button for changing the default Quick Mask color.

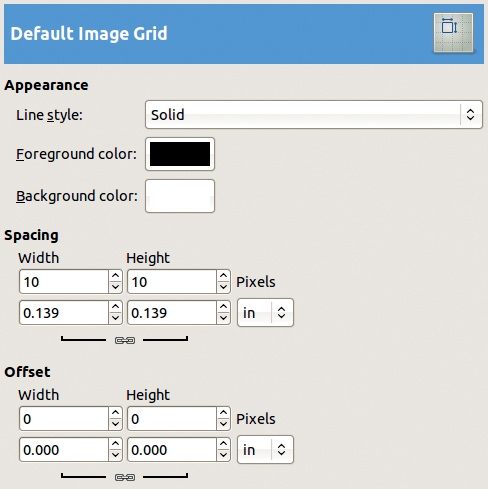
The tab shown in Figure 22-8 is where you customize the initial characteristics of the grid that appears when you select Image: View > Show Grid. This tab is the same as Image: Image > Configure Image Grid. See 10.3 Grids for more information.
You set the Image window parameters on three tabs. On the first tab, shown in Figure 22-9, you specify the following:
USE “DOT FOR DOT” BY DEFAULT: This box is normally checked, in which case, if the zoom factor is 100 percent, the displayed image pixels are the same size as the screen pixels. When unchecked, the size of the displayed image is determined by its internal resolution. (See 10.1 Rulers and Units for more details.)
MARCHING ANTS SPEED: Set the time in milliseconds between movements of the dotted line around a selection.
RESIZE WINDOW ON ZOOM: When this is checked, GIMP tries to resize the Image window as the zoom factor changes. Selecting this option is basically the opposite of checking the resize button at the top-right corner of the Image window, which, if you recall, allows you to enlarge the window to zoom in and shrink the window to zoom out.
RESIZE WINDOW ON IMAGE SIZE CHANGE: When this is checked, the Image window is resized as the size of the image changes when you crop or resize it (Image: Image > Scale image).
INITIAL ZOOM RATIO: You have two choices: Fit to window or 1:1. The second choice is probably not suitable if you intend to open images that are larger than the size of your screen at this zoom factor.
WHILE SPACE BAR IS PRESSED: One option in this list is particularly useful: The “pan view” allows you to move an image within the Image window simply by moving the pointer. Alternatively, you can set it to no action or to switch to the Move tool temporarily.
SHOW BRUSH OUTLINE: Normally checked, but if you are using a very large brush or your computer is slow, consider unchecking this option.
SHOW POINTER FOR PAINT TOOLS: When this is checked (the default), a small icon of the painting tool being used accompanies the mouse pointer. When this box and the previous one are both unchecked, no pointer or outline follows the mouse, meaning you are painting without seeing where you are painting.
POINTER MODE: This option offers three ways to show the pointer: as the tool icon with a pointed arrow if the preceding box is checked, as a crosshair pointer instead of the arrow, or as a crosshair alone.
POINTER RENDERING: This option specifies whether to display the pointer in black and white or as a grayscale image (FANCY). Choose FANCY unless you encounter serious performance problems.

The tab shown in Figure 22-10 specifies the parts of the Image window that are shown initially and includes the initial status of the various checkboxes that appear in the Image: View menu. You can specify different components for the Image window’s normal mode and for fullscreen mode (Image: View > Fullscreen or ![]() ).
).
You can also set parameters for the color of the canvas padding, the part of the Image window that is not part of the canvas. Some of the padding is shown if the image is smaller than the window in at least one dimension. Choose from these options:
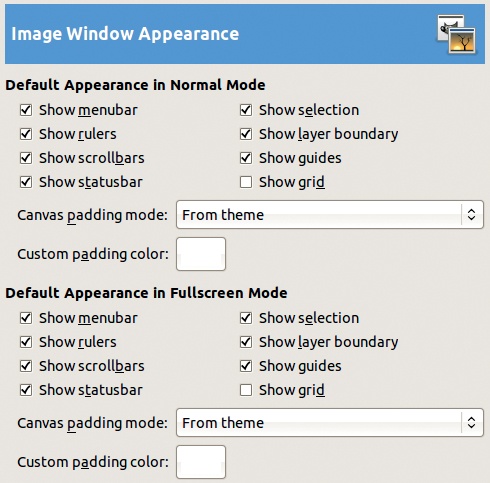
FROM THEME: Assuming you’ve loaded additional themes, a collection of themes can define a custom color.
LIGHT CHECK COLOR: This option refers to the light color in the checkerboard pattern that represents transparency. This pattern is specified in the Display tab, discussed in the next section.
DARK CHECK COLOR: This sets the darker color in the checkerboard pattern for transparency.
CUSTOM COLOR: Choose a custom color using the Color chooser.
The tab shown in Figure 22-11 allows you to specify the text that appears in the Image window’s title and status bar . (Note that the title bar is controlled by the operating system’s window manager, so it may not appear exactly as GIMP specifies.) Predefined formats are available for both title and status bars. You can also define a new format by editing the proper field, which contains a format string that should be familiar to programmers.
A format string contains ordinary characters and variables that begin with a % sign. GIMP offers more than 20 variables; only the most important ones are described here:
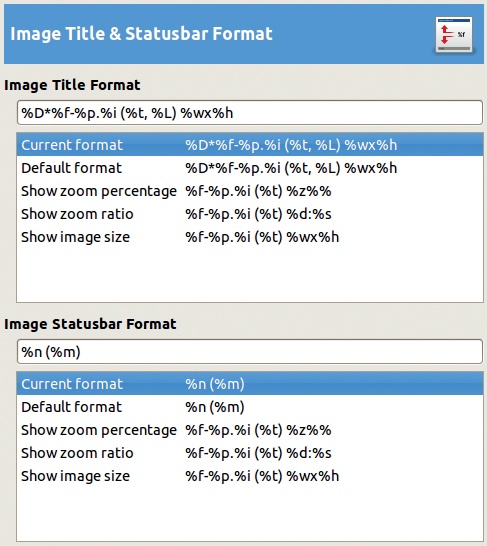
D*: Image not saved since the last time it was changed (displays an asterisk)f: Image filenamep: Unique image identification numberi: View number (useful if the image is viewed several times)t: Image typeL: Number of layersw: Image width in pixelsh: Image height in pixelsm: Memory amount used by the imagen: Name of the current layer
These string options let you choose what to display in the title or status bar. Depending on your own preferences and needs, you may choose to display or hide different types of information about the image.
The tab of options shown in Figure 22-12 allows you to specify the representation of transparency. As you can see in this figure, you can choose from six different representations. The first three use a checkerboard pattern, whereas the other three use a continuous color. If you use a checkerboard pattern, you can choose one of three square sizes.
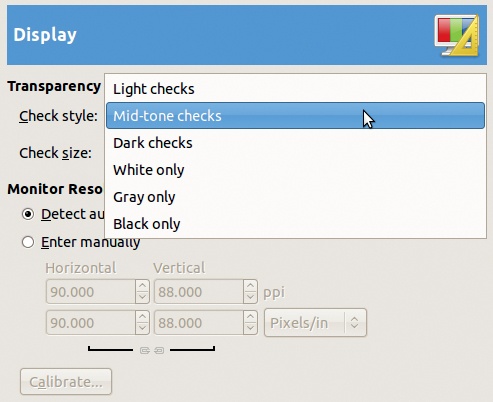
This tab also lets you specify your monitor’s resolution manually. Monitor resolution is detected automatically, but to enter it manually, check the corresponding radio button to define your monitor’s horizontal and vertical resolutions and choose among the different measurements. If you do not know the exact value that corresponds to your screen, click the CALIBRATE button to open a window with measurements in your chosen units. Measure the vertical and horizontal rulers displayed on the screen carefully, and input your measurements into the corresponding fields in the window. Then GIMP computes the actual resolution.
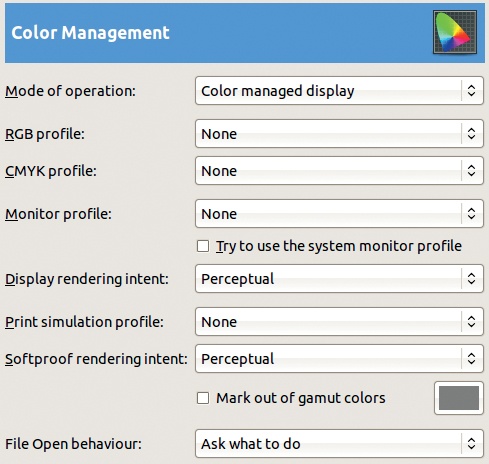
Color management is described in 12.3 Color Management. The tab of options in Figure 22-13 shows the various parameters that you can set.
MODE OF OPERATION: Choose from three modes:
NO COLOR MANAGEMENT: GIMP’s color management capabilities are bypassed, which is probably a bad idea.
COLOR MANAGED DISPLAY: Use the display color profile to display colors as accurately as possible.
PRINT SIMULATION: When this is selected, GIMP uses the printer profile you provide so you can preview the color results you’ll achieve with this profile. Note that this option does not deal with actual printing, as discussed in 19.4 Printing.
The next three options require an ICC profile: a file whose name ends with
.icc. The location of these files depends on your operating system. On GNU/Linux, look in /usr/share/color/icc/; on Mac OS X, look in /Library/ColorSync/Profiles/; and in Windows, check Windowssystem32spooldriverscolor. You can also find profiles on sites like the European Color Initiative (http://www.eci.org/).The RGB PROFILE defines GIMP’s internal color space. Unless you have very specific requirements, consider using the Adobe RGB color space, which has a larger gamut than that of a display monitor or a four-color printer but whose gamut is not excessively large. Many people prefer to stick with the sRGB color space, which is closer to a printer color space.
The CMYK PROFILE is not used in GIMP, which does not handle CMYK internally. This could change in a future version of GIMP.
The MONITOR PROFILE likely uses the sRGB color space. If you check the following box, GIMP uses the color profile provided by the operating system and used in its own color management.
The DISPLAY RENDERING INTENT option allows you to choose among four ways to convert from one color space to another. The methods differ in the way they present colors in the initial color space but not in the final color space. The default, PERCEPTUAL intent, uses an interpolation system that is almost reversible (no important information is lost) and does not clip out the most saturated colors. It is well suited to work with photographs. The SATURATION intent converts saturated input colors to saturated output colors and is well suited to colorizing or similar work. You can safely ignore the two other intents, RELATIVE COLORIMETRIC and ABSOLUTE COLORIMETRIC. (See also Using Color Management.)
The PRINT SIMULATION PROFILE is used for print preview if you choose print simulation mode. Use a CMYK common profile, such as
Fogra27L CMYK Coated Pressor your printer’s specific profile.The SOFTPROOF RENDERING INTENT is used for print preview. The choices are the same as those for DISPLAY RENDERING INTENT, but you can also check the MARK OUT OF GAMUT COLORS and then, in the small box to the right, choose the color to be displayed in place of out-of-gamut colors.
The FILE OPEN BEHAVIOUR option specifies what GIMP has to do when loading an image with an embedded color profile that differs from the internal sRGB space. GIMP can KEEP THE EMBEDDED PROFILE and thus not convert the image, which will still be displayed correctly using this profile. CONVERT TO RGB WORKSPACE uses the embedded profile but forgets it afterward. ASK WHAT TO DO is probably the safest option.
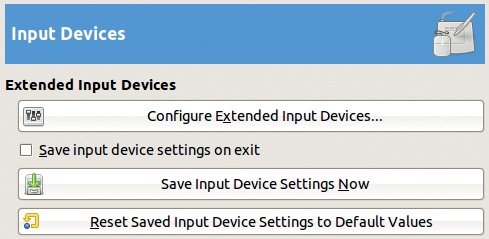
The options on the INPUT DEVICES tab, shown in Figure 22-14, are mainly for configuring graphics tablets. This tab has only three buttons and one checkbox; all but the first are self-explanatory.
Clicking CONFIGURE EXTENDED INPUT DEVICES opens the dialog shown in Figure 1-41. The menu on the left lists all known devices, but those unavailable are grayed out.
A Wacom tablet is considered to be four different devices: the stylus, the eraser, the mouse (called a cursor), and the pad (the small touch-pad(s) present on some tablets).
After selecting a device, you can choose from three modes: DISABLED, SCREEN, and WINDOW. The best choice is generally SCREEN, which allows you to use the stylus or tablet mouse across the entire screen. Choosing DISABLED makes the device act as a simple mouse, without sensitivity to pressure or tilt. You can safely ignore KEYS and most of AXES, except Pressure, which you may find useful for adjusting a tablet that isn’t responding properly. It offers an answering curve similar to that of the paint dynamics.
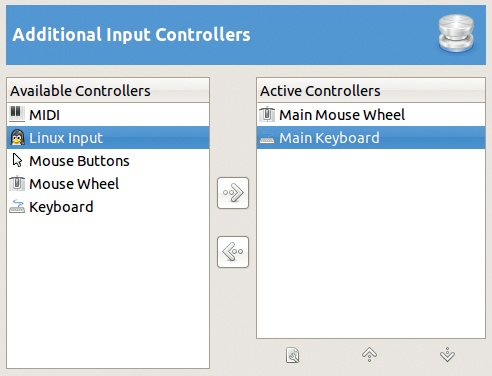
The ADDITIONAL INPUT CONTROLLERS tab, shown in Figure 22-15, is part of the Input Devices tab in the Preferences dialog. It displays available controllers on the left and active controllers on the right. Click an item on one list to move it to the other list using one of the arrow buttons.
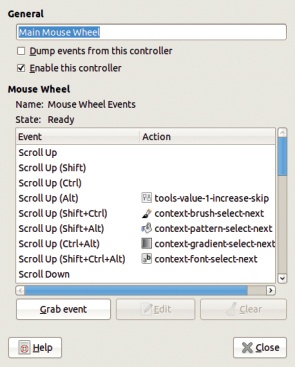
When you’ve selected an item in the right column, you can edit its parameters by double-clicking or by clicking the small icon in the bottom row of the right column. Figure 22-16 shows a part of the dialog that appears when you select MAIN MOUSE WHEEL. A similar dialog pops up when you move a controller from the available to the active list.
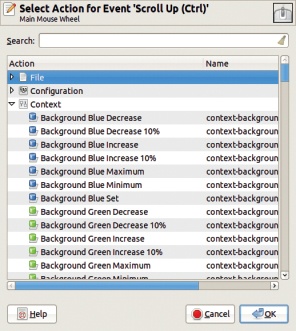
In the dialog shown in Figure 22-16, you can specify actions that will be triggered by using the mouse wheel. Several predefined actions deal with selecting brushes, patterns, gradients, and fonts and the opacity of the current painting tool. To add a new action, select the event and click the EDIT button at the bottom to open a dialog similar to Figure 22-17.
Figure 22-18 shows the dialog that appears when the active controller is the main keyboard. Notice that several predefined events are available, but none are used by default and you can even redefine these shortcuts to whatever you’re familiar with.
The WINDOW MANAGEMENT tab, shown in Figure 22-19, controls the way GIMP manages the numerous windows onscreen when you are not in single-window mode.
WINDOW MANAGER HINTS tells the window manager how to handle the Toolbox and the other dock windows. You can choose from three possibilities:
UTILITY WINDOW is the default. When this is selected, the Toolbox and dock windows are raised on top of all others as soon as you activate any GIMP window, and they stay there until you raise another window on top of them.
NORMAL WINDOW makes the Toolbox and dock windows behave like normal windows.
KEEP ABOVE keeps the Toolbox and dock windows on top of any other window.


Your choice of behaviors is a matter of personal taste, but note that some window managers (such as the Windows operating system) don’t handle these options correctly, so your actual results may vary. The ![]() key may be useful in such cases. Changes you make here are effective only after you restart GIMP.
key may be useful in such cases. Changes you make here are effective only after you restart GIMP.
The ACTIVATE THE FOCUSED IMAGE button, if unchecked, disconnects the fact that a window has focus (is active as far as the window manager is concerned) from the fact that it’s active as far as GIMP is concerned. This option can be helpful if you set up your window manager so the window under the pointer automatically has focus, but you want to determine which Image window is active.
The checkbox and two buttons under WINDOW POSITIONS should be self-explanatory. You can save the screen layout you define or reset it to the default.
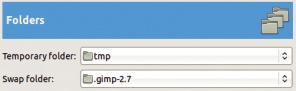
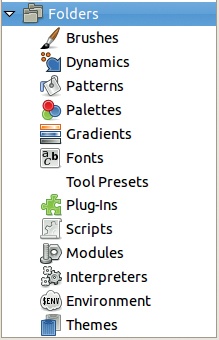
The FOLDERS tab, shown in Figure 22-20, heads up a long list of possible folders, as shown in Figure 22-21. GIMP finds the information and data that it needs in folders, some of which are system-wide, while others belong to the user. On the Folders tab, you can specify the location of the TEMPORARY FOLDER where GIMP stores files that will be automatically deleted upon shutdown. Normally this folder belongs to the user, but you can change it to a system-wide temporary folder that will be cleaned every time the operating systems boots.
The SWAP FOLDER is used for the temporary storage of internal data that does not fit in memory. The default folder is in your personal space, but consider choosing a folder on another disk to improve performance.
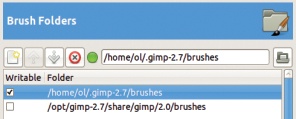
The other Folder tabs mention at least two folders: one personal and one system-wide. You can write to your personal folder, that is, add new objects or remove or edit existing ones. Normally, you can’t write to the system-wide folder, but if you intend to install new brushes, paint dynamics, patterns, palettes, or gradients, making the corresponding system-wide folder writable (something that is not possible for the other object types) may prove useful.
When you click one of the folder names, the buttons in the top row become active, as shown in Figure 22-22. Here you can move a folder up or down the list, which changes the order in which that folder is searched. You can also remove a folder from the list, add a new one, or change an existing name. The round button to the left of the folder’s name is green if the folder already exists; otherwise, it is red.