
As you saw in the preceding tutorial, building a logo often requires creating a texture first. The patterns provided by GIMP can be used as textures. You can browse through these in the Patterns dialog, initially located below the Layers dialog. But you have only a few patterns to choose from, and they’re somewhat small. You can find more patterns and textures online, but building your own isn’t very difficult, and you’ll discover that creating the texture you want, exactly as you want it, is often faster.
In this section, we introduce you to tiling, which lets you fill an unlimited area seamlessly by repeating a smaller image and blending the edges together. We then present a short list of the tools available in GIMP for creating new textures. Finally, we demonstrate these tools, so you can use them to create your own textures quickly.
A pattern is tilable if you can use it to fill an area of any size and shape. You should also not see any visible seams between the tiles of the pattern.
Many, but not all, of the predefined patterns in GIMP are tilable. For example, the Blue Squares pattern is tilable, but the Amethyst pattern is not. To see the pattern names, open the drop-down menu by clicking the triangle button in the top-right corner of the Patterns dialog. Select VIEW AS LIST.
Sometimes, even when a pattern is tilable and lacks a visible seam, the repetition is still very obvious. For example, the Chocolate Swirl pattern is clearly repetitive. This is partly because it’s rather small at 50 × 50 pixels. Although the Blue Web pattern is only 64 × 64, it isn’t as clearly repetitive because it doesn’t have a simple geometrical form. The Nops pattern has no simple geometrical form and is 128 × 128, so it seamlessly fills a large area.
If you want to fill a large area with a texture, generally you don’t want to build the texture as large as the intended area. This is especially true if you want to fill the background of a web page. Not only is the area large, but often you can’t predict its size as that depends on the size of the browser window. Of course, if the texture is pavement, seeing the seams between tiles is fine. On the other hand, if the texture is a grassy field or water, you definitely don’t want to see the seams.

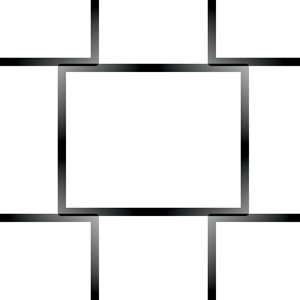
GIMP has a tool that allows us to build a tilable image with ease. We demonstrate it on a simple geometrical form. Create a new 400 × 400 image with a white background. Using the Rectangle select tool (![]() ), select a 250 × 200 rectangle centered in the image. Using Image: Select > Border, create a border 5 pixels wide. Finally, fill this border with black, and remove the selection (
), select a 250 × 200 rectangle centered in the image. Using Image: Select > Border, create a border 5 pixels wide. Finally, fill this border with black, and remove the selection (![]() ). You can see the result in Figure 4-16.
). You can see the result in Figure 4-16.
This very simple tile wouldn’t make a very good pattern. By applying the Make Seamless filter (Image: Filters > Map > Make Seamless) (which has no parameters and works immediately), you get Figure 4-17. The rectangle has been cut into four parts and copied into the corners of the image. A gradient has also been applied, although, in this case, it makes almost no difference because the background is white.
To check the result, call Image: Filters > Map > Small Tiles. The result appears in Figure 4-18. The original image has been reduced in size by half and duplicated four times. This image is clearly seamlessly tilable, and the pattern is surprisingly interesting.

In the previous example, the Make Seamless filter was effective. This isn’t always the case if the original image is more complicated. The correct starting image can produce a reasonably good pattern, as in Figure 4-19, but that’s the exception, not the rule. To create a pleasing pattern from a complex image, you first need to edit your image with some of the other tools available in GIMP.
The HSV and RGB Noise filters (Image: Filters > Noise) automatically generate simple tilable patterns. Let’s give it a try:
Create a new image of any size.
Select Image: Filters > Noise > RGB Noise and leave all parameters as set.
Call Image: Filters > Map > Small Tiles and observe the results.
You can also create a tilable image with the Image: Filters > Render > Clouds > Solid Noise filter. Check the TILABLE button, and you’re done.
To create a tile from an existing image, you can use the Image: Filters > Blur > Tileable Blur filter, which merges and blurs the borders of the image, making it tilable. This filter also blurs the rest of the image, but you can fix that.
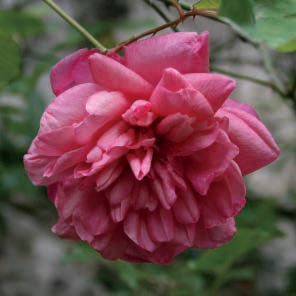
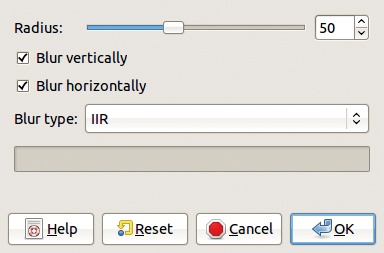
Let’s try this with the image in Figure 4-20. Duplicate the layer and work on the copy. Select the Tileable Blur filter to open the dialog shown in Figure 4-21. Set the RADIUS value to 20 (“Radius” has the same meaning as in the Gaussian Blur filter), and click OK. Use this blurred top layer to create a border:

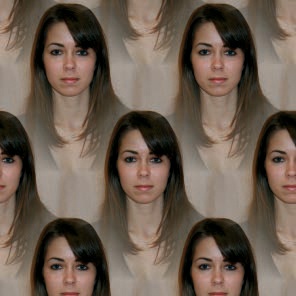
You get the final result, shown in Figure 4-22, by selecting the Small Tiles filter.
In the following sections, we show you different ways to build textures. First, we demonstrate how to get started with a background, and then we briefly introduce a number of useful tools. Later, we walk you through creating a variety of patterns.
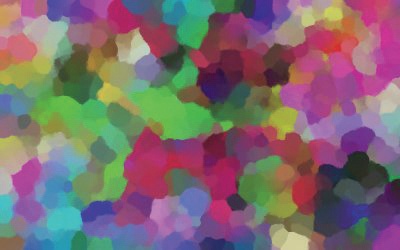
First, create the background. You can use an existing image, build one with the drawing tools introduced in Chapter 3, or automatically generate something with a filter. The Image: Filters > Noise menu offers several surface-filling filters: HSV NOISE, HURL, and RGB NOISE all make nice background textures. The other three filters in that menu will also work, but you have to start with an existing image. The Image: Filters > Render menu lists tools for generating more complicated backgrounds. Beginning with a new blank image, try the following:
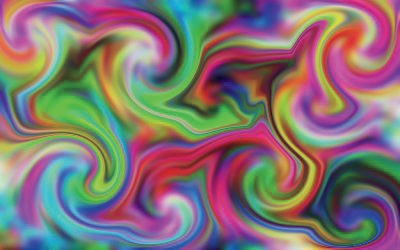
Apply Clouds > Plasma to generate a colorful texture.
Apply Clouds > Solid Noise to generate a monochromatic bumpy texture that you can tile.
Apply Pattern > Checkerboard to generate a black and white checkerboard.
Apply Pattern > Maze to generate a maze that you can tile.
On the Image: Filters > Artistic menu, you’ll find tools similar to those on the Image: Filters > Render menu. Three of these tools generate nice texture backgrounds. Experiment with these filters:
Apply > Apply Canvas and > Clothify, which both generate a tilable, cloth-like texture.
Apply > Weave, which adds a new layer in Multiply mode that contains a tilable texture similar to wickerwork.
Of course, you can use the filling tools to create a background. Use the Bucket Fill tool with an existing pattern or the Blend tool with one of the many available gradients, shapes, or repeat modes.
Once you have a background, the next step is to transform it. The Image: Filters menu is a gold mine.
One of the most useful submenus is Image: Filters > Blur. Generally, before you emboss or bump an image, you apply a blur to create the edges of the relief.
What if you want to distort the initial background? If you do, the Image: Filters > Distort submenu provides the necessary tools, including Emboss, Mosaic, Ripple, and Whirl and Pinch. We try some of them in the next sections.
The Image: Filters > Light and Shadow submenu contains some nifty tools, but only one is useful for creating textures: the Glass Tile filter. The tools in the Image: Filters > Artistic submenu are also handy for texture building. Experiment with the Oilify filter and what is often called the “texturing Swiss army knife”: GIMPressionist. For more information on GIMPressionist, see GIMPressionist.
Embossing and bumping tools, which add relief to textures, are spread across several filter submenus:
Emboss and Engrave are in Image: Filters > Distorts.
Lighting Effects is in Image: Filters > Light and Shadow.
Bump Map is in Image: Filters > Map.
Several other GIMP tools can be used to improve a texture and give it a unique appearance:
Create a texture with multiple layers, and use a blending mode other than NORMAL. You’ll see this in action in several of the following examples.
Adjust colors and color balance using the tools in Image: Colors. The Auto submenu contains tools for automatized adjustments without any parameters. The Map submenu contains several more powerful tools.
In many cases, duplicating the current layer and making modifications is beneficial. For instance, you can add a Gaussian blur or some noise to the new layer and then merge the layers using a blending mode selected in the Layers dialog.
The Fuzzy Select tool and the Select by Color tool can be used to generate wild patterns from an automatically generated pattern such as Plasma. This is the basic idea behind the Scott effect, which is used to generate natural-looking aged surfaces.
Finally, use ordinary tools in unusual ways to create some very special effects. For example, try applying a spiral gradient to an image 1 pixel wide and then enlarging the image.
The Blend tool is quite useful for easily creating textures.
You can change four main parameters: the blending mode, the gradient, its shape, and whether it repeats. You can also affect the result by changing the starting and stopping points of your stroke. This tool can generate innumerable textures—limited only by imagination!
We step you through some of the possible variations, and then we concentrate on one specific and spectacular effect. We begin each test with a new 400 × 250 image, but you can work at any size. Note that textures produced with the Blend tool are not tilable, so you can use the Blend tool only to fill an area as large as the image you begin with. But some parameter combinations require a lot of computing power, which increases with larger image sizes.
First, reset the foreground and background colors to their default values (![]() ). Also reset the Blend tool options to their defaults using the yellow arrow button at the bottom right of the tool options: The gradient should be black to white, the shape should be linear, repeat should be set to none, and the mode should be NORMAL.
). Also reset the Blend tool options to their defaults using the yellow arrow button at the bottom right of the tool options: The gradient should be black to white, the shape should be linear, repeat should be set to none, and the mode should be NORMAL.
The spectacular effect in Figure 4-23 can be achieved in just two steps:
If your result looks more like a spiral, you’ve moved the mouse too far. Zoom in further and try again.
This effect occurs because pixels provide only an approximation of the complicated shape that is built. You can produce variations on this effect by choosing other gradients or by changing the foreground and background colors if one of the FG to BG gradients is selected.
Create other interesting effects by changing the blending and repetition modes. To see the effect of changing the blending mode, apply the Blend tool several times. In normal blending mode, a new blend simply replaces the old one. The other blending modes allow you to blend layers to create new composite effects. The repetition mode changes the pattern in which the colors are repeated when you apply a gradient that’s shorter than the canvas. To see the effect, create two new images. Choose the radial shape, set the gradient to something colorful such as one of the full saturation options, and draw a short gradient across each blank image using the Sawtooth wave for one and the Triangular wave for the other.
You can also use repetition modes to produce interesting grayscale patterns. We generated Figure 4-24 in the following way:
Beginning with the default settings, we changed the blending mode to Multiply.
We changed the repetition mode to Triangular wave.
We made two very short, perpendicular strokes on the image.

A surprising side effect is that, if you’re lucky and have hit upon just the right combination of strokes, this texture is tilable!
Figure 4-25 shows the result of half a dozen strokes in random directions with the blending mode set to Darken only and the repetition mode set to Triangular wave.
You can achieve interesting effects using the Difference blending mode. In this mode, every pixel painted by the Blend tool is mixed with the existing pixel. The value of the new pixel is the absolute value of the difference between both pixels. Thus, a dark pixel lightens, and a light pixel darkens.
This mode produces the most interesting results when you draw many crisscrossing strokes. Long strokes usually work better than short ones. Figure 4-26 was created using several long random strokes and the Triangular wave repetition mode. We use this pattern as the basis for the next two textures.

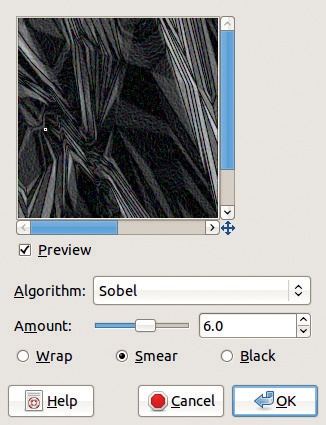
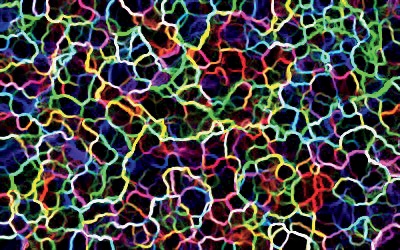
Select Image: Filters > Edge-Detect > Edge. In the dialog that appears, select the options and value shown in Figure 4-27. Click OK, and finish the texture by using the Image: Colors > Color Balance toolto give it some color (Figure 4-28).
The next texture is more complicated to generate. First, apply a Gaussian blur with a radius of 25 (Image: Filters > Blur > Gaussian Blur) to the texture from Figure 4-26. Then use the Edge filter, as in the last example, but with a value of 2. The result is very dark, so invert it with Image: Colors > Invert.


To adjust the texture’s contrast, select the Image: Colors > Levels tool and adjust the left triangle in the Input Levels area, as shown in Figure 4-29. Our result is shown in Figure 4-30.
We could stop here, but we’d like to make a few more subtle changes before calling this texture complete. Add a new layer in a medium gray, for example, 808080 in hexadecimal. Then select Image: Filters > Noise > RGB Noise, uncheck the INDEPENDENT RGB box, and set all three colors to 0.2. Next, apply Image: Filters > Blur > Motion Blur along with the parameters shown in Figure 4-31.


Apply Image: Filters > Map > Displace with the parameters shown in Figure 4-32 and then change the blending mode to Overlay. After you merge the layer, you get Figure 4-33. You can then colorize the texture by selecting, for example, Image: Colors > Color Balance.
Build a new texture using the Blend tool with Difference blending mode and Triangular wave repetition mode (see Figure 4-34). Add a transparent layer, and select Image: Filters > Render > Clouds > Plasma. Set the Turbulence to its maximum of 7.0. Blur this layer with a Gaussian blur of radius of 10.0 (Figure 4-35).


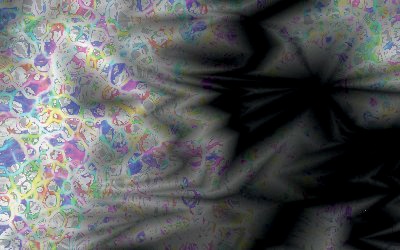
Then select Image: Filters > Distort > IWarp. With the Deform radius set to 50, add some swirls using the SWIRL CCW and the SWIRL CW deform modes (Figure 4-36).
Now apply Image: Filters > Artistic > Oilify with mask size 15, then Image: Filters > Artistic > Cubism with tile size 10, and then Oilify again (Figure 4-37). Applying Image: Filters > Edge-Detect > Edge with the amount set to 10 results in Figure 4-38.

Using the Select by Color tool (![]() ), click a black area in the image, cut the selection (
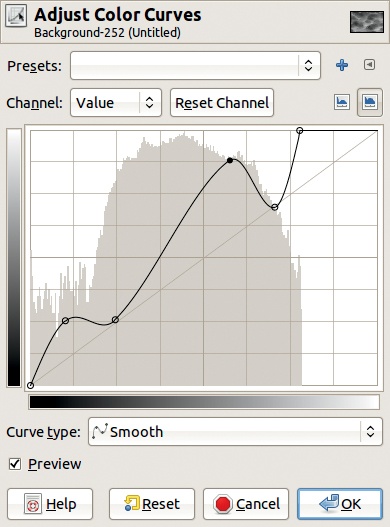
), click a black area in the image, cut the selection (![]() ), and discard it. Set this layer’s mode to Darken only and its opacity to 50%. Using the Image: Colors > Curves tool, adjust the value curve until your image resembles Figure 4-39.
), and discard it. Set this layer’s mode to Darken only and its opacity to 50%. Using the Image: Colors > Curves tool, adjust the value curve until your image resembles Figure 4-39.


Now apply Bump Map on the upper layer, using the layer itself as the map (Image: Filters > Map > Bump Map), and colorize it using Image: Colors > Colorize. See the results in Figure 4-40.
Finally, add a new, transparent layer just above the background. Select the Blend tool in normal blending mode with Triangular wave repetition mode. Draw a very short horizontal stroke in the intermediate layer, and place the layer in Difference mode. Figure 4-41 shows the Layers dialog at this point. The final result appears in Figure 4-42.

Of course, you could create an infinite variety of textures using this process.
The Image: Filters > Noise menu has six entries. Three of them create a more or less random pattern of pixels on the active layer. The other three change the active layer by moving the existing pixels. The general idea is to generate an unpredictable arrangement of pixels. HSV NOISE and RGB NOISE provide some control over the color of the pixels generated.
Let’s generate noise and use it as the foundation for some fine-grained textures.


The simplest method produces a brushed metal effect. Because a metal is usually just one color, generate monochromatic noise. You can do this with the RGB Noise filter. In the dialog shown in Figure 4-43, uncheck the INDEPENDENT RGB box to get gray noise. Check the CORRELATED NOISE box to get stronger noise. Finally, push the three sliders (which are linked) to 0.5 to get a moderately coarse noise.
To turn the noise into brushed metal, select the Image: Filters > Blur > Motion Blur filter. In the dialog shown in Figure 4-44, set ANGLE to 0 to get a horizontal effect and set LENGTH to 100.


If you don’t like the metallic look, changing the color is easy with the Image: Colors > Colorize tool. As you can see in Figure 4-45, the right side of the texture looks strange. To fix it, remove that edge with the Crop tool (![]() ).
).
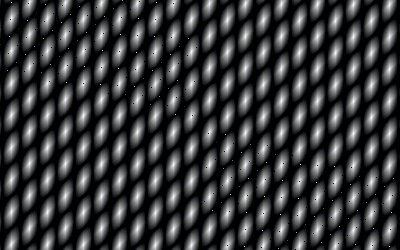
Next, we create a simple canvas texture. In a new image, generate some RGB Noise. Its strength determines the result’s appearance. Choose 0.7. Duplicate the layer, and apply a Gaussian blur to each layer. Select a layer by clicking it in the Layers dialog. When you apply the blur, break the chain between the horizontal and the vertical radius (see Figure 4-46). For one of the layers, set the horizontal radius to 0 and the vertical radius to 10. For the other layer, reverse this: Set the horizontal radius to 10 and the vertical radius to 0 (as shown in the figure). Set the top layer to Multiply mode, and you get the canvas texture shown in Figure 4-47.

The last example in this section simulates a piece of wood. As before, begin with a new 400 × 250 image. Fill the background with a neutral gray, such as 999999. Create an additional layer filled with the medium gray 7F7F7F (127 in the three RGB channels). Select Grain extract as the blending mode. Add some strong RGB Noise (Image: Filters > Noise > RGB Noise). Uncheck the INDEPENDENT RGB box, and move the three cursors to 1.00. To get the wood texture, add a motion blur: Apply Image: Filters > Blur > Motion Blur with a Radial blur type, an angle of 60, and the blur center set to about 50 for X and Y.
Since wood is rarely this shade of gray, colorize it. To do this, add a third layer, fill it with brown (8c6434 in our case), and set the blending mode to Color blending mode. See the result in Figure 4-48. Note this way of colorizing preserves the original, grayscale texture, unlike the Colorize or Color Balance tools.
As stated previously, the embossing, or bumping, filters are scattered across three different filter menus.
The simplest of these filters is Image: Filters > Map > Bump Map. Let’s use this filter to improve the canvas texture from Figure 4-47. First, merge the two layers. Then select the filter. Choose the parameters shown in Figure 4-49 and click OK. See the result in Figure 4-50.


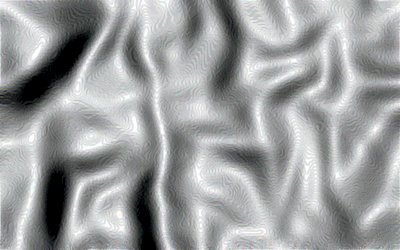
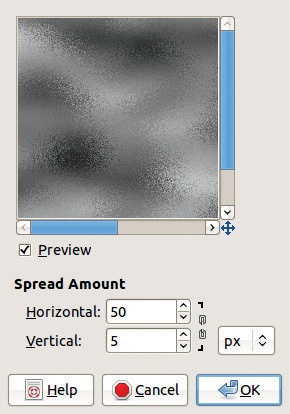
In the next example, we use the same filter to build a water-like texture. Fill a new image with the Image: Filters > Render > Clouds > Solid Noise filter, using the parameters shown in Figure 4-51. Then apply the Image: Filters > Noise > Spread filter with the parameters shown in Figure 4-52. Apply a Gaussian blur of 5 in both directions to get Figure 4-53.

Next, select the Bump Map filter, using the image itself as a map, as in the preceding example. To get ripples on the waves, set ELEVATION to 80 and DEPTH to 40. The AZIMUTH is set to 135, but this setting isn’t very important. The aquatic appearance is enhanced by using the Image: Colors > Curves tool, as shown in Figure 4-54. Now the water, shown in Figure 4-55, just needs some color. We do this with Color Balance, Colorize, Levels, or even Curves, all of which are found in the Image: Colors menu. You could also add a new colored layer and set it to Color mode.

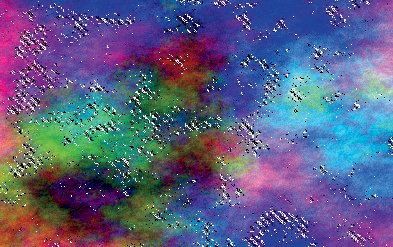
Next we demonstrate the Scott effect, used to create decayed or rusty textures. The idea is simple, but it can be used as the basis for some very nice, natural textures. Here, we give you a foundation to work from. First, create a new image, and fill it with Image: Filters > Render > Clouds > Plasma. Choose a turbulence of 2.0. Select at random with the Select by Color tool (![]() ). To build a larger selection, press the
). To build a larger selection, press the ![]() key and continue to click randomly within the image. Build a selection similar to the one shown in Figure 4-56.
key and continue to click randomly within the image. Build a selection similar to the one shown in Figure 4-56.
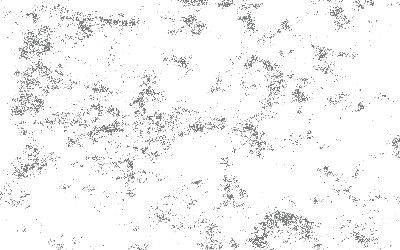

The purpose of the plasma layer is simply to generate the selection. Hide it and add a white layer and then a transparent layer. With the transparent layer active, fill the selection with a shade of gray. The result appears in Figure 4-57.
Hide the top layer, and discard the selection. Activate the middle layer, and build a brushed metal texture, using the RGB Noise filter and then Motion Blur, as we did in First Method: The Brushed Metal Effect. To complete the effect, select the Bump Map filter and use it to bump the metal layer, utilizing the top layer as a map. Play around with the parameters, especially Elevation and Depth. See one possible result in Figure 4-58.
The result can be bumped on another form or colorized in various ways. Retrieve the Select by Color tool selection by converting Alpha to Selection in the top layer and then cut it out or colorize it. Of course, these are just a few suggestions. You can continue to edit this texture using any of the effects available in GIMP.

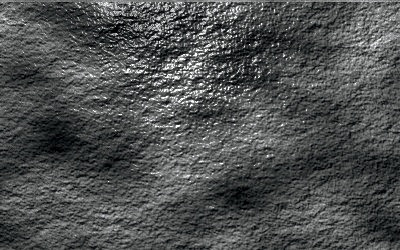
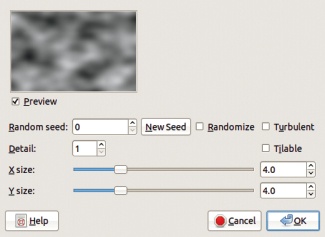
In our final example in this section, we use the Image: Filters > Light and Shadow > Lighting Effect filter to build a stone texture. First, create a new image, and fill the background layer using Image: Filters > Render > Clouds > Solid Noise. Add some RGB Noise with the three channels set to a low value.
Add a new layer and fill it with a moderately turbulent Plasma. This layer will be used as a bump map, so make it invisible and select the background. Select the Lighting Effects filter, and in the Lighting Effects filter dialog, shown in Figure 4-59, select the BUMP MAP tab and ENABLE BUMP MAPPING with the Plasma layer serving as a map. You can also change the light source, the light color, and a few other options. The final result, which appears in Figure 4-60, can be colorized using any of the methods we’ve demonstrated.

You can use and combine many other techniques to generate new textures.
You can create the tilable texture in Figure 4-61 by doing the following:
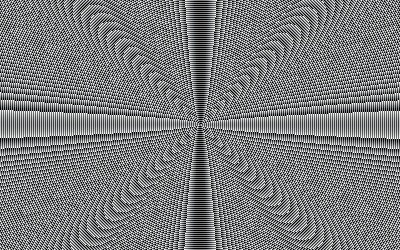
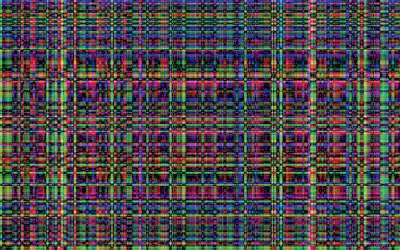
Another, somewhat surprising technique produces the interesting result shown in Figure 4-62. Try the following:
Create a new white 400 × 250 image.
Add a new 1 × 250 layer. Apply the Plasma filter. Using Image: Layer > Scale Layer, scale this layer to 400 × 250. Take care to break the chain between WIDTH and HEIGHT. With the Move tool (
 ), move this layer to occupy the whole image.
Repeat step 2 for a third layer, this time starting with a size of 400 × 1.
Put the top layer in Difference mode, and merge it down.

Note that this plaid texture is already tilable, without requiring any further action. Go ahead— try it out!
Our last texture is built almost entirely by hand without using powerful tools. We build it step-by-step and provide some key illustrations to guide you.
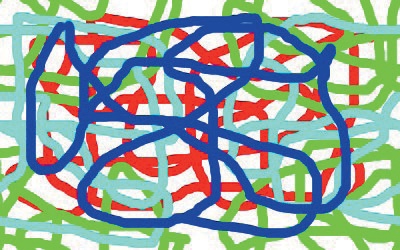
Begin with your customary white 400 × 250 image. Draw a tilable texture, using only the Paintbrush tool (![]() ). Select the
). Select the Hardness 100 brush, and set it to size 10 using the Size option. Choose a bright color—red, for example—and draw some random curves, scattered across the image but not touching the edges, as shown in Figure 4-63.
Now select the Image: Layer > Transform > Offset tool (or ![]() ). In the dialog shown in Figure 4-64, check WRAP AROUND and click OFFSET BY X/2, Y/2 and then OFFSET. Change the color of the Paintbrush tool, and draw more curves, especially over white space. Repeat this process twice more, changing color each time and also alternating between an offset of [x/2, 0] and [0, y/2]. The result appears in Figure 4-65. You can check that it’s tilable if you wish.
). In the dialog shown in Figure 4-64, check WRAP AROUND and click OFFSET BY X/2, Y/2 and then OFFSET. Change the color of the Paintbrush tool, and draw more curves, especially over white space. Repeat this process twice more, changing color each time and also alternating between an offset of [x/2, 0] and [0, y/2]. The result appears in Figure 4-65. You can check that it’s tilable if you wish.

Deform this image with Image: Filters > Distorts > Whirl and Pinch. Choose an angle of approximately 120 degrees. Next, apply the Image: Filters > Map > Small Tiles filter using the default parameters. Add a Gaussian blur with a radius of 20. Select Image: Colors > Levels, and adjust the input levels by moving the black triangle to the right and the white triangle to the left so the three triangles are close together. The result is shown in Figure 4-66.
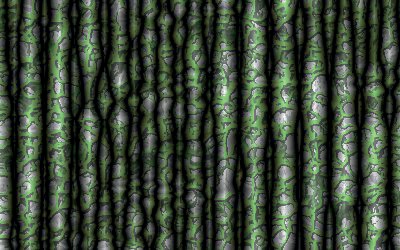
Select Image: Colors > Curves, and change the shape of the curve so it resembles the letter M, with the high points near 64 and 192 and the low points at the origin, 128, and 256, respectively. The result appears in Figure 4-67. This texture is already interesting and tilable, and you might want to save a copy before you go on.
Next remove the color using Image: Colors > Desaturate, followed by Image: Colors > Auto > Stretch Contrast. To add relief, first create a Gaussian blur with a radius of 10 and then duplicate the layer. Place the top layer in Subtract mode. The result is completely black, since you subtract each pixel from itself. Use the Move tool (![]() ) to move the top layer a few pixels down and to the right. We recommend using the arrow keys for this minute adjustment. The result is a dark image with subtle swirls of light.
) to move the top layer a few pixels down and to the right. We recommend using the arrow keys for this minute adjustment. The result is a dark image with subtle swirls of light.

Figure 4-66. After applying the Whirl and Pinch and Small Tiles filters and then adjusting the Levels

Merge the two layers, and adjust the levels again so the triangles are close together under the black area on the far left of the histogram. Add a Gaussian blur with a radius of 5. Create a new layer, and fill it with light gray. Bump map this layer, using the background as a map, and adjust the parameters until it resembles Figure 4-68. Note that, because you moved the top layer slightly, the image is no longer tilable. We’ll fix that later.
To make this texture more interesting, do the following:
Add a layer mask to the top layer.
Paste the copied layer into the top layer (
 ), and anchor it to the layer mask (
 ).
).Use the Levels tool to make this mask sharper.
Hide the bottom layer, and add a layer above it filled with some light color.
Apply the mask to the top layer, and transform its Alpha channel to a selection.
With the middle layer active, fill this selection with some dark color. Remove the selection.
Apply a Gaussian blur to the middle layer, with a radius of 5, and move it a few pixels down and to the right. This creates the shadow cast by the texture in the top layer.
Colorize the top layer.


The result appears in Figure 4-69. To make it tilable, select a 200 × 125 rectangle from somewhere in the center of the image. Be sure to avoid the edges. Copy the selection, and create a new image with the copy (![]() ).
).
This new image is tilable. You could use the same process to make the texture from Figure 4-67 tilable.
