
GIMP offers numerous tools and filters for creating animations. In this section, we show you some of those tools.
With this tool and little work, you can create an impressive, or at least amusing, animation.
Basically, we’ll warp an existing image and then automatically generate the intermediate layers of the animation. To do this, we need to introduce an additional capability of a tool used previously to distort still images.
We start with a picture of a rather serious girl, the first one in Figure 5-1. Our animation will make her smile in a silly, exaggerated way. First, select the face with the Fuzzy Select tool.
Select the IWarp tool: Image: Filters > Distorts > IWarp. The dialog shown in Figure 6-32 pops up. Select the MOVE Deform Mode, and choose a small DEFORM RADIUS, such as 10 pixels. With the mouse pointer, or a tablet stylus if you have one, click and drag both sides of the mouth up and out with small, careful strokes. Increase the deform radius and move the lower lip down slightly and the upper lip up slightly. You can also move the lower eyelids down a little and pull the corners of the eyes out just a tiny bit. This tool has no real undo capability, but if you make a mistake, you can use the REMOVE Deform Mode to correct what you just did.
We could use this tool to change the still image. If we click the ANIMATE tab, however, we can automatically generate an animation. Set the NUMBER OF FRAMES to 20 and check the PING PONG box. The additional layers of the animation are built by GIMP after you click OK.
As with the preceding animations, adjust the timing of layers, optimize the image for GIF, and then export the image as a GIF.
Earlier in this chapter, we used the Filter all Layers tool to make an animation from a multilayer image (see Method Two: Filtering All Layers). Filter all Layers can also be used to apply systematic changes to all the frames of an existing animation. The tool works by applying a filter to all the layers. You can set the initial and final values of the filter parameters, and if those values are different, the tool filters each layer by varying the parameters progressively from the beginning value to the final one.
Most of the filters available in GIMP can be applied progressively to the layers of an image. You can even use the Filter all Layers tool with several different filters, one after the other.
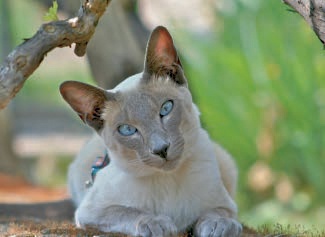
To demonstrate, we’ll animate the image of Olivier’s Siamese cat shown in Figure 6-33. Because her name is Aria, change the first layer name to Aria #1. Duplicate the layer 39 times, and the successive layers are automatically named and numbered from 1 to 40.

To choose among the mapping filters in the Filter all Layers tool, type the word map in the Search box and click SEARCH BY NAME. Choose the plug-in-map-object filter, and click APPLY.
Map the image on a plane and then change the Y value on the Orientation tab. We want the image to rotate on a vertical axis and make a full 360-degree rotation, so we change the value of Y to –180, as shown in Figure 6-34 (taken after we clicked PREVIEW!). Click OK, and after the first layer is transformed, a small dialog appears.
Click CONTINUE. As shown in Figure 6-35, change the Y rotation to +180. Click OK, type some filename in the continuation dialog, and click CONTINUE. The process takes a long time to run because of the number of layers. In the resulting animation, Aria rotates around the vertical axis, as shown in Figure 6-36.

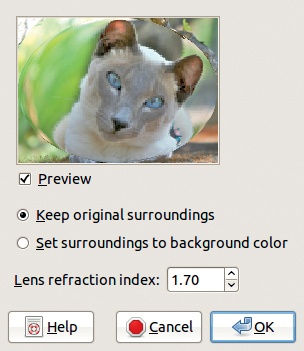
Now we want to apply a second filter to all of the layers. We apply the filter PLUG-INAPPLYLENS, using the same parameters for every layer. Apply the filter via Filter all Layers and click the APPLY button to get Figure 6-37. Leave the parameters as they are and click OK. The same dialogs as shown previously appear, but this time leave the parameters unchanged. The result appears in Figure 6-38.


You can use the Filter all Layers tool with more than a hundred filters. But the tool does have some limitations:
Although the tool interface lists all the filters, from time to time, we encounter a filter that does not work correctly. A filter isn’t working if you don’t see the successive dialogs that usually appear. This discrepancy happens because each filter must be adapted by the programmer to work with Filter all Layers, and sometimes filters are released without the necessary adaptation. If you run into this problem, all you can do is be patient and hope for an update. In the meantime, you can probably find another, similar filter that does work with the tool.
Although Filter all Layers can be used with a variety of filters, the tool itself is fairly straightforward and performs one basic function: It generates a smooth transition between the initial image and the filter-transformed image.

The next tool is simple to use, but it produces a very interesting effect if the parameters are set correctly. The main function of the Morphing tool, found in the Image: Video > Morph > Morph menu, is to progressively transform a given image into another one. Generally, this works best if the images have something in common. Note that this tool is also a part of GAP, so you need to install this set of plug-ins to use it.
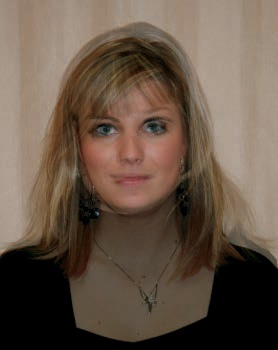
To demonstrate this tool, we’ll morph one portrait into another. The two portraits were taken on the same day and under the same conditions. As Figure 6-39 and Figure 6-40 show, these girls are of the same age, both are blond with blue eyes, both are wearing black clothes, and both were photographed in front of the same background. But their faces, hair and clothing styles, and head tilts are different.
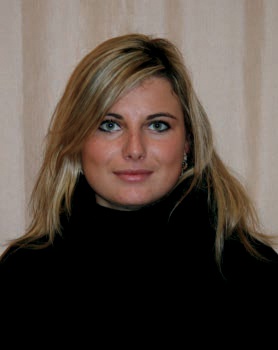

Open both images as layers in a new image, for example, by dragging the thumbnail of one portrait to the Toolbox to create a new image and then dragging the thumbnail of the second portrait into the new image you just created. Make the top layer semitransparent by adjusting the opacity and then move it slightly to align the shoulders and faces of the two girls. Crop the layers so they’re the same size. Figure 6-41 shows the result, with the top layer still semitransparent.
Before you use the Morphing tool, both layers must have an alpha channel: Layers: right-click > Add Alpha Channel. After you add an Alpha channel, the layer name is no longer in boldface in the Layers dialog.
Now select the Morphing tool. Its large dialog has many components, but you need to use only a few of them. The purpose of the Morphing tool is to progressively transform the source image (which appears on the left side of the dialog) to the destination image (which appears on the right side of the dialog). Here the lower layer serves as the source, but you may change that if you prefer. Choose images of a moderate size, so they appear in the preview windows in a correct scale.
The morphing process uses points placed on the source image and corresponding points placed on the destination image. The source image is transformed by the animation to move each point, as well as its neighboring pixels, to the position of the corresponding point.
First, place shapepoints around the border of both images to prevent weird deformations of the image frame. Leave the default number, 64, un changed, and click the SHAPE button. Now the outlines of the images correspond.
Next we add shapepoints to the source image and move the corresponding points on the destination image. Click some characteristic feature in the first image. A yellow point appears, and a corresponding yellow point appears on the destination image. We add points on the tip of the nose, at the corners of the eyes, around the mouth, along the chin and hair, and so on. You can experiment with the Edit modes while adding shapepoints. For example, you can move existing shapepoints or delete them or zoom in or out to place difficult shapepoints.
After adding the shapepoints, the only parameter we change from its default value is the number of steps. This value is the number of layers that will be built as intermediate layers between the source and the destination. We recommend at least 20 steps—or more if the two images being morphed are very different.
Finally, click OK. The large dialog disappears, and GIMP begins to create the new layers. This process may take a while, depending on the size of the images and on the number of steps. When GIMP is done, the image is ready to be tested with Image: Filters > Animation > Playback. We recommend you increase the duration of the first and last frames.
The best results are obtained when the images are fairly similar and the shapepoints have been carefully placed. Figure 6-42 and Figure 6-43 show frames 7 and 14 of our 22-frame animation, respectively. Because the hair and clothing styles were different, the morphing is unnatural for these features, but the faces morphed smoothly.
To finish the animation, optimize for GIF, and then export the image as an animated GIF.