
A composite portrait is an image that combines several different portraits to build a new portrait. For example, you could merge several artists’ renderings of eyewitness accounts to create the most accurate possible likeness of a dangerous criminal. You could also use these techniques to guess what the child of two people would look like or to invent a strange hybrid animal.
In this example, we create a composite of several young women who kindly agreed to let us use their pictures for this demonstration.
Each portrait was taken in front of the same neutral background, with the same lighting, and with the girls in approximately the same position. But differences in skin hue or in the tilt of their head will create some interesting challenges. Using photographs taken under disparate conditions would be much more difficult, though. Imagine trying to copy a nose lit from the left onto a face lit from the right. Of course, you could flip the first image vertically, but that could lead to undesirable effects elsewhere in the image. Scaling a feature because the source photograph is much larger—or much smaller— than the target one would lead to differences in sharpness. And putting the chin of a middle-age man on the face of a young woman, or vice versa, would, for many reasons, look odd. For this example, we chose conditions that make the project feasible and simple while still being instructive.
Begin with the four 900 × 1200 portraits shown in Figure 5-1. The four portraits are arranged as layers within a single image. Our composite will have the eyes from portrait 1, the hair from portrait 2, the nose from portrait 3, and the mouth and chin from portrait 4.
The first thing you need to do is correct the lighting so it’s the same across all four portraits. Use the Image: Colors > Levels tool on each layer separately: Select the layer in the Layers dialog and then the Levels tool, and click AUTO. The result is shown in Figure 5-2. The skin hues still vary widely but less than they did before the adjustment.


Of all the features, the girls’ hair is the most difficult to copy. No selection tool could capture it precisely, and correcting it with the Quick Mask tool would be tedious—and extremely difficult. The best solution is, therefore, to copy the other features onto the face with the hair you want (for this example, portrait 2). The composite girl will be wearing the black shirt from this portrait, but all of the girls are dressed in black anyway, so the shirt doesn’t make much of a difference.
To create the new image that will be the composite portrait, simply click and drag the layer of portrait 2 from the Layers dialog to the Toolbox. Immediately save this image (![]() , and from time to time, save it again (
, and from time to time, save it again (![]() ), so you don’t risk losing all your work.
), so you don’t risk losing all your work.
Next, copy the features from the other portraits. You can do this in two ways:
Each technique has advantages and drawbacks, so we show you both techniques and let you decide which one works best for you. Creating a new layer for each new feature is important because it allows you to change one feature without having to rebuild the whole portrait. Containing the features in different layers also lets you make adjustments to the color, orientation, or size of one feature without changing the rest of the portrait.


Once you’re satisfied with the placement, size, and coloration of the copied features, you can flatten the image and then do some minor retouching to better incorporate the new features into the face.
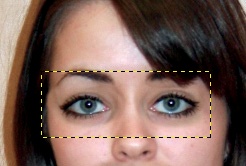
Zoom the initial portraits and your new portrait to the same zoom factor, for example 50%. Make sure portrait 4 is the active layer. Select the Free Select tool (![]() ). Check the FEATHER EDGES box and choose a RADIUS of 10. Build a tight selection around the mouth and chin of portrait 4, as shown in Figure 5-3. If you copy too large an area, you might end up with discrepancies in skin color.
). Check the FEATHER EDGES box and choose a RADIUS of 10. Build a tight selection around the mouth and chin of portrait 4, as shown in Figure 5-3. If you copy too large an area, you might end up with discrepancies in skin color.
Copy the selection made in portrait 4, and paste it into the composite picture. Press ![]() to create a new layer with the floating selection. The copy appears in the center of the image; move the copy to its proper place with the Move tool. Because the girl in portrait 4 tilted her head, the new mouth and chin are crooked. To correct this, flip the new layer horizontally with Image: Layer > Transform > Flip Horizontally and then rotate it (
to create a new layer with the floating selection. The copy appears in the center of the image; move the copy to its proper place with the Move tool. Because the girl in portrait 4 tilted her head, the new mouth and chin are crooked. To correct this, flip the new layer horizontally with Image: Layer > Transform > Flip Horizontally and then rotate it (![]() ) into the proper position. The mouth and chin are now aligned, but the color is uneven, as shown in Figure 5-4. We’ll correct this later. Double-click the new layer in the Layers dialog and change the name to
) into the proper position. The mouth and chin are now aligned, but the color is uneven, as shown in Figure 5-4. We’ll correct this later. Double-click the new layer in the Layers dialog and change the name to mouth.
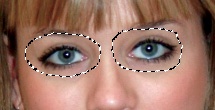
Make sure portrait 1 is visible and active and then copy the eyes, again using the Free Select tool. To avoid selecting the eyebrows and the bridge of the nose, build the selection in two parts. First, draw a circle around one eye, press and hold the ![]() key, and draw a second circle around the other eye. See Figure 5-5. You could also change the MODE in the tool’s options, rather than pressing
key, and draw a second circle around the other eye. See Figure 5-5. You could also change the MODE in the tool’s options, rather than pressing ![]() .
.
Again, copy the selection, paste it into the composite picture, and create a new layer from the floating selection. Name this layer eyes. Move the layer into place, and rotate it slightly (![]() ). The result, shown in Figure 5-6, isn’t bad, although you could improve the skin color transition.
). The result, shown in Figure 5-6, isn’t bad, although you could improve the skin color transition.
For the nose, use the Clone tool (![]() ). Create a new transparent layer and call it
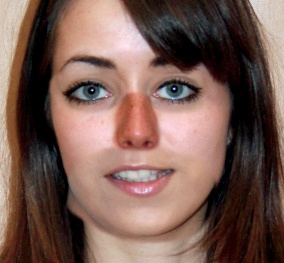
). Create a new transparent layer and call it nose. Select the Clone tool and select the Hardness 075 brush. Set the Clone tool’s size option to 20, and select ALIGNED as your ALIGNMENT option. Using a tablet stylus if you have one, or the mouse if you don’t, ![]() -click the tip of the nose in portrait 3 and then paint on the composite picture, beginning at the tip of the nose. The resulting image has two main problems: First, the skin color is inconsistent, and second, the tilt of the nose isn’t quite right. The nose tilt can be corrected by rotating the new layer slightly. One possible result appears in Figure 5-7.
-click the tip of the nose in portrait 3 and then paint on the composite picture, beginning at the tip of the nose. The resulting image has two main problems: First, the skin color is inconsistent, and second, the tilt of the nose isn’t quite right. The nose tilt can be corrected by rotating the new layer slightly. One possible result appears in Figure 5-7.
Next, smooth the features to create a more coherent composite portrait. Here, we demonstrate a few of the ways you can do this.
For the mouth and chin, use the Levels tool. Select it, and with the mouth layer active, move the right and middle triangles slightly for each of the three color channels. You should get a skin color similar to that of the original portrait. The area under the chin is still much too dark, however. Because the chin is on a separate layer, you can simply erase the part you don’t need. Select the Eraser tool (![]() ), and choose the brush and size that you used with the Clone tool. Zoom in to work more precisely, and if you have one, use a tablet pen. You’ll still see a hue discrepancy between the chin and the neck, but don’t worry about that.
), and choose the brush and size that you used with the Clone tool. Zoom in to work more precisely, and if you have one, use a tablet pen. You’ll still see a hue discrepancy between the chin and the neck, but don’t worry about that.
The main problem now is the color of the nose. Correct it using the Levels tool. Move the middle triangle in the Value channel liberally toward the left. Try somewhere near 1.8.
Now you’ve done all you can with a multilayer image. To complete the composite portrait, you need to flatten the image. As a precaution, save the multilayer image and then duplicate it (![]() ), and work on the copy. Merge all layers (Layers: right-click > Flatten Image), so you can use the Smudge, Dodge/Burn, or Clone tools on the image as a whole.
), and work on the copy. Merge all layers (Layers: right-click > Flatten Image), so you can use the Smudge, Dodge/Burn, or Clone tools on the image as a whole.
Several parts of the composite portrait require delicate touch-ups. Use the Smudge tool (![]() ) to smooth the transitions between the various components of the final portrait, especially around the nose and on the upper part of the mouth and chin fragment copied from portrait 4. You can also use the Healing tool (
) to smooth the transitions between the various components of the final portrait, especially around the nose and on the upper part of the mouth and chin fragment copied from portrait 4. You can also use the Healing tool (![]() ) to correct slight irregularities on the nose bridge or on the cheekbones.
) to correct slight irregularities on the nose bridge or on the cheekbones.
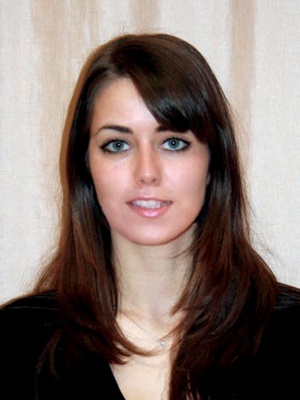
Finally, select the whole face, but not the hair, and apply a very light Gaussian blur with a radius of 1 or 2 pixels. This makes the face smoother and helps to hide any visible borders that remain between the features and the face. Figure 5-8 shows the final result.