
In Drawing in GIMP, we saw how awkward it is to draw using a mouse—our signature was ugly and unnatural. A mouse is great for clicking, but the large pointer makes it difficult to select a single pixel, and it’s virtually impossible to draw a straight line or a graceful curve. In the coming chapters, we’ll often want to draw precise lines or smooth contours.
If you plan to do much work in GIMP, we highly recommend investing in a graphics tablet. Depending on the manufacturer, the tablet’s size, and its capabilities, prices can range from $20 to more than $2000. You can find an excellent tablet with all the really useful features for about $350, though you can pick one up for less if you compromise on pressure and tilt sensitivity.
Graphics tablets generally plug into a USB port. Depending on your operating system, you may have to install software from an accompanying CD or configure some system files to get your tablet working. On GNU/Linux systems, support is provided by the Linux Wacom project (http://linuxwacom.sourceforge.net/), and usually a tablet works as soon as it’s plugged in.
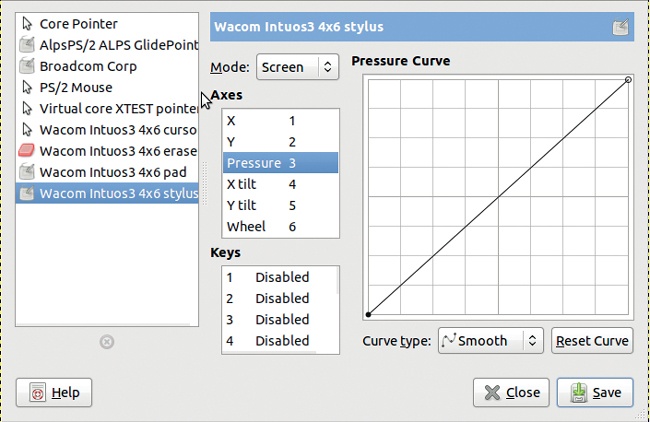
Even though the official websites of tablet manufacturers often neglect to mention that their tablets are compatible with GIMP (or any free software), most tablets are. Once the tablet is installed and working, you just need to let GIMP know that its there. To do this, open the Image: Edit > Preferences dialog to the INPUT DEVICES section. Click CONFIGURE EXTENDED INPUT DEVICES, and the dialog shown in Figure 1-41 will appear. The same dialog can be opened from Image: Edit > Input Devices. For now, the only fields you need to pay attention to are the device menu on the left and the MODE button.
If your tablet is properly installed, you should see four new devices in the device menu: Cursor, Pad, Eraser, and Stylus (or any other names chosen during the tablet’s installation). Cursor corresponds to the tablet’s mouse, and Stylus and Eraser correspond to the two ends of the tablet’s pen. You can forget Pad for the moment. For these three new devices, set MODE to SCREEN. Now click CLOSE in this dialog and OK in the Preferences dialog, and your tablet is ready to go!
Depending on your needs, you may decide to either put the tablet beside your keyboard like a mouse or move your keyboard to the side and place the tablet directly in front of your monitor. An artist or other professional will generally do the latter, while a more casual user may just leave the tablet to the side except when it’s needed. You can experiment to see which arrangement is more comfortable for you.
The tablet mouse acts like a normal mouse, but with one difference. With a regular mouse, there is generally a component called acceleration. When you move the mouse a little, the pointer on the screen moves proportionally. If you move the mouse faster, the pointer moves more quickly and farther across the screen. This feature allows you to move the pointer across a screen 2000 pixels wide with only a slight gesture of the hand, while still allowing you to make very precise movements slowly.
The tablet mouse does not use acceleration. A position on the tablet corresponds to the equivalent position on the screen, which always remains constant. In other words, the top left corner of the tablet always corresponds to the top left corner of the screen. This means that you’ll have to move your hand farther to move the pointer across the screen than you would with an ordinary mouse, especially if you have a larger tablet.
The tablet’s stylus behaves in the same way. When the tip of the pen is close to the tablet’s surface, the pointer moves to the corresponding position on the screen. Touching the pen to the tablet is equivalent to left-clicking with the mouse. You can click, double-click, and drag using the pen. You can also right-click by pressing a button on the pen.
The pen usually has two active ends: one for drawing and one for erasing. The drawing end often looks like a fine felt-tip pen. Sometimes the pen will come with more than one tip, and these tips resemble different drawing tools. The other end is usually shaped like a pencil’s eraser. You can associate different tools with these ends and save your settings in GIMP. We associate the Paintbrush tool with the normal tip and the Eraser tool with the other end. Some tablets even allow you to have several different pens, which could be set up as a red brush, a yellow pen, and a black pencil, for example.
The amount of pressure that you apply when drawing with the pen is transmitted to the drawing application. In GIMP, most drawing tools use a feature called paint dynamics, which handles input from the tablet’s pen. This will be covered in detail in Paint Dynamics. If you choose the Basic Dynamics, pen pressure is correlated to the brush opacity and pen velocity to the brush size.
Some tablets also sense the tilt of the pen and even its rotation. In GIMP, these properties are also handled by PAINT DYNAMICS.
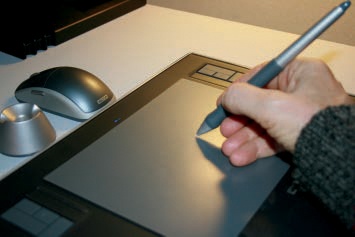
Figure 1-42 shows the correct way to hold a tablet pen. It can take a little time to learn to use it comfortably, especially if the tablet is placed beside the keyboard rather than directly in front of the screen.
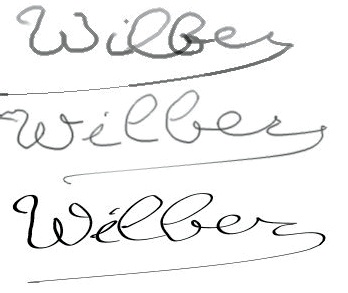
Figure 1-43 shows three signatures made with the tablet pen, using three different GIMP tools. The first was made with the Pencil tool, with opacity controlled by pen pressure. The brush size is controlled by the pen’s velocity, which you can see by looking at the underline—the pen was moving faster toward the left. The second signature was made with the Paintbrush tool, using the same dynamics. The third was made using the Ink tool, which is useful for simulating calligraphy.
Figure 1-44 shows the effect of changing the pressure parameters of the Paintbrush tool. The lines were drawn in the same way, increasing the pen pressure from left to right. The brush was also the same. For the first line, only opacity was controlled by the pen pressure. For the second line, only hardness, which means that the brush is less fuzzy when pressure increases. For the third line, only size changed. For the fourth line, all three parameters (opacity, hardness, and size) were controlled by pen pressure.

A graphics tablet can come in handy when doing a variety of tasks in GIMP. In Chapter 2, we’ll use one to make precise selections in a photograph. In Chapter 3 you’ll see more examples of using a tablet with drawing tools. In the rest of the chapters, we’ll note when using a tablet is beneficial.
One question often comes up when people install a new tablet: Once you’ve installed a graphics tablet, can you throw away your old mouse?
Well, it’s up to you. Some people put a mouse pad on top of their tablet and use an ordinary mouse most of the time. When they use GIMP to draw or make a precise selection, they remove the pad and mouse and use the tablet pen.
Other people do throw away the old mouse and only use the tablet. They might alternate between using the tablet mouse for normal tasks and the pen for drawing and selecting, or they might use the pen for every task that most people use a mouse to do.