
In this section, we’ll help you get started working with your images. We’ll show you some popular, easy-to-use tools that let you crop, resize, and sharpen your images, and then we’ll introduce you to a couple of GIMP’s many filters. We’ll also show you the power of layers and demonstrate some basic drawing tools.
When you open a file in GIMP, it takes up more space than it did when it was sitting there on the hard drive. This is because GIMP lets you undo and redo actions. In order to let you return to a previous state, GIMP has to store that state, and the one before, and the one before that. To undo something, select Image: Edit > Undo or press ![]() . If you change your mind and want to redo, select Image: Edit > Redo or press
. If you change your mind and want to redo, select Image: Edit > Redo or press ![]() .
.
If you want to put an image on a web page, send it in an email, or print it, you may want to change its size. You can resize an image in GIMP using Image: Image > Scale Image. This tool’s dialog is shown in Figure 1-20. The most important parameters are the WIDTH and HEIGHT fields. You can change the units for these fields (by default they’re set to pixels) or type in the new resolution. The little chain on the right determines whether the aspect ratio of the image should be preserved or not. It’s connected by default, which is usually best, but it will disconnect if you click it.
Suppose you change the width of the image to 1024 pixels. When you press ![]() , the height is automatically changed to 683 pixels, though the image doesn’t actually change size until you click the SCALE button. You may also want to set the INTERPOLATION to SINC (LANCZOS3), which is a rather processor-intensive algorithm that usually yields the best results.
, the height is automatically changed to 683 pixels, though the image doesn’t actually change size until you click the SCALE button. You may also want to set the INTERPOLATION to SINC (LANCZOS3), which is a rather processor-intensive algorithm that usually yields the best results.
If you choose to use units other than pixels (such as inches or centimeters), you’ll need to pay attention to the X and Y resolution fields. The resolution is measured in pixels per inch, so an image that’s 300 pixels wide would be one inch wide at 300 ppi. The default value, 72 ppi, is appropriate for a CRT screen. For an LCD screen it should be 98 or 100 ppi. For printing, it should be at least 300 ppi. If you use a lower resolution when printing, your image will look pixelated.
After scaling down an image, you should sharpen it, as scaling down can reduce the sharpness of an image. Image: Filters > Enhance > Unsharp Mask is the simplest way to do this. A dialog will appear—simply click OK.
Cropping an image permanently removes part of it, like cutting a photo with scissors. You might crop a photo to remove uninteresting areas, to emphasize the main subject, or to alter the composition. An image in which the main subject is exactly centered is often less lively than one in which the subject is a bit to one side.
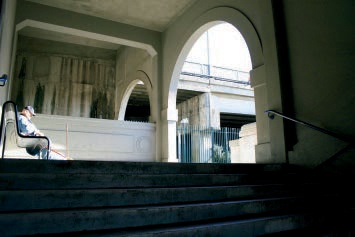
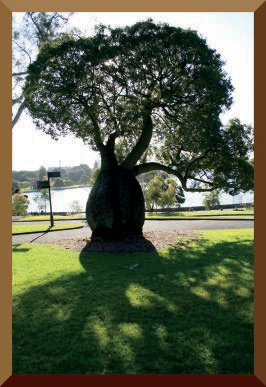
Take, for example, the photograph shown in Figure 1-21. It’s wider than most photos, and it’s hard to tell what we’re suppose to be looking at— is this a picture of the man dozing on left or of the contrasting light in the doorway on the right? You could crop the photo in two different ways to emphasize these potential subjects.
Figure 1-22 shows the Crop tool’s icon selected in the Toolbox.
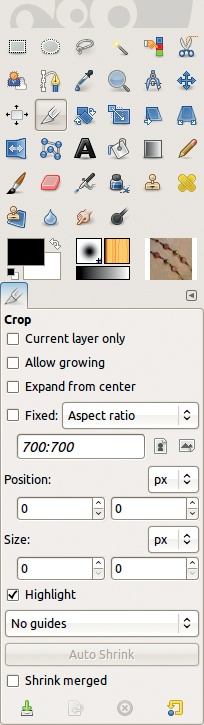


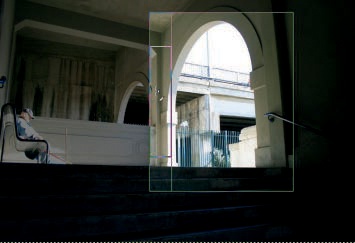
The Crop tool has a lot of options, shown in Figure 1-22, but you can leave them as is for now. If the Crop tool is selected, the pointer becomes crosshairs with an icon of a blade next to it. Select the area to crop by clicking and dragging, as shown in Figure 1-23.
When you stop dragging, the area outside your selection is dimmed, and the outline of the selected area looks like the one in Figure 1-24. The pointer changes to a cross with four arrows, which is the icon of the Move tool in GIMP. You can move the cropping rectangle around in the image by dragging it.
When you hover the pointer over one side of your selection, the pointer’s shape changes, as shown in Figure 1-25, and you can drag the side to change the size of the rectangle. You can also drag the corners of the selection to change the size of the area to be cropped while maintaining the aspect ratio. Once you’ve selected the area to crop, click inside it or press ![]() to proceed. Clicking outside the selected area cancels the selection.
to proceed. Clicking outside the selected area cancels the selection.

What do you do with the masterpiece you just created? You put it in a frame, of course. You can frame images digitally in GIMP using filters, which are a diverse collection of tools grouped together in the Image: Filters menu.
We’ve decided to frame the photo shown in Figure 1-26. To begin framing, select Image: Filters > Decor > Add Border, which brings up the dialog shown in Figure 1-27.
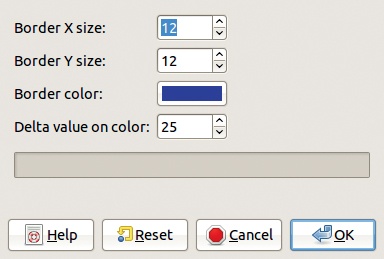
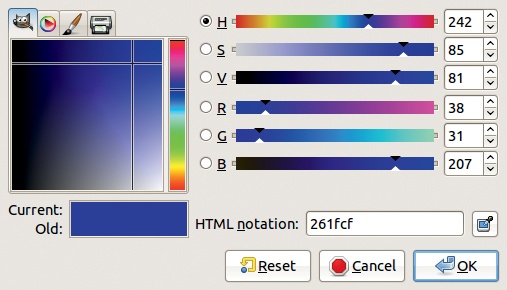
You can choose the width of the border, the color, and the characteristics of the shading that gives the frame depth. Our photo is 800 × 1200 pixels, so the default width of 12 pixels is too small. We changed it to 40 for both dimensions. A delta value of 25 is also rather small, so we changed it to 50. We didn’t like the blue color, so we clicked the color button, which brings up the dialog shown in Figure 1-28.
The four tabs on the top left allow you to choose different methods of color selection. For now we’ll use the leftmost tab, with an icon of Wilber’s head on it. Wilber is the GIMP mascot.
The vertical strip in the center shows that blue is currently selected. You can click in the strip to select a different color. The large square on the left shows the shade of blue. You can click to choose a lighter or darker shade.
We want our frame to be brown, but there is no brown in the vertical color bar. We make one by choosing a red hue in a dark shade. By moving the hue cursor down to the red section in the vertical strip, you get a mahogany color. By moving the cursor farther up, you get something closer to oak or chestnut. Our choice is shown in Figure 1-29. After you choose a color and click OK, GIMP will process for a while, and the dialog will disappear. And it looks like nothing changed!

Well, you may have seen the result if your Image window was larger than the image, but if it looked like nothing happened, the frame is just hidden. To reveal it, press ![]() to fit the Image window to the image. Now you can see the result, shown in Figure 1-30. It’s not very realistic, so we’ll improve it using a bevel filter.
to fit the Image window to the image. Now you can see the result, shown in Figure 1-30. It’s not very realistic, so we’ll improve it using a bevel filter.
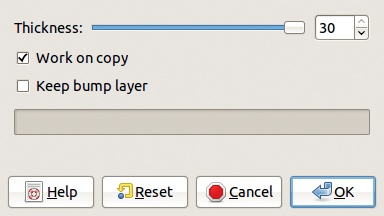
Select Image: Filters > Decor > Add Bevel, and the dialog shown in Figure 1-31 appears. Increase the THICKNESS to 30 and uncheck the WORK ON COPY checkbox. Click OK, and GIMP adds the bevel. If the result is too subtle, you can quickly run the same filter with the same parameters a second time by pressing ![]() . Our result is shown in Figure 1-32.
. Our result is shown in Figure 1-32.

You may want to keep several sketches in one file, add a background to a painting, or make a composite image of several files. You can do all of these things using one of GIMP’s most powerful features: layers.
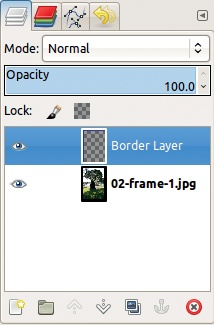
The Layers dialog is located by default in the upper section of the multi-docks window. Figure 1-33 shows that our current image is composed of two layers. The lower layer, called Background, is the original photograph. The upper layer, called Border Layer, was added by the Add Border filter and modified by the Add Bevel filter. This layer is currently active, so it’s highlighted. The eye to the left of the layer’s name tells you that the layer is visible. Click the eye to turn the visibility on or off.
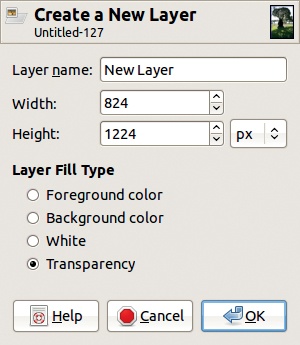
You can create a new layer by clicking the button on the lower left. The dialog shown in Figure 1-34 will appear. You can choose the new layer’s name, size, and fill type. The default fill type is Transparency. When you click OK, the new layer is created and becomes the current layer.
GIMP is a great program for making digital art, be it a quick sketch or a detailed painting. In this section we’ll go over some of the basics that you’ll need to know to start making your own digital art in GIMP.
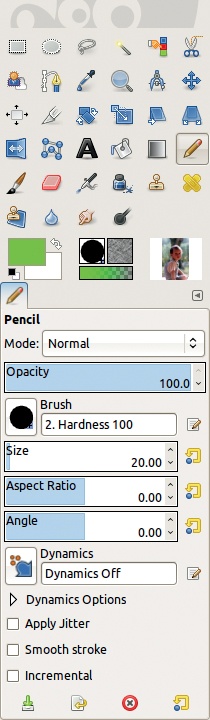
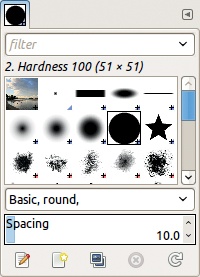
GIMP offers a number of tools that you can use to draw or sketch. Each tool is modeled after a real drawing tool, such as a brush, pencil, or pen. To demonstrate some of these tools, we’re going to sign Wilber’s name on some images. In Figure 1-35 we simulated a felt-tip pen using the Pencil tool. We did this by adjusting the brush option, which represents the size and shape of the pencil’s tip. We chose the Hardness 100 brush and changed its size to 20. You can adjust the brush settings in the Pencil tool options or in the Brushes dialog, which is located in the bottom half of the multi-dock window (see Figure 1-36).

You can also choose the ink color. This doesn’t appear in the Pencil options—the Pencil tool will use the current foreground color, which is displayed in the upper box in the bottom left of the Toolbox. The lower box shows background color. The double-pointed arrow between these two boxes switches the foreground and background colors, and the smaller black and white boxes to the left reset the foreground and background colors to black and white, respectively. We left the color on the default setting (black).
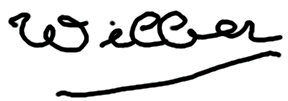
When we used a mouse and the Pencil tool to sign Wilber’s name, the result was awkward, as shown in Figure 1-37. This is because the Pencil tool doesn’t use antialiasing (smoothing the edges with semi-transparent pixels) and because it’s difficult to draw with a mouse.

Hide the pencil layer by clicking the eye next to its name in the Layers dialog, and then create another transparent layer. In the pop-up dialog, replace the layer name with Paintbrush. Select the Paintbrush tool by clicking its icon, which is next to the Pencil tool’s icon, and again choose a round, size 20 brush. The signature, shown in Figure 1-38, looks a little better because of the antialiasing, but signing with a mouse is still awkward. We’ll show you how to sign with a stylus in Working with a Tablet in GIMP.
You can print your photos and drawings directly from GIMP once you’ve finished working on them. Figure 1-39 shows the File menu, where you’ll find the print choices that are available. Depending on the GIMP extensions installed on your computer, the menu may contain only some of the entries shown. Specifically, the entry PRINT WITH GUTENPRINT requires the Guten-print package. This collection of free printer drivers is available only for GNU/Linux and Mac OS X systems.
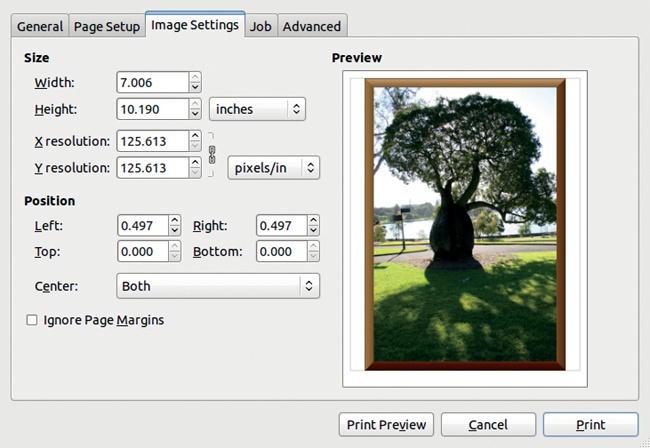
If you’re using GNU/Linux or Mac OS X, choose PRINT from the Image: File menu. The dialog that appears contains five to seven tabs, depending on which printer you choose in the first tab. In the second tab, you can choose a paper type and paper source from those that are defined for your printer, as well as the size and orientation of the paper. The third tab (shown in Figure 1-40) shows a print preview. Here you can change the resolution or dimensions of the printed image, as well as its position on the page. If your printer has more advanced settings, they will be listed on the tabs that follow. The last tabs allow you to change parameters that are useful only if you have several printers and several people trying to use them at the same time.
On Windows, the print dialog is very different. It contains only two tabs, but in the first one, where you select your printer, you can click the PREFERENCES button to open a new dialog. This dialog has several tabs and allows you to set the same parameters as the print dialog described above but presented differently and in a different order.
For all systems, once the parameters are set as you want, click PRINT to accept your selections and print your image.