We’ve already covered most of the tools for creating multilayer animations, but we need to discuss a few minor tools in the Image: Filters > Animation menu, shown in Figure 18-8.
The Blend tool requires at least two layers plus a background layer.
You choose the number n of intermediate frames in the tool dialog (Figure 18-9). The intermediate frames are a composite of the previous frame and the next one. A new image is built, with the number of layers equal to (n + 1) × f, where f is the total number of layers in the original image (not including the background layer). If you only have two layers, the new image has 2(n + 1) layers. The first layer fades out, then the next layer appears, and then the first one fades in again. If you have more layers, the layers fade in and out from the bottom layer to the top layer and then again from the top to the bottom layer.
The animation created by this tool is very specific, so the applications are pretty limited.
The Burn-In tool generates an animation in which one image fades into another. This tool requires a starting image with two layers. The top layer must have an Alpha channel, and this layer must be selected or the tool is grayed out in the menu. Figure 18-10 shows the tool dialog. The upper part of the dialog specifies how the transition between layers is done.
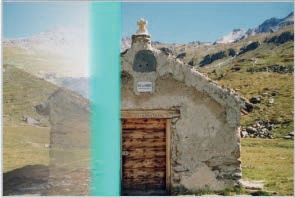
When FADEOUT is checked, the upper layer progressively fades out from left to right, revealing the layer beneath. Figure 18-11 shows an intermediate layer of the animation, with the FADEOUT WIDTH set to 200 pixels.
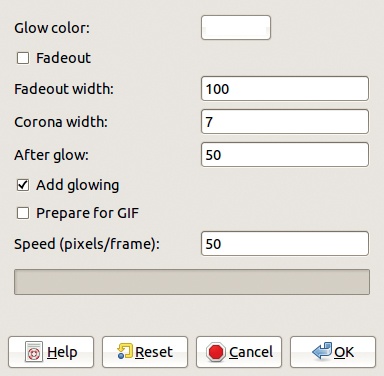
If ADD GLOWING is checked, a “glow” effect is added to the transition in the color specified in the GLOW COLOR box. Figure 18-12 shows an intermediate layer of the animation, with the width of the Fadeout set to 250 pixels to take into account the width of the glow (50 pixels).
When FADEOUT is unchecked, the upper layer completely disappears. Figure 18-13 shows an intermediate layer of the animation when the glow effect is used. The animation speed is specified as the number of pixels in the upper layer that becomes transparent in every frame. The number of frames is automatically computed from this number.


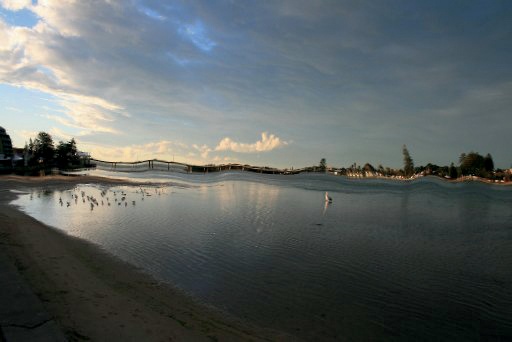
This tool takes an image with one layer and builds an animation that simulates the reflection of the image on water with ripples created as if by wind. Figure 18-14 shows the Rippling tool dialog, and Figure 18-15 shows one layer of a rippled animation. RIPPLING STRENGTH sets the force of the wind. NUMBER OF FRAMES is the number of layers that are created.


EDGE BEHAVIOR specifies how the layer edges are handled. BLACK keeps image borders straight, and the two other modes (WRAP and SMEAR) deform the border in different ways.
The edge behavior effect is only apparent when the rippling strength is greater than the default value of 3.0. A high rippling strength leads to dramatic image distortion, as shown in Figure 18-16, where the strength is set to 80.
The Selection to Animimage tool is very similar to the Filter all Layers tool, discussed in Filtering All Layers. In this section, we focus on the differences between them.
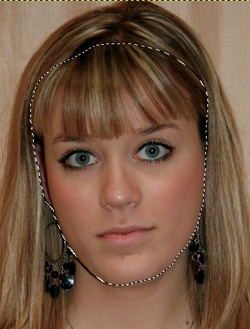
Figure 18-17 shows an image with a single layer and a selection that has been made using the Free Select tool and corrected with the Quick Mask.
The Selection to Animimage tool dialog, accessed via Image: Filters > Animation > Selection to Animimage, is shown in Figure 18-18. You can choose the number of layers to be generated. This plug-in automatically creates the layers, unlike the Filter all Layers tool. You can also choose the color used to fill the new image outside of the selection and whether to apply the filter to all new layers. If the filter is not applied to all new layers, the tool generates the layers without applying a filter.. . . So it just duplicates the layer!
When you apply the filter, two new windows replace the dialog:
A new image containing a copy of the selection made in the initial image, with the number of copies of the background layer specified in the preceding dialog
A dialog identical to Figure 18-18 that lets you select a filter
You can choose the Cartoon filter, for example, and select APPLY VARYING to open the Cartoon filter dialog (see Figure 17-148) for the first layer. Set the PERCENT BLACK to 0, and click OK. In the next dialog, set PERCENT BLACK to 1.000 for the final layer.
The result is an animation that progressively transforms the portrait into a cartoon.
The Spinning Globe tool automatically maps an image to a globe and then makes it spin. Simply select an image, open the tool, set the two parameters, and decide whether the three checkboxes should be checked, and the computer does the work.
The image you use determines the shape of the globe. If the image is a true square, the globe is a sphere. Otherwise, it is an ellipsoid.
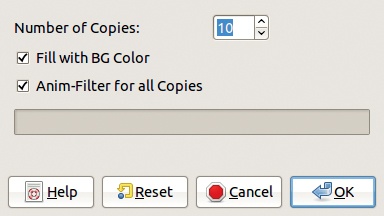
To demonstrate, we used the same portrait as before. When we select the Spinning Globe tool (Image: Filters > Animation > Spinning Globe), the dialog shown in Figure 18-19 appears. Here, we choose the number of frames. For a photograph, 10 is too few and would make the animation jerky. For a simple graphic, however, 10 frames might be enough. You can also choose the rotation direction, which is right to left by default, and whether the background of the animation is transparent (you can add a background later) or uses the background color. The animation can use indexing with a given number of colors, which is wise if you plan to export the animation to GIF. Finally, you can choose to work on a copy of the image.

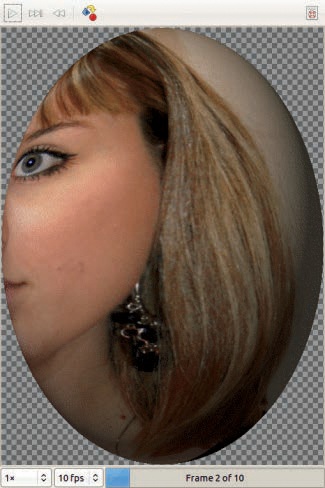
Here, we change FRAMES to 30 and uncheck TRANSPARENT BACKGROUND. Figure 18-20 shows the animation stopped on frame 2.
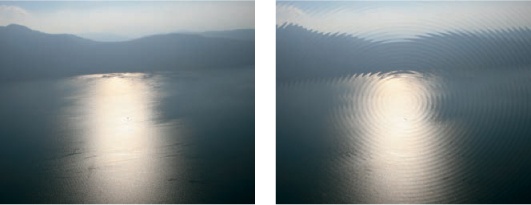
The Waves tool is even easier to use than Spinning Globe, and the result isn’t too bad either. The Waves tool generates an animation that looks like the waves created when a stone is thrown into a still lake.

When you select the Waves tool, the dialog shown in Figure 18-21 appears. The rock always falls in the center of the image, and the proportions of the concentric waves are determined by the image itself. But you can choose the following:
The number of frames. Six frames is normally enough.
The amplitude and wavelength of the waves. The default values are usually fine.
The direction of the movement. If you click INVERT DIRECTION, the waves move toward the center of the animation and disappear, which is a weird effect since it runs contrary to known physics.
Click OK to generate the frames. Figure 18-22 shows the initial image and the animation’s effect.
The Animation menu has four additional entries, which let you optimize and play back your animations:
OPTIMIZE (FOR GIF) is probably the option you’ll use most frequently. It saves a multilayer image as a GIF animation. This tool has no dialog and generates a new image with the same layers as the original image but at a (hopefully) reduced size.
PLAYBACK tests an animation generated as a multilayer image. In this tool’s dialog, the image appears in its original size without any zoom, which can be problematic if the image is larger than the screen because the toolbar may appear off-screen. If that happens, just use
 to close the dialog.
The toolbar buttons should be self-explanatory with the exception of DETACH, which removes the image animation from its frame and allows you to move the frame. If you then want to use
to close the frame, make sure the frame window (and not the full animation) is selected first.OPTIMIZE (DIFFERENCE) has almost the same effect as OPTIMIZE (FOR GIF). The main difference is that OPTIMIZE (DIFFERENCE) keeps all layers the same size as the image, whereas OPTIMIZE (FOR GIF) tries to make every layer as small as possible. The size of the generated file can vary slightly, but predicting which filter will produce the smallest file is difficult.
UNOPTIMIZE is useful if you’re editing an animation that’s already optimized. If you want to add or remove frames, you need to undo the optimization first, then make the changes, and finally reoptimize the animation.