
Suppose, for the purposes of this tutorial, that your first name is Carol, a respectable, non-gender-specific name. Suppose you, Carol, want to decorate an online photo album with an animated logo of your first name. The letters of your name will appear progressively and then move into position. Once your entire name has appeared, the animation stops.
In Chapter 4, you learned how to build a complex logo. Because the focus of this tutorial is the animation, the logo will be very simple. If you like, you can combine these animation techniques with more advanced logo designs, but be advised that such combinations often result in an awkward mess.
As you’ll see in 18.1 Principles of Animation, an animation is made from successive image frames. One of the ways to create an animation is to build a multilayer image in which each layer is one frame.
The simplest way to create the frames is to build each one in turn by hand. Of course, this method is also the most cumbersome and feasible only for very simple animations.
In this tutorial, we use the background layer as the animation background and move only the letters of the name in successive image layers.
To begin, create a new 600 × 400 image (![]() ). Fill the background with the color of your choice. To do this, click the Color chooser in the Toolbox (see Figure 3-3), choose your color, and then press
). Fill the background with the color of your choice. To do this, click the Color chooser in the Toolbox (see Figure 3-3), choose your color, and then press ![]() to fill the layer with the foreground color. Alternatively, you could choose the Bucket Fill tool (
to fill the layer with the foreground color. Alternatively, you could choose the Bucket Fill tool (![]() ) and click to fill the area.
) and click to fill the area.
Now select the Text tool (![]() ). Pick a bold font (in our case, we selected
). Pick a bold font (in our case, we selected DejaVu Sans Bold Semicondensed), and set the size to 100. Select a text color that shows up clearly against your background color.
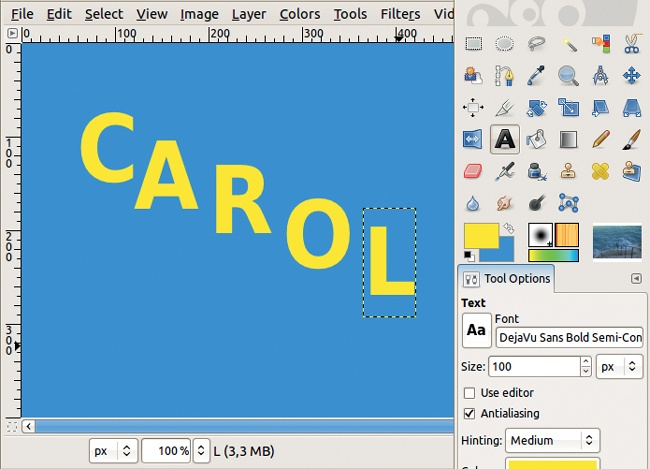
The first click corresponds to the upper-left corner of the box containing the first letter. If you click elsewhere in the image after typing the first letter, a new layer is automatically created for the next letter, which is exactly what you want. After adding all the letters, your image should look like Figure 6-1. The colors we chose for the logo are 2f91dc and f6ee11 in HTML notation.
This image is already a simple animation. To test it, select Image: Filters > Animation > Playback. In the window that opens, simply click the PLAY button, and you see the animation playing.
Why does it work? When you click PLAY, GIMP reveals the layers one by one, and because text layers have transparent backgrounds, the letters don’t cover up the background, or the rest of the logo, when they appear.
To complete this logo, press (![]() ) and export it as a GIF image. In the dialog that opens, check SAVE AS ANIMATION and uncheck LOOP FOREVER.
) and export it as a GIF image. In the dialog that opens, check SAVE AS ANIMATION and uncheck LOOP FOREVER.
As explained in Output Formats, this produces a file that you can display in a browser. After exporting your logo as a GIF, you can use it at the top of your web page, for example.
Test your animation by opening it in your browser, generally by selecting File > Open or pressing ![]() . You can also include the animation in an HTML page with the
. You can also include the animation in an HTML page with the <img src='...' /> tag.
The previous animation was simple. Suppose you want something more complicated. Building all the frames by hand would be time consuming and boring—especially if you want to create a smooth animation, which requires many frames. To make such animations in a practical way, you need a program that automatically generates frames from an initial image. The GIMP Animation Package (GAP) does just that. You install it separately from GIMP, but the process is simple (see Appendix E for help installing GAP).
When GAP is installed, a menu called VIDEO appears in the Image window, and two additional entries appear in the FILTERS menu: FILTER ALL LAYERS and FILTERMACRO. Another tool installed with GAP is Image: Filters > Animation > Selection to AnimImage, which is similar to Filter all Layers.
Create a new image that’s the same size and background color as used in the last exercise. As before, use the Text tool to create the logo in the same color, size, and font, but this time type the name as a single layer. Our result is shown in Figure 6-2.

For this animation, the text layers must be opaque. Merge the text layer with the background by selecting Image: Layer > Merge Down or right-clicking on the text layer in the Layers dialog and selecting Merge Down.
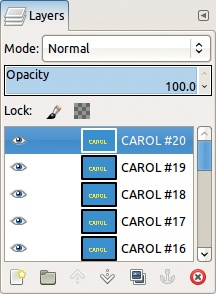
The animation has 20 layers, which begin as identical copies of the initial logo image. After you’ve merged the text with the background, change the name of the layer, for example, to CAROL #1, by double-clicking in the layer name. Then click the DUPLICATE LAYER button 19 times (Figure 6-3) in the Layers dialog (see Figure 6-4).
Now select Image: Filters > Filter all Layers. This tool applies a filter to all the layers of an image. You choose the parameters of the filter for the first and last layers, and the tool interpolates the values for the layers in between.


For our logo, we apply a blurring filter. Type the word blur in the Search field and click SEARCH BY BLURB.
Choose plug-in-gauss, and click APPLY. The numeric field and the small curve next to APPLY allow you to change the speed of the progression: It can be uniform or slow at the beginning and faster at the end (for this example, choose 4), or vice versa (a negative number would reverse the speed). When the next dialog appears, set a large blur radius, such as 50 pixels, as shown in Figure 6-5.
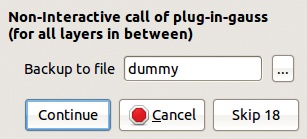
Click CONTINUE. The dialog shown in Figure 6-6 appears. Click CONTINUE again, and another dialog similar to Figure 6-5 appears. This time, set the blur to 0 for the final frame. Click OK. Now the dialog shown in Figure 6-7 appears.
Next you need to name a temporary file where the animation will be stored. Choose a directory, type caroltemp.xcf (or any name you like), and then click CONTINUE once more. The process takes some time because GIMP is applying the Gaussian Blur filter to 20 layers.
Once this process finishes, the animation is ready. Test it by selecting Image: Filters > Animation > Playback. When the animation finishes playing, it returns to the beginning.
You can change this in several ways :
Export the animation as a GIF image, and uncheck the LOOP FOREVER option.
Change the duration of the last frame (i.e., the topmost layer); to do this, double-click the layer name in the Layers dialog and type
(1000ms)after the name. Be sure to include the parentheses and a space between the name and the duration. The final frame now displays for a full second while the others last for only 100 milliseconds.Duplicate the top layer as many times as you’d like.
When using FILTER ALL LAYERS, you can only control what is done to the first and the last frame. Additionally, because frames are represented by layers, you can’t have multilayer frames. GAP provides tools that you can use to build animations with much more control.
In the Image: Video menu that was added when you installed the GAP plug-in, you’ll find tools for creating animations with frames stored as separate image files.
The names of these image files must be of the form namexxxx.xcf, where name is the name you give to the animation and xxxx is a number beginning with 0001 and increasing consecutively until the last frame. The number of digits can vary depending on the length of the animation.


The first frame of a very short animation might be named 01. Longer animations can have 6, or even 10, digits.
For this example, imagine you want to build a new animation, similar to the last two but a bit more complex. This time, the name CAROL will grow progressively larger and become increasingly opaque. Simultaneously, a rectangular frame will grow and become opaque and then rotate from a vertical position, perpendicular to the text, to its horizontal position, neatly framing the text.
First, build a model for the animation, which is a three-layer image. Create a new 300×150 image (![]() ) with the same blue background color. Once again, add the text layer with the name
) with the same blue background color. Once again, add the text layer with the name CAROL. Finally, build the frame in the same color as the text:

The result is shown in Figure 6-8. Keep this image opened in GIMP.
To better organize your workspace, create a new folder called Carol in whatever directory you use to store images. You’ll store all of the animation frames in that new folder.
Create the first frame by clicking and dragging the background layer thumbnail of your model image from the Layers dialog to the Toolbox. Save this image (![]() ) in the new folder, and name it
) in the new folder, and name it carol-0001.xcf. This is the background of the first frame.
Next duplicate this frame. The simplest method is to use Image: Video > Duplicate Frames. The dialog shown in Figure 6-9 appears. Move the N TIMES slider to 20 and click OK. After GIMP finishes working, nothing seems to have happened, but if you check, you’ll see the new frames are in the Carol folder. We’ll be working on the first frame only, so ignore the new frames for now.
One of the most useful tools in the GAP plug-in is Image: Video > Move Path. Open the first frame, carol-0001.xcf, and then call the Move Path tool. As shown in Figure 6-10, the dialog that appears is quite large, but don’t panic—in this tutorial, we focus on just a few of its features.
Use the MOVE PATH tool to add layers, which are taken from an open image (the model image in our case), to the animation frames. The move is applied along a path defined with points. At each point, you can apply transformations such as blending modes, scaling, opacity, rotation, and perspective to the added layer. If you add several layers at the same time, you can choose how they are taken from the model image.
We’ve added numbers to Figure 6-10 that correspond to numbers in the text to guide you through the following steps. Select the layer in the SOURCE IMAGE/LAYER menu from among those in the currently open images (1). First, choose the frame layer. Because there is only one layer, choose NONE from the STEPMODE menu (2).
The coordinates of the path’s points are taken according to the origin selected in the HANDLE menu. Choose CENTER (3), and then set the X and Y coordinates (4) to 150 and 75, respectively. A red crosshair appears in the background frame. To see the frame, check the INSTANT APPLY box (5) at the bottom of the dialog.
The original characteristics of the frame layer are 20.0% for scaling (6), 20.0% for opacity (7), and –90° for rotation (8).
Now you’ve set the first point, which applies to the first frame. Add another point by clicking the ADD POINT button. Note that the point number has changed (9). For this point, which will be the last frame, the layer’s position and opacity change, but the point coordinates should remain the same. change WIDTH, HEIGHT, and OPACITY to 100% and ROTATE to 0.0. The first layer of the animation is now complete.
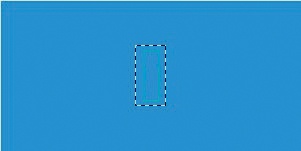
Click OK, and GIMP processes the frames. This process can take a while, depending on the size and number of frames. When GIMP finishes, you’ll see the first frame with an additional layer: the logo’s rectangular frame in its initial position, as seen in Figure 6-11.
To add the second layer (the text), use the MOVE PATH tool again. This time, select the text layer in the model image. Select the same values for STEPMODE, HANDLE, the X and Y coordinates, WIDTH and HEIGHT, and OPACITY, as you used for the previous layer. Check INSTANT APPLY to see the result.
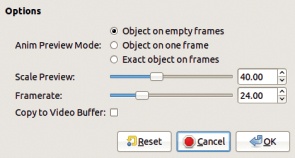
Add a new point, and set WIDTH, HEIGHT, and OPACITY to 100%, but don’t change the coordinates. The animation is finished! To check it before saving, click ANIM PREVIEW (10). The dialog shown in Figure 6-12 appears. Click OK. GIMP builds a reduced version of the animation as a multilayer image, with the Playback window already open. Although previewing the new animation is exciting, it not only takes a while but also builds an unnecessary image that clutters up your workspace. We recommend skipping this feature and simply clicking OK (11) in the Move Path dialog.
Once GIMP finishes processing, all the frames of the animation contain the same three layers as the model image but with progressive changes to the frame and text layers. You can view this animation by selecting Image: Video > VCR Navigator and clicking the PLAYBACK button.
Suppose you want to export this video as a GIF animation. To do this, you need to transform this multi-image animation to a multilayer one and merge the layers in each frame. You can do this automatically using Image: Video > Frames to Image, which brings up the dialog shown in Figure 6-13. Leave everything as is and click OK. Once again, GIMP works for a while, eventually creating a new multilayer image. Change the duration of the last frame (the topmost layer) to 1000 ms by typing (1000ms) after the layer name. You can then check your animation with Image: Filters > Animation > Playback or export it as a GIF file.