
The two simple GAP examples demonstrated on Method Two: Filtering All Layers and Method Three: Moving Along a Path are only a brief introduction to this complex and powerful plug-in. In fact, GAP isn’t a plug-in at all, but rather a diverse collection of animation-related plug-ins. Most, but not all, are found in the Image: Video menu.


In this section, we consider only the plug-ins that are found on this menu. All of these plug-ins (except the ones in the Morph submenu) deal with multi-image animations rather than multilayer animations, which we’ve created in all but one of the preceding examples (see Method Three: Moving Along a Path).
The multi-image format is ideal for building and manipulating large and complex animations. It allows you to convert to and from popular video formats like MPEG. When necessary, GAP also converts between multi-image and multilayer animation formats. All these benefits take this set of plug-ins a long way toward being a complete video manipulation tool embedded within GIMP.
The Move Path tool (Image: Video > Move Path) is the main interface for GAP. As you learned in Method Three: Moving Along a Path, you first need to follow these steps:
Open at least one multilayered or multi-image animation in GIMP. This image will serve as the source of the layers you’ll add to your animation; you may choose to open several images.
Create a new folder to contain the new animation.
Place a background image for the new animation in this folder. Call it something like name
-00001.xcf.Open this background image in GIMP, and duplicate it using Image: Video > Duplicate Frames. The number of copies should equal the desired number of frames.
Once you have the source and background files open, select the Move Path tool from the animation’s source image.
If you haven’t set up the environment properly before opening the Move Path tool, the tool complains and refuses to work. Note that you can use an existing multi-image animation as the background, rather than creating one as we’ve done. In this case, simply open the source animation (Step 1 ) and then open the background animation, and you’re ready to open the Move Path tool.
The Move Path tool adds layers from the source image to a sequence of frames in the target animation. You define how layers are added to the frames by modifying several parameters. Basically, you define positions (i.e., relative locations) in the target animation; for each position, define these values for the following parameters:
Position
Orientation
Scale in X and Y
Opacity
Perspective
If the source image has an active selection, however, you can choose to add just the selection to the new animation.
You can use the Move Path tool to build an animation with several scenes by building a complex path for the layers in the successive frames and applying changes to only a subset of the frames that correspond to a specific scene.
Finally, and this point is important, to add several layers to the target frames, apply the Move Path tool multiple times—once for each layer.
We’ll walk you through two new examples to demonstrate some nifty things this tool can do.
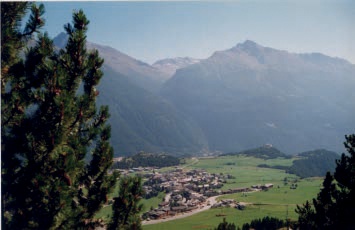
First, we make an animation that simulates somebody looking at a scene through binoculars and moving the binoculars in search of a target. The scene is a village surrounded by mountains, as shown in Figure 6-44.
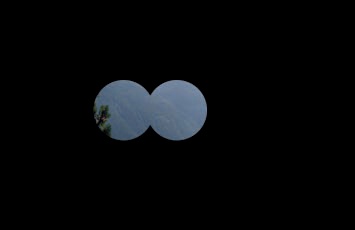
We add the binoculars as a new layer that’s completely black except for two overlapping circles that are transparent. Here are the steps to create the binoculars:

Create a new transparent layer.
Build a circular selection.
Save it to a channel (Image: Select > Save to Channel) and then select the layer again.
Move the selection a horizontal distance equal to about two-thirds its diameter.
In the Channels dialog, add the saved channel to the current selection.
Save the new binocular selection as a channel.
Select the top layer on the Layers tab, invert the selection, and fill it with black.
The result should look like Figure 6-45.
In our animation, we move the binoculars around the landscape. But both layers are currently the same size, so as the binoculars move, the black won’t fully cover the background, resulting in something like Figure 6-46. To avoid this, we need to enlarge the top layer to cover the landscape.
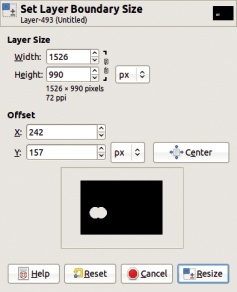
Select Image: Layer > Layer Boundary Size, increase the size in both directions, and center the canvas around the enlarged layer, as shown in Figure 6-47. Then make this entire layer black, except for the binocular window. Because this layer is now larger than the canvas, this step is somewhat tricky. Here’s one way to do it:
Because we enlarged the image, we need to crop it at the end of the process.
Now create a new folder for the animation; call it Binoculars. Drag the background layer thumbnail from the Layers dialog to the Toolbox, and save the image as bin-0001.xcf in the new folder Binoculars.
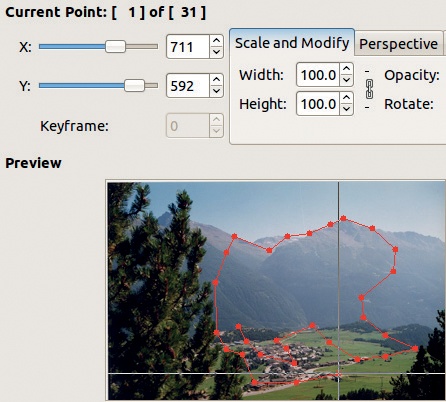
Duplicate this frame 59 times, using Image: Video > Duplicate Frames. The animation now has 60 frames. We use a path to move the binoculars around the landscape. Choose the Path tool in the Toolbox (![]() ) and click to add points to the background image you just saved, as shown in Figure 6-48.
) and click to add points to the background image you just saved, as shown in Figure 6-48.

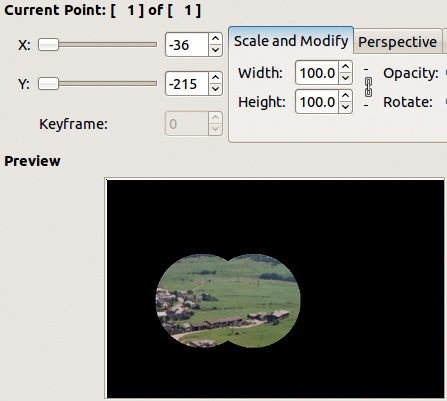
Select the Move Path tool (Image: Video > Move Path. . . ). In the dialog, check that the selected layer is the top layer of the source image, which appears mostly black in the thumbnail. Choose None for the STEPMODE and Center for the HANDLE.
Click the GRAB PATH button in the EDIT CONTROLPOINTS area of the dialog to import the path we just built as a sequence of control-points, which are equally placed across the 60 frames. Then the dialog should look similar to Figure 6-49.
The GAP plug-ins lack the capability to undo, so check the animation you just built by clicking ANIM PREVIEW. If everything is correct, click OK to generate the final animation. Discard the multilayer image that was created for the preview.
Although it did serve as a basic introduction to using paths with the Move Path tool, the animation we just created isn’t very realistic. If you are looking through binoculars, it’s the landscape that appears to be moving, not you.
If you closed it, open the binocular animation that you just made. Create a new folder for the next version of the animation and then create a new blank image that’s much smaller than the landscape in the source image. For this example, we create a 521 × 338 image, and our landscape image is 1042×676. Save this image into the new folder with name bin-0001.xcf, and duplicate it 59 times with Image: Video > Duplicate Frames.
Open the Move Path tool dialog (Image: Video > Move Path). Choose the landscape layer of the previous animation as the source layer (top left of the dialog), None for STEPMODE (below SOURCE IMAGE/LAYER), and Center for HANDLE (to the right of STEPMODE), and check INSTANT APPLY at the bottom of the dialog. This time, let’s build the path within the Move Path tool dialog by clicking in the preview to place points. Click ADD POINT and then click in the preview to add a new point. If you click close to an existing point in the preview, you end up moving that point rather than adding a new one, so click the last point and drag it to add a new one instead. Note that the source image moves around as you place the points. Our result is shown in Figure 6-50.
Before finalizing this animation, check the CLIP TO FRAME checkbox and then click OK. GIMP processes for a while as it builds the first part of the animation, with the landscape moving in the smaller image. You can test the result by selecting Image: Video > Playback.

Now place the binoculars above these landscape frames. Use a layer mask. Add the mask as a new layer to all the frames with the Move Path tool again. Figure 6-51 shows the settings we used. The binocular layer is chosen as source layer and placed in the center of the image.
Simply click OK to get the new animation. Each frame contains three layers—from top to bottom: the binocular image, the landscape, and a white background. We want to merge the topmost layer with the background and use the resulting layer as a mask for the landscape layer. This reduces the number of layers and demonstrates the Image: Video > Frames Modify tool at the same time.

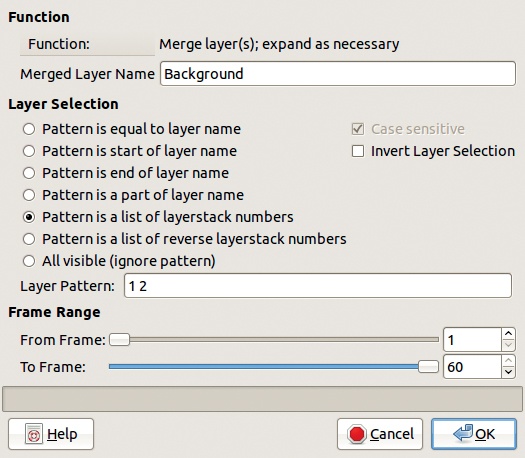
The Frames Modify tool is handy for modifying a set of layers across all the frames in a multi-image animation. The dialog appears in Figure 6-52, showing our first selections. Click the FUNCTION menu (at the top of the dialog) and select LAYER STACKPOSITION >LOWER LAYER(S). Leave PATTERN IS A LIST OF LAYER STACK NUMBERS checked, and enter 0 for LAYER PATTERN. Click OK.

Next we merge the two bottom layers. Select the Modify Frames tool again, and this time choose the settings shown in Figure 6-53. Because the layers are numbered from top to bottom beginning at 0, the layer pattern is “1 2.” The resulting composite layer is named Background.
The final step is shown in Figure 6-54. The bottom layer acts as a mask for the landscape layer.