The Text tool (![]() ) is used, unsurprisingly, to set text. Its icon and pointer are shown in Figure 15-80. To use it, click the image where you want to place the top-left corner of the text and then enter your text. Each time you click and add text, a new layer is created.
) is used, unsurprisingly, to set text. Its icon and pointer are shown in Figure 15-80. To use it, click the image where you want to place the top-left corner of the text and then enter your text. Each time you click and add text, a new layer is created.
The Text tool options are shown in Figure 15-81. Here they are from top to bottom:
FONT determines how the text will look. The
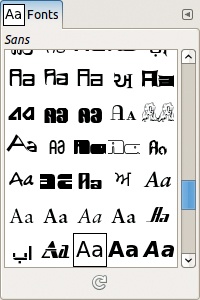
Aabutton opens a drop-down menu of the available fonts (Figure 15-82). The buttons at the bottom of this menu, from left to right, do the following:Reduce the size of the font previews
Enlarge the font previews
Show the font previews as a list (currently selected)
Show the font previews as a grid
Open the Fonts dialog (Figure 15-83)
You can scroll through the fonts using the mouse wheel. When you begin typing a name in the field at the top of the dialog, a drop-down menu of the matching fonts appears.


SIZE is the font size in pixels, by default, but you can switch to resolution-dependent units like millimeters or inches.
USE EDITOR switches to using the Text editor rather than editing the text directly in the image, as explained in Using the Text Tool.
ANTIALIASING smooths the edges of the fonts, but it doesn’t work on an image in Indexed mode.
HINTING sets the level of hinting instructions, which improve rendering at small sizes. Clicking the button opens a drop-down menu with four choices—from NONE to FULL.
COLOR opens the Color chooser, described in The Color Chooser.
JUSTIFY sets the alignment of the text using four small icons that act like radio buttons. The justification can be left, right, center, or justified. These options are only available if the BOX option value is FIXED.
The next three options use the same units as SIZE and can be set to negative values:
Indent the first line
Line spacing
Letter spacing
BOX changes how the text box works. You can choose either FIXED or DYNAMIC. With fixed text, you can change the dimensions of the box and the text, and the justify, indentation, and spacing parameters automatically operate. With dynamic text, the box extends while you are typing, and you must press
 to start a new line.
LANGUAGE changes the language, which can affect the way the text is rendered. If you type in this field, a drop-down list of the available languages appears. Right-click to open the menu shown in Figure 15-84. The last two entries open a menu of input methods and a menu for inserting a Unicode control character, respectively.


As you just learned, you can change fonts in the Text tool options dialog. You can also use the Fonts dockable dialog. Figure 15-83 shows its default appearance, and Figure 15-85 shows the fonts in a grid; you can select the display format in the dialog menu. To change fonts, just click the one you want. If you change the font in the Text tool options, the change is reflected in the Fonts dialog. If you click and hold the Aa button in the Fonts dialog, a temporary window appears, showing a sentence that uses all 26 letters of the alphabet.
The Fonts menu, which opens if you right-click the Fonts dialog, contains the two entries shown in Figure 15-86. RESCAN FONT LIST refreshes the list; you’ll find it useful after you install new fonts. RENDER FONT MAP opens a dialog (Figure 15-87) where you can search for a suitable font. It displays example text in the available fonts. The default TEXT contains all 26 letters, but you can change this. You can also choose to show the font name as the text. When checked, LABELS shows the name of the font under the example text. FILTER reduces the number of fonts that are shown. You can also choose the size and the color scheme of the example text. Part of our result appears in Figure 15-88. Although this tool is useful, keep in mind it doesn’t show all of the available fonts.

On Windows and GNU/Linux machines, GIMP uses a general tool called Fontconfig to manage fonts. To add a font, simply place it in the appropriate directory, and Fontconfig does the rest. Mac OS X, as explained on the GIMP website (http://docs.gimp.org/en/gimp-using-fonts.html), is slightly different.
To use the Text tool, click the image, and if the box is dynamic, the embedding box automatically adjusts around the text you enter. You can also click and drag the box corners and sides to adjust it to the dimensions you want, but when you do, the box becomes fixed. When the box is fixed, line breaks are automatic.
Above the text box is an option box (Figure 15-89) with several fields and buttons that you can use to edit a selection within your text. The top-left field is used to change the font. The top-right field is the font size in pixels.
The bottom-left button (broom icon) clears all the style settings in the text box. The next four buttons toggle boldface, italics, underline, and strike through, respectively. The next two fields move the selected text vertically and change the character spacing, respectively.


If you check the USE EDITOR option in the Text tool options dialog, the Text editor, shown in Figure 15-90, opens. The top buttons let you load text from a file, delete the text, and align the text on the left or on the right. The next two rows are the same settings as shown in the options for the text box. When you check the USE SELECTED FONT box at the bottom, the text above should be displayed in your chosen font.
You can add or edit text in either the Text editor or in the image, but if you’re working with text directly in the image, the function of several keyboard shortcuts temporarily changes. For example, ![]() selects all text instead of the entire layer, and
selects all text instead of the entire layer, and ![]() just adds the letter
just adds the letter p to the text rather than opening the Paintbrush tool. Any single-letter shortcut behaves the same way.

The text is created as a new layer that’s the size of the text box. This layer has the special properties of a text layer and is named using the beginning of the text itself.
If you right-click the text box, the menu shown in Figure 15-91 opens. Some of these options are also found in the Text editor, and others are standard editing commands (Copy, Cut, etc.). You’ll see a submenu of INPUT METHODS at the bottom, which you can also access from the LANGUAGE field in the Text tool options. The two commands, PATH FROM TEXT and TEXT ALONG PATH, are discussed in the next section.
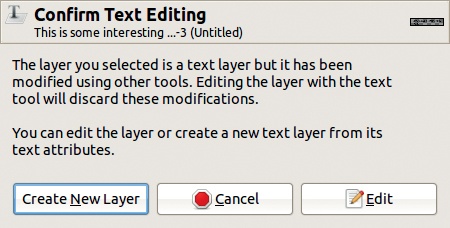
You can edit your text as long as it’s in a text layer. Simply select the Text tool and click somewhere in the text. If the layer properties have changed—after you edit it with a transformation tool, for example—the warning dialog shown in Figure 15-92 opens. If you choose to edit the text, the transformations you made are removed. Alternatively, you can choose to create a new text layer above the transformed one.

The Text tool is not a word processor, so its capabilities are limited. This tool is useful for creating text effects (see Chapter 4) or for adding a little text to a larger image.
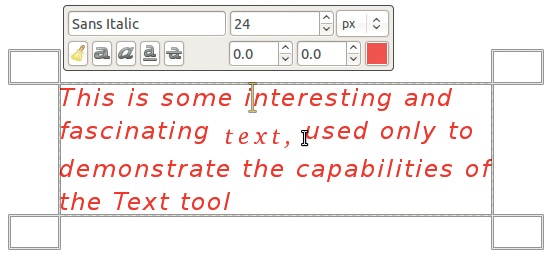
As mentioned earlier, you can edit the look of a selection within your text. In Figure 15-93, we selected the word text (hence the yellow box) and changed its font to Bitstream Charter and italics, set its size to 24 pixels, moved it down 5 pixels, and increased the character spacing by 4 pixels.
If you change the parameters in the tool options, all the text in the layer is affected. In Figure 15-94, we changed the font, text color, line spacing, and character spacing.
Some of the ways to work with text are hidden around the GIMP interface. As you saw previously, you can open menus by right-clicking the text layer, its option box, or the LANGUAGE field of the tool options. Right-clicking the text line in the Layers dialog opens the menu shown in Figure 15-95. This menu can also be accessed via the triangle button in the top-right corner of the Layers dialog.
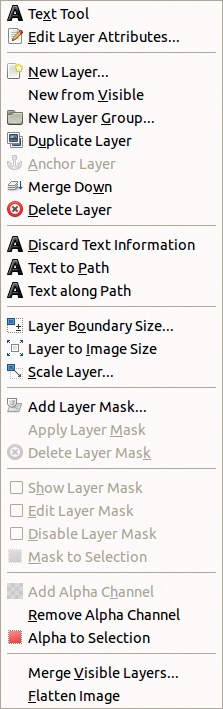
This menu has three new entries:
DISCARD TEXT INFORMATION: This entry transforms the text layer to an ordinary layer. The characters are represented with pixels, so you won’t be able to edit them as text.
TEXT TO PATH: This entry is called PATH FROM TEXT in the menu accessed when you right-click the text box. Use it to change the shape of characters. For example, Figure 15-96 shows the path built from some text, and Figure 15-97 shows the result of moving some of the anchors, converting the path to a selection, and filling the selection.
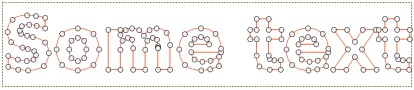
TEXT ALONG PATH: For this transformation to work, a path must already be active in the Paths dialog. After making a path (Figure 15-98), select the text layer and then choose TEXT ALONG PATH.
GIMP builds a new path out of the text that curves along the path (Figure 15-99). As before, we converted the path to a selection and filled it with black (Figure 15-100). The original, horizontal text remains as well.