With a digital camera, you can easily take several pictures of the same subject and capture a view from multiple vantage points. You can also build panoramic images (i.e., wide pictures that cover a larger area than you can see at any one time).
Software tools that specialize in building panoramas are available. One of them is Hugin (see http://hugin.sourceforge.net/), which is free and works on GNU/Linux, Mac OS X, and Windows. It uses a powerful algorithm called SIFT, which was developed at the University of British Columbia. It builds the panorama in a completely automated way. The algorithm finds a collection of control points in the different photographs. The result is spectacular, but the algorithm is processor intensive, especially if the panorama is being built from a lot of large photographs.
We also use Pandora, a GIMP plug-in developed by Akkana Peck, at the end of this section. After you install it, Pandora is accessible in Image: Filters > Combine.
Some digital cameras offer a panorama mode designed to ensure the images overlap sufficiently. Don’t worry if your camera lacks that feature; taking the pictures you need for your panorama, using normal settings, is easy. Just follow this advice:
Keep your feet firmly planted as you shoot. Rotate the top of your body to capture each successive shot, but try to keep the camera at the same height as you move across the landscape so each shot has the same amount of sky visible. Too much vertical motion can reduce your final panorama to a very narrow strip. If feasible, use a tripod for greater stability.
Do not change the exposure as you move: The settings must be the same for all pictures, even if the lighting conditions are not the same. Choose the optimal settings for some part of the intended panorama (the center, for example), fix them, and then take all the pictures. If you’re not sure how to do this, refer to your camera’s manual.
Take more pictures than necessary. To build a panorama, you need a lot of overlap. A camera’s optical system generally distorts the corners, and sometimes the sides, of every image. Only the center of an image isn’t distorted in any perceptible way. This is why you build your panorama using mainly the center of each picture.

Perhaps your camera can take photos with a really high pixel count. For example, Olivier’s camera has a maximum image size of 3888 × 2592. When loaded in GIMP, an image of that size occupies 90.9MB. If you load six of them, probably the minimum number for a panorama, they occupy 545.4MB, which is too much for most computers to handle. And as soon as you begin working on an image, its size increases because of the stored information that allows you to undo. Basically, unless your computer is an extraordinary beast with a huge amount of memory, building an enormous panorama causes it to crash.
Generally, really large panoramas are impractical anyway. A panorama intended for a web page shouldn’t be much wider than 1000 pixels. If you want to print the image, a width of 4000 pixels results in a print size of 13.3 inches or 33.9 cm when printed at 300 ppi.
You can take the pictures for your panorama using the highest setting available on your camera and then scale them down to a usable size. Be careful not to scale down too much, however, or you’ll lose precision and sharpness.
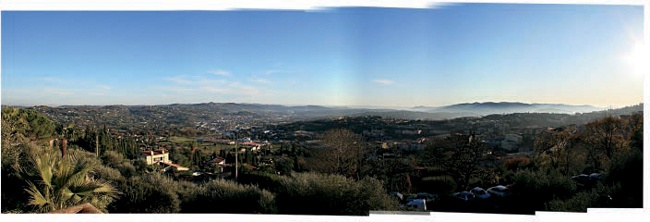
Olivier took eight photographs of the view from his balcony, following the advice in the previous section. The images are 3888 × 2592, but we scaled them down to 1200 × 800. When scaling an image, choose the Sinc (Lanczos) algorithm, which, although somewhat processor intensive, does the best job. After scaling down, we applied the Image: Filters > Enhance > Unsharp Mask filter with its default parameters to compensate for the loss of sharpness caused by scaling.
Because these photographs overlapped a lot, as they should, the complete panorama will not be more than 2800 pixels wide. As keeping the camera at exactly the same height for all shots was difficult, we created a new image that was 2800 × 1000, which happened to give us some wiggle room. This image isn’t extremely large, but it will have to be scaled down for a web page. On the other hand, this image is rather small for printing. Here’s how we would build the panorama.

Load the first photograph into this new image with
 . The new layer appears in the center of the image; move it completely to the left, as shown in Figure 5-30.
Load the second photograph as a new layer and change its opacity to 50% so you can see whether it’s positioned correctly. Move it so the overlapping areas of the two photographs align. Focus on superimposing the house in the middle so it’s as sharp as possible. Use the arrow keys to tap it into place. As Figure 5-31 shows, a perfect superimposition is impossible because of the lens distortion. Here, we are able to get the house in sharp focus, but the surrounding hills are blurry and the electric pole on the left is doubled. We can tell from the horizon that the camera was slightly tilted when the second picture was taken.
To improve the transition from one photo to the other, add a white layer mask to the top layer. Select the Blend tool and choose a linear gradient from black to white without repetition. You want the top layer to transition from transparent on the left to opaque on the right. To create a perfectly horizontal gradient, press
 while dragging from left to right, beginning somewhat to the right of the left edge and ending at the house.
Once the gradient is built, click the layer thumbnail to select the layer itself. Set the opacity of this layer back to 100% and move it very slightly (with the arrow keys) so the house is as sharp as possible. You also need to rotate the top layer a tiny bit to compensate for the camera’s tilt. This is tricky because partial transparency disappears while you are using the rotation tool. Figure 5-32 shows the result so far as well as the Layers dialog.
Repeat this process for the remaining photographs: Load the photograph, set transparency to 50%, position it, remove the transparency, add a layer mask, draw a gradient on this mask, and finish positioning the photograph. To avoid creating weird artifacts in the scenery, be careful not to make the gradient too wide and avoid placing it in an area with a lot of fine detail. As you add layers, the size of the image increases and, in this case, is 123.4MB after we’ve added all eight photographs.

Sometimes, if a detail from the lower layer appears out of place, changing the gradient is helpful. You can adjust the gradient by painting on the layer mask, or you can add another gradient over the problem area—above the existing gradient. Set the second gradient to Multiply mode (from the MODE menu in the tool options dialog). To see the layer mask itself, ![]() -click its thumbnail or right-click in the Layers dialog.
-click its thumbnail or right-click in the Layers dialog.
The current result appears in Figure 5-33. The color of the sky is uneven at a couple of the junctions between photographs. Because the sky contains clouds and a light haze on the extreme right, replacing it completely with some gradient between two different shades of blue would detract from the image. We prefer to leave the panorama as is, although some careful (and tedious) work with the Dodge/Burn tool (in Dodge mode) or the Clone tool could improve the result.

With all the pictures in place, all that’s left is to crop and flatten the image. Our final panorama appears in Figure 5-34.
The Pandora plug-in, mentioned at the beginning of this section, can also be used to build a panorama. Here’s how you use it:
Load all the photographs as layers in a new image. Do this quickly using
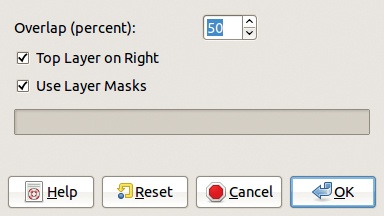
.Select the Image: Filters > Combine > Spread out layers filter. In the dialog that appears (Figure 5-35), select the OVERLAP quantity between images (in this case, 80 is better than 50) and decide whether the top layer is on the left or right. Note that the last image loaded becomes the top layer.
The finishing touches are left up to you. Move the layers and fine-tune the layer masks to get a smooth panorama.