
GIMP has two kinds of palettes. One is the color-map, also called an indexed palette, which is included with all GIF files, containing a maximum of 256 different colors. Indexed palettes can be automatically defined when you change the image mode from RGB to indexed, but you can also use a “custom palette” that has already been defined.
You can use any palette as a custom palette when converting an image to indexed mode. Working with palettes is like making a tapestry using a finite set of colors and interspersing those few colors to get the effect of a larger array.
You’ll find many GIMP palettes in the systemwide Palettes folder; they have the suffix .gpl (GIMP Palette). The GPL file format contains a short heading followed by the values in the three channels, R, G, and B, as well as an optional name for each color. The order of the values is unimportant.
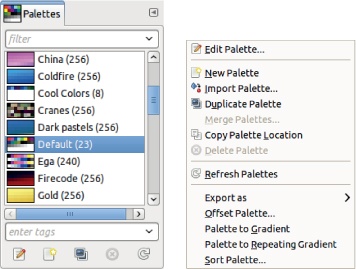
To see all the existing palettes, open the Palettes dockable dialog (Image:Windows > Dockable Dialogs > Palettes), which is shown in Figure 22-60 (left). Figure 22-60 (right) shows the Palettes menu, which you can select from the dialog menu or access by right-clicking inside the dialog. Use this menu to work with palettes directly or access the options by right-clicking the palette you want to edit. You can also use the buttons at the bottom of the Palettes dialog. Like other GIMP objects, palettes have a system-wide and a personal Palettes folder, and you can only edit palettes you create or duplicate.
In the Palettes dialog, double-click any palette to open the Palette Editor (Figure 22-61, left).
Clicking any color in the Palette Editor copies it to the foreground color, and ![]() -clicking copies it to the background color. You can also use the Palette Editor for painting by using the Palette tab of the Color chooser (see The Color Chooser).
-clicking copies it to the background color. You can also use the Palette Editor for painting by using the Palette tab of the Color chooser (see The Color Chooser).
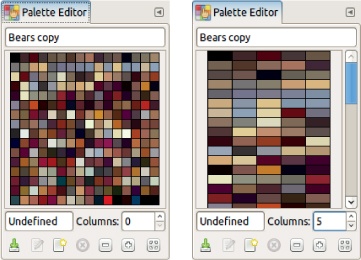
One important property in this dockable dialog is the COLUMNS field: If this field is 0, the palette colors are displayed in an optimized way. But you can force them to be displayed in columns, as shown in Figure 22-61 (right).
To change a color in the palette, right-click and select EDIT COLOR (or double-click the color) to open the Color chooser dialog. Using the dialog menu, the bottom buttons, or the right-click menu, you can also delete a color or add the foreground or background color to the palette. You can name the new palette and save it without closing the dialog. Even if you don’t explicitly save it, when you close the new palette, it’s saved in your personal Palettes folder.
Another way to define a new palette is to import it from a gradient, an image, or another palette by selecting Palettes: Palettes Menu > Import Palette. When you select this option, the dialog shown in Figure 22-62 opens.
In this dialog, you can select the source and name of the palette. You can also choose the number of different colors for the palette, which cannot be greater than 10,000. But if you import the palette from an RGB image, the number of different colors is generally much greater than the maximum, so you’ll need to increase the INTERVAL, meaning that neighboring colors will be grouped using this vicinity factor. For example, in Figure 22-63, we imported from the base image of Figure 20-5, pushed the number of colors to 1000, and set the interval to 16.

Now, let’s discuss the remaining entries in the Palettes dialog menu.
DUPLICATE PALETTE is fairly self-explanatory. The Palette Editor is opened automatically for the new palette.
EXPORT AS helps you build a table of colors to use in various contexts. The available formats are CSS Style Sheet, Java map, PHP or Python dictionary, and text file. Depending on the palette, the colors may have names. Depending on the output format, the color notation uses various conventions.
OFFSET PALETTE opens a small dialog where you set the offset value. The number of palette colors that you choose are moved from the end of the palette to the beginning. This doesn’t effect the palette’s function, but it does let you rearrange the colors if you’re using them to paint, for example.

The next two entries in the Palettes dialog menu let you use palettes when building gradients. The final entry lets you sort a palette.
PALETTE TO GRADIENT: Use this option to build and save immediately a new gradient containing all the colors of the present palette, in order. Each color will have the same width in the gradient. This option is best with small palettes because the gradient is easier to edit.
PALETTE TO REPEATING GRADIENT: The only difference between this option and the previous one is that the first color is repeated at the end of the gradient.
SORT PALETTE: This opens a dialog for sorting the palette colors based on color model (RGB or HSV) and channel in ascending or descending order. This option is handy when you want to generate a gradient from a palette or when using a palette for painting.
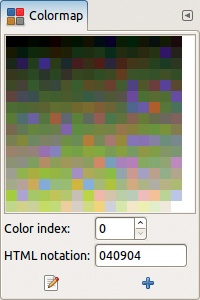

When working on an indexed image, you can edit its indexed palette using the Colormap Editor. The Colormap Editor, shown in Figure 22-64, is a dockable dialog that you access from Image: Windows > Dockable Dialogs > Colormap. The menus available are shown in Figure 22-65. As you can see, you can change a color, add new colors from the foreground or background colors (if some space is left in the colormap), or rearrange the indexed palette. Choosing to rearrange the indexed palette opens the window partly shown in Figure 22-66, which also shows the right-click menu.

When you click a color, its index in the colormap appears at the bottom of the dialog, along with its hexadecimal value in the RGB color space (called HTML notation). You can change either field: The colormap field selects a color; the hexadecimal field changes the color.