
We are now going to explore some of the painting tools in more detail, but first, some remarks about brushes . . .
Brushes are used with every painting tool and work just like brushes in real life—a larger brush lays down more color at once, and a fuzzy brush results in softer edges. Figure 3-34 shows some of the simple effects that you can get by changing brushes. Because this is digital painting, however, you can also use brushes to create effects that you couldn’t do so easily with real paint. The basic brushes, Hardness 100 and Hardness 075, are versatile and straightforward and are used frequently in this book.
Figure 3-35 shows some creative effects that you can achieve using just the Hardness 100 brush. We created a scalloped edge by adjusting the SIZE, ASPECT RATIO, and ANGLE parameters. To draw the ghostly line on the left, we played with the paint dynamics settings. For the striped line on the top, we used a gradient as the paint color and the Random Color paint dynamics to vary the color at random within that gradient.

The Pencil tool (accessed via Image: Tools > Paint Tools > Pencil, ![]() , or the Toolbox button shown in Figure 3-36) is draws freehand strokes with a hard edge, even when used with a fuzzy brush, as it doesn’t include any antialiasing.
, or the Toolbox button shown in Figure 3-36) is draws freehand strokes with a hard edge, even when used with a fuzzy brush, as it doesn’t include any antialiasing.
Antialiasing smooths edges, even at low resolutions, by taking advantage of how vision works. The Paintbrush tool uses antialiasing to produce soft strokes by generating semi-opaque pixels on the edges, whereas the Pencil tool generates only fully opaque pixels. Figure 3-37 shows spots drawn with the Paintbrush tool (left) and the Pencil tool (right). These spots were magnified to show the effect of antialiasing at the pixel level.
The Pencil tool is useful when you want to control exactly how a pixel changes. For example, pixel art is often done using the Pencil tool with a brush size of 1 pixel (SIZE option set to 1.00). The Pencil tool is also useful for drawing very small images like icons.
Some icons are drawn in a vector graphics program and scaled down to their final size afterward. But small, simple icons often come out better when drawn at their intended size, pixel by pixel.
Icons, like those representing the tools in the GIMP Toolbox, are generally tiny images (around 16 × 16 pixels) and are drawn with a limited color palette in indexed mode. The limited palette gives an icon set a more uniform look. Indexed mode can be selected via Image: Image > Mode > Indexed.

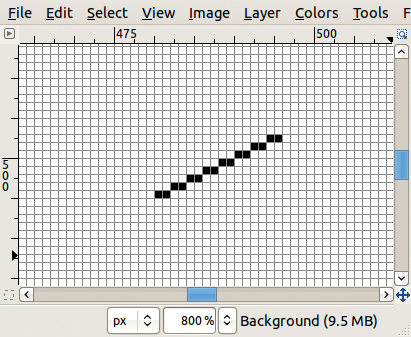
To work at the pixel level, zoom to 800% (Image: View > Zoom > 8:1 or use the zoom drop-down list at the bottom of the Image window). When the image is magnified so dramatically, however, you might find it hard to see what the icon will look like at normal zoom.
To help with that, you can display a second view of the image (Image: View > New View) at 100% zoom. Because the second view is so small, hide the layer borders (Image: View > Show layer boundary) to gain clarity. An example of these two views is shown in Figure 3-38. Note that in single-window mode, you won’t be able to view both at once; you’ll have to tab back and forth.
Pixel art is a form of digital art that’s created on the pixel level. Graphics in old video games and many mobile phone games are pixel art.
Again, choosing a color palette, drawing at 800% zoom, and opening a second view at 100% is best. Pixel art comes in two major categories: isometric and nonisometric. Isometric pixel art is based on the isometric line, and the result is a 3D object that is viewed from above and to the side. Nonisometric pixel art deviates from this line, resulting in a 2D object that is shown from any other view, such as the top, bottom, side, or front. The isometric line is shown in Figure 3-39: 2 pixels across and 1 pixel up.
Drawing pixel art with a gray, 1 × 1 pixel grid is easier. To view this grid, select Image: Image > Configure Grid and change the foreground color to gray and the width and height to 1 pixel, as shown in Figure 3-40. Then use Image: View > Show Grid to display it.

You can build an isometric grid (Figure 3-41) quickly by selecting the pixels of an isometric line. Use the Rectangle Select tool (Image: Tools > Selection Tools > Rectangle Select or ![]() ) to select specific lines or sections of the grid or the Select by Color tool (Image: Tools > Selection Tools > By Color Select or
) to select specific lines or sections of the grid or the Select by Color tool (Image: Tools > Selection Tools > By Color Select or ![]() ) to select all the black pixels. Copy (Image: Edit > Copy or
) to select all the black pixels. Copy (Image: Edit > Copy or ![]() ) the line, paste it (Image: Edit > Paste or
) the line, paste it (Image: Edit > Paste or ![]() ), and flip it (Image: Layer > Transform > Flip Horizontally). Move this copy to the proper place, and then use Paste and Flip Horizontally or Flip Vertically to add additional lines. You might need to practice, but once you have a nice grid, you can use it over and over. The length of the initial isometric line determines the grid’s density.
), and flip it (Image: Layer > Transform > Flip Horizontally). Move this copy to the proper place, and then use Paste and Flip Horizontally or Flip Vertically to add additional lines. You might need to practice, but once you have a nice grid, you can use it over and over. The length of the initial isometric line determines the grid’s density.


For example, you can use the grid to make the isometric cube shown in Figure 3-42. Start with two isometric squares and link them with vertical lines. Erase the pixels that should be hidden, and enhance the three-dimensional effect by filling each face with a different shade of the same color to suggest shadow and light.
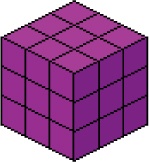


You can create a larger cube with the same grid, as shown in Figure 3-43. Figure 3-44 shows a large cube that’s been decorated to look like bricks. These bricks follow the same rules: The horizontal lines are isometric lines, and the vertical lines are parallel to the cube lines. We also added lighting to the individual bricks and shading to the cube faces.
You can rotate the isometric line to build other basic shapes like the pyramids in Figure 3-45 and the cylinder in Figure 3-46. These shapes can be combined to build things like the house in Figure 3-47 or the tower in Figure 3-48. To add a shading gradient to round objects, use dithering. When pixels of similar color are interspersed, as shown in Figure 3-49, they blend into each other and look like an intermediate color to the eye. You can also add more detail and even build tiny towns with isometric cars, people, or trees. See, for example, http://sparklette.net/art/navy-open-house-ad-impressive-pixel-art/.


The Paintbrush tool (press ![]() or click the Tool-box button shown in Figure 3-50) is used for freehand strokes with a soft edge. Even with a hard brush, it produces soft edges, and with a fuzzy brush, the edges are even fuzzier.
or click the Tool-box button shown in Figure 3-50) is used for freehand strokes with a soft edge. Even with a hard brush, it produces soft edges, and with a fuzzy brush, the edges are even fuzzier.
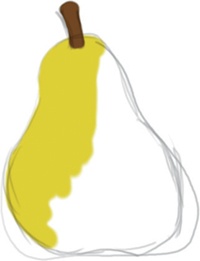
In digital painting, the Paintbrush tool is used for two main things: drawing lines and filling areas. Generally, the first step in digital painting is to sketch the objects. A black fuzzy brush works well for sketching. If the lines will remain as outlines around the object, they should be clean and done with a relatively small brush size, as shown in Figure 3-51. If the lines are just a sketch and will be erased, use a larger brush size with a looser style, as shown in Figure 3-52. Painting without permanent outlines is more challenging because you’ll need to be much more careful when finishing the edges of objects.


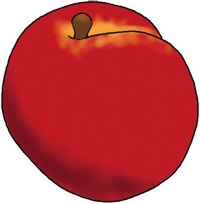
You can also use the Paintbrush tool to fill the objects with color, as shown in Figure 3-53 and Figure 3-54. You might add individual objects to larger paintings like the landscape in 3.5 The Digital Painting Process.
The Airbrush tool (accessed via Image: Tools > Paint Tools > Airbrush, ![]() , or the Toolbox button shown in Figure 3-55) is used to paint soft areas of color. If you use a graphic tablet and
, or the Toolbox button shown in Figure 3-55) is used to paint soft areas of color. If you use a graphic tablet and Basic Dynamics, opacity will be linked to pen pressure, so when you press lightly, a fine mist of color is added. Each stroke adds color, regardless of whether you’ve lifted the pen off the tablet. Moreover, speed matters: The more slowly you move the pen, the more paint is left.


You can use the Airbrush tool to add light (Figure 3-56) or shadow (Figure 3-57). The Airbrush tool lets you to choose colors for the light and the shadows, unlike the Dodge/Burn tool. To smooth transitions, see The Smudge Tool.
The Ink tool (accessed via Image: Tools > Paint Tools > Ink, ![]() , or the Toolbox button shown in Figure 3-58) is used for calligraphy because it replicates the look of a quill, especially if you use a graphic tablet that handles pressure and tilt.
, or the Toolbox button shown in Figure 3-58) is used for calligraphy because it replicates the look of a quill, especially if you use a graphic tablet that handles pressure and tilt.
For calligraphy, adjust the Ink tool options (see Figure 15-53) until they suit your style. In particular, adjust the ANGLE, TILT, and SPEED sensitivity until you get the result you want. Figure 3-59 is an example of traditional European calligraphy, and Figure 3-60 is an example of Japanese katakana.

