Painting tools are intuitive because they behave like traditional drawing media.
We already discussed the features shared by the painting tools (Drawing Tool Options). In this section, we discuss each tool individually, focusing on options and features unique to that tool.
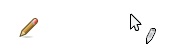
The Pencil tool (![]() ) paints hard-edged strokes. Its icon and pointer are shown in Figure 15-39. The characteristic that makes the Pencil tool unique is that the stroke edges are not anti-aliased. See The Pencil Tool.
) paints hard-edged strokes. Its icon and pointer are shown in Figure 15-39. The characteristic that makes the Pencil tool unique is that the stroke edges are not anti-aliased. See The Pencil Tool.
The Pencil tool options are shown in Figure 15-40. The FADE OPTIONS settings work only if the Paint Dynamics Mapping matrix contains a check in the Fade column, and the COLOR OPTIONS settings work only if there is a check in the Color row.
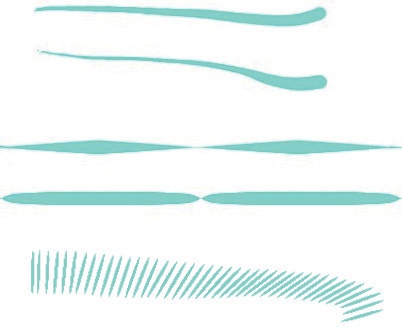
Figure 15-41 (top) shows the result of painting with Basic Dynamics. Because no check appears in the Color row in the Mapping matrix, the tool uses the foreground color. Size and Velocity are correlated, however, so the stroke is narrower when the movement is faster. Opacity is correlated with Pressure and Fade, so the stroke is less opaque when the pressure is lower. Because the SAWTOOTH WAVE repeat is selected, the opacity fades and then starts again after a distance of 100 pixels (the fade length).

For the second stroke in Figure 15-41, we defined a new paint dynamics that links only Color and Fade. The colors follow the current gradient, which is used along a path of 100 pixels and then starts again.
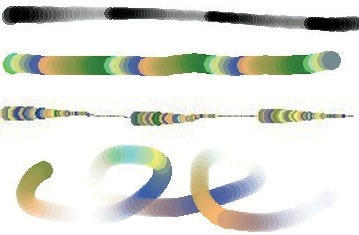

In the third stroke in Figure 15-41, Color is correlated with Random, so the colors are taken at random from the gradient, and Size is correlated with Fade, so it decreases along a path of 100 pixels and then starts again.
In the last example in Figure 15-41, Color is correlated with Direction, so the colors vary along the gradient based on the direction of movement, and Opacity is correlated with Fade. Note that we changed the REPEAT option to TRIANGULAR WAVE for this example, so the opacity decreases and then increases again.
The Paintbrush tool (![]() ) paints soft-edged strokes but otherwise is similar to the Pencil tool. Its icon and pointer are shown in Figure 15-42.
) paints soft-edged strokes but otherwise is similar to the Pencil tool. Its icon and pointer are shown in Figure 15-42.
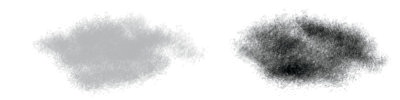
The Paintbrush is the most general-use tool for creating digital illustrations in GIMP. The Paintbrush options are the same as the Pencil options, so we won’t show the dialog again. Instead we’ll demonstrate a couple of options that we haven’t explored yet, with no checked box in the Fade column or the Color row of the current paint dynamics. In Figure 15-43, we make the top stroke with APPLY JITTER checked and a value of 0.20, and we make the bottom stroke without jitter.

In Figure 15-44, we set the OPACITY to 43% and scribble with the dynamic Acrylic 02 brush. We make the scribble on the left with the INCREMENTAL option turned off and the scribble on the right with INCREMENTAL turned on.
In Figure 15-45 (top), we draw a stroke with the tablet stylus, increasing the pressure along the stroke. The paint dynamics correlates Size with Pressure. We draw the top stroke with the default, straight answer curve. For the bottom stroke, we make the curve strongly concave by moving its center toward the bottom-right corner, so the brush size is constant at the beginning of the stroke and then increases at the end of the stroke.
In Figure 15-45 (middle), we draw the horizontal strokes with paint dynamics that correlate Size with Fade. For the top stroke, the answer curve is flat. For the bottom stroke, the answer curve is strongly convex, the middle point having been moved toward the top-left corner.
To demonstrate the Wheel parameter, we use the Art Pen, which has a rectangular tip. If the tip is flat on the tablet, the greatest surface area touches the tablet, and if the pen is rotated by 180°, the smallest area touches the tablet. The best way to translate this to paint dynamics is to invert the answer curve that correlates Wheel with Size. This way of using the Art Pen becomes very natural. But in Figure 15-45 (bottom), we correlate Wheel with Orientation and use the Hardness 100 brush with ASPECT RATIO set to –10. Rotating the pen then rotates the brush.
The Eraser tool (![]() ) removes color from the current layer by painting with transparency if the layer has an Alpha channel or with the background color if it does not. Its icon and pointer appear in Figure 15-46.
) removes color from the current layer by painting with transparency if the layer has an Alpha channel or with the background color if it does not. Its icon and pointer appear in Figure 15-46.
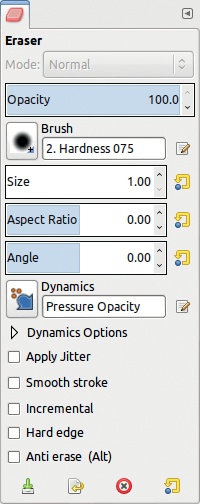
As Figure 15-47 shows, the Eraser tool has fewer options than the Pencil and Paintbrush tools because it has no mode or color option. Two new options appear, however, that are unique to the Eraser: HARD EDGE and ANTI ERASE.
To illustrate this tool, we create a simple image filled with green. We add a second transparent layer (which, therefore, has an Alpha channel) and paint a purple blob with the Paintbrush tool and the Hardness 050 brush at size 40. In Figure 15-48, we use the Eraser tool with the same brush. We make the two left strokes with HARD EDGE unchecked. Because we use the Hardness 050 brush, the edges are fuzzy. On the right, the HARD EDGE option is checked so the full diameter of the brush erases pixels, making the stroke appear wider.


When ANTI ERASE is checked, the color that was erased appears again, as shown in Figure 15-49. This feature works only on layers with an Alpha channel. When pixels are made transparent, the color information is retained. Antierasing toggles the transparency, revealing the color that was invisible. Pressing ![]() temporarily toggles this option.
temporarily toggles this option.

Many tablets come with a double-ended stylus, the ends of which look like a drawing tip and an eraser. GIMP can remember which tool is attached to each end, so you can associate the drawing tip with the Paintbrush, for example, and then flip the stylus over to use the Eraser tool. To create the association, click the Eraser tool icon with the proper end, and as long as you don’t use it to click another tool icon, it remains associated with the Eraser.
The icon and pointer associated with the Airbrush tool (![]() ) appear in Figure 15-50. The Airbrush tool is similar to the Paintbrush tool, but the amount of paint deposited on the canvas is more variable. If you paint more than once over the same spot, Airbrush adds more paint, and if you paint a stroke faster, it adds less paint. If you click and hold the mouse over one spot (or press the stylus on one spot), it keeps adding more paint unless you check MOTION ONLY (this can also be affected by the current paint dynamics).
) appear in Figure 15-50. The Airbrush tool is similar to the Paintbrush tool, but the amount of paint deposited on the canvas is more variable. If you paint more than once over the same spot, Airbrush adds more paint, and if you paint a stroke faster, it adds less paint. If you click and hold the mouse over one spot (or press the stylus on one spot), it keeps adding more paint unless you check MOTION ONLY (this can also be affected by the current paint dynamics).
The Airbrush tool options are the same as those of the Paintbrush tool, except that INCREMENTAL is always active with this tool.
Three options are specific to the Airbrush tool, however, as shown in Figure 15-51. When MOTION ONLY is checked, no paint is added unless the brush is moving. The RATE slider [0 to 150] changes how quickly the paint comes out of the airbrush. The FLOW slider [0 to 100] sets the strength of the paint stream, so it also affects how much paint ends up on the canvas. If you correlate Rate with Pressure in paint dynamics, set the Rate to the maximum because at lower settings the result is too subtle.

The Ink tool (![]() ) simulates a calligraphy pen with a changeable nib. Its icon and pointer are shown in Figure 15-52. The Ink tool draws an antialiased stroke using the nib settings rather than the current brush, and it has its own settings for paint dynamics, so the current brush and paint dynamics don’t affect this tool.
) simulates a calligraphy pen with a changeable nib. Its icon and pointer are shown in Figure 15-52. The Ink tool draws an antialiased stroke using the nib settings rather than the current brush, and it has its own settings for paint dynamics, so the current brush and paint dynamics don’t affect this tool.
As Figure 15-53 shows, the Ink tool’s Mode and Opacity options are like the other painting tools. But its other options are unique. Let’s take a look at these options. We’ll start at the bottom, with the SHAPE of the pen nib. You can choose among a round, square, or diamond-shaped nib. If you click and drag the small white square in the SHAPE window, you can customize the shape of the nib. You can then simulate a felt-tip pen, a quill pen, a brush, or any other pen type.
The SENSITIVITY options control the effect of the stylus movements (like paint dynamics). SIZE sets the maximum size of the nib, depending on how hard you press with the stylus. Because the minimum size is set in the ADJUSTMENT field, the greater the value, the more the size can vary. TILT uses the tilt of the stylus to change the nib shape. SPEED controls the size of the nib: The faster you draw, the narrower the stroke. You need a low speed value to get a wide stroke. These three options are in [0 to 1]. Of course, the effect of all of these depends on your tablet’s capabilities.
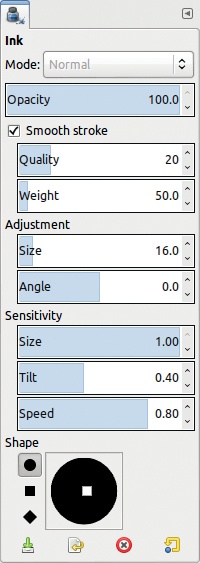
ADJUSTMENT sets the initial stroke parameters. SIZE [0 to 200] is the size of the nib, and ANGLE [–90 to +90] is its angle relative to the horizontal.
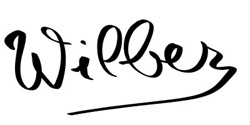
Figure 15-54 to Figure 15-56 show three examples of a signature for Wilber, the GIMP mascot. We drew the first signature slowly using all the default settings, except we used a narrow diamond-shaped nib. In the second signature, we applied pressure to change the stroke width and set TILT to 1.0. In the third signature, we reduced the adjustment size to 2.9 and signed more quickly.