
Once you’ve built a selection, you can use it for a number of purposes. Here, we discuss how you may use a selection that you’ve just built. If you’d like to save the selection for later use, we will discuss masks in depth in the next chapter.
When a selection is active, it’s outlined by marching ants. You can hide this outline, if it’s distracting, by pressing ![]() or selecting Image: View > Show Selection. But use this toggle wisely. One of the main pitfalls a new GIMP user encounters is a forgotten hidden selection. When a hidden selection exists, transformations to the image seem to work strangely, or not at all. If a transformation doesn’t work as expected, always toggle the visibility of marching ants to check whether a hidden selection is to blame.
or selecting Image: View > Show Selection. But use this toggle wisely. One of the main pitfalls a new GIMP user encounters is a forgotten hidden selection. When a hidden selection exists, transformations to the image seem to work strangely, or not at all. If a transformation doesn’t work as expected, always toggle the visibility of marching ants to check whether a hidden selection is to blame.
Changes to an image, whether via drawing or painting, color correction tools, or filters, are applied to the current selection only. This allows you to delimit precisely which part of the image the action affects. We’ve included many examples of this throughout the book.

Suppose you select some building in a photograph and want to correct its perspective with the corresponding transformation tool (see Chapter 16). As soon as you apply the transformation tool, a new layer, called a floating selection, appears in the image. Figure 13-79 shows a floating selection in the Layers dialog.
This new layer is temporary, but while it exists, you cannot change anything elsewhere in the image, nor can you change the active layer. GIMP gives us three ways to get rid of this temporary anomaly and regain control of the other image layers:
Delete the floating selection if you don’t really need it for anything.
Create a new layer to contain the floating selection.
Anchor the floating selection to the current layer. That is, add it to that layer, in effect replacing all the pixels that will be hidden by the selection.
Any of these actions can be applied by right-clicking the Layers dialog or from the Image: Layer menu. Press ![]() to anchor the floating selection to a layer. Note that this shortcut doesn’t always operate on a layer, however. It can also operate on a layer mask or on a channel, depending on previous actions.
to anchor the floating selection to a layer. Note that this shortcut doesn’t always operate on a layer, however. It can also operate on a layer mask or on a channel, depending on previous actions.

When transformations are applied to a selection, the initial content of the selection will be replaced. For instance, if you rotate a selection, the part of the image that was selected will not be at the same place and position as before. If the layer doesn’t have an Alpha channel, the area that the selection occupied, but has moved out of, is filled with the current background color. If an Alpha channel does exist, the empty area becomes transparent. If you want to retain a copy of the selection in its original form, you must duplicate the layer prior to transforming the selection.
The Image: Select menu appears in Figure 13-80. Its entries affect the selection rather than the image as a whole. We will discuss each of the entries in turn.
ALL or ![]() creates a selection that covers the entire canvas. If you’d like to manipulate the entire canvas, it is not always necessary to press
creates a selection that covers the entire canvas. If you’d like to manipulate the entire canvas, it is not always necessary to press ![]() . For example, if there is no selection and you choose Image: Edit > Copy, the whole canvas is copied. However, if you wish to move the canvas, you must select it first.
. For example, if there is no selection and you choose Image: Edit > Copy, the whole canvas is copied. However, if you wish to move the canvas, you must select it first.

NONE or ![]() dismisses any current selection, leaving nothing selected.
dismisses any current selection, leaving nothing selected.
INVERT or ![]() inverts the selection, so all the pixels that were fully selected are not selected, and vice versa. Partially selected pixels remain selected, but the amount of selection is inverted. For example, if a pixel is 80% selected, after inversion, the other 20% is selected. If you think about the selection as a grayscale image, inverting the selection means that a black pixel becomes white, a white pixel becomes black, and a pixel that is gray at 60% becomes gray at 40%.
inverts the selection, so all the pixels that were fully selected are not selected, and vice versa. Partially selected pixels remain selected, but the amount of selection is inverted. For example, if a pixel is 80% selected, after inversion, the other 20% is selected. If you think about the selection as a grayscale image, inverting the selection means that a black pixel becomes white, a white pixel becomes black, and a pixel that is gray at 60% becomes gray at 40%.
FLOAT or ![]() makes the selected pixels a floating selection. This option is rarely useful, especially because it cuts pixels from the initial layer. This command is generally thought of as an obsolete feature.
makes the selected pixels a floating selection. This option is rarely useful, especially because it cuts pixels from the initial layer. This command is generally thought of as an obsolete feature.
BY COLOR is simply another way to access the Select by Color tool (see The Select by Color Tool).
FROM PATH or ![]() builds a new selection from the current path if one exists. The previous selection is discarded.
builds a new selection from the current path if one exists. The previous selection is discarded.
SELECTION EDITOR opens the dockable dialog shown in Figure 13-81. This dialog allows easy access to some of the most common selection-related tasks via the six buttons along the bottom of the dialog. The current selection is displayed in the window.
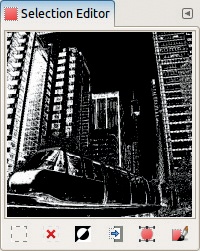
If you click the display window of the dialog, the Select by Color tool’s method is used to build a selection automatically, as shown in Figure 13-82. Press the ![]() ,
, ![]() , and
, and ![]() keys to change the selection mode as usual.
keys to change the selection mode as usual.
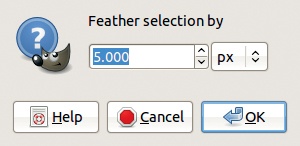
FEATHER opens the dialog shown in Figure 13-83. This option is useful if you forget to check the FEATHER EDGES checkbox when using a selection tool, choose too small a value, or build a selection using a tool that doesn’t include this option.
SHARPEN removes all feathering from the selection, and the result is dramatic only if the fuzzy outline of the selection was the result of feathering. If you use it on a selection made with the Fuzzy Select tool, for example, the effect is barely noticeable, and the border of the selection remains convoluted, as shown in Figure 13-84.
SHRINK opens the dialog shown in Figure 13-85. The size of the selected area is reduced by a specified number of pixels. This means that fewer pixels are selected than before, regardless of the shape of the selection. The SHRINK FROM IMAGE BORDER checkbox is meaningful only if the selection is larger than the canvas. If that is the case, and if this option is checked, the initial selection is treated as if it extends only to the canvas edges.


GROW has the opposite effect and brings up a similar dialog.
BORDER opens the dialog shown in Figure 13-86. Border can be used to build a new selection that extends along the outline of the current selection. Figure 13-87 shows the result when the initial selection was an ellipse. You can choose the width of the border, which is applied symmetrically along the selection. A checkbox allows you to feather the border, but you cannot control the width of the feathering. The other checkbox, LOCK SELECTION TO IMAGE EDGES, constrains the new selection to within the canvas limits.

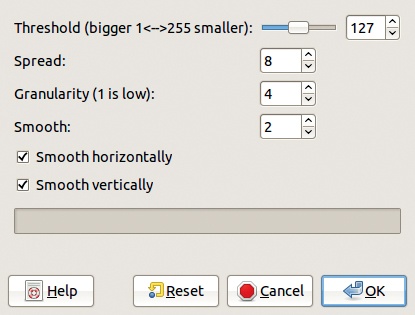
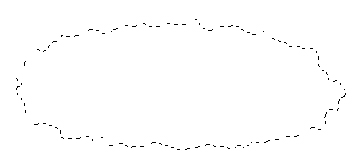
DISTORT opens the dialog shown in Figure 13-88. This tool is used to distort the selection outline randomly. By playing with the parameters, you can get different effects, but the outcome is difficult to predict. From an initial simple ellipse, using the default parameters, we get Figure 13-89. If we double the three parameters—SPREAD, GRANULARITY, and SMOOTH—we get Figure 13-90.


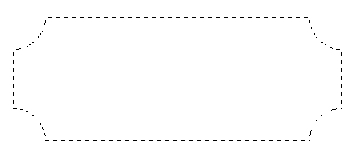
ROUNDED RECTANGLE opens the !dialog in Figure 13-91. This tool builds a rectangular selection with rounded corners with the specified radius around the current selection. If you check the CONCAVE option, the selection will be shaped like the one in Figure 13-92.
The next two entries on the Select menu, TOGGLE QUICK MASK and SAVE TO CHANNEL, will be considered in the next chapter. The last entry, TO PATH, uses the marching ants of the existing selection to build a path.
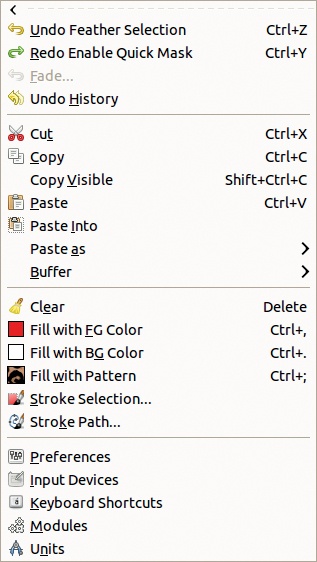
The Edit menu is shown in Figure 13-93. In this section, we cover only the entries that apply to selections.
CUT or ![]() deletes the selected pixels in the current layer and copies them to the clipboard. The contents of the clipboard can be retrieved via the Paste command, but they’re also available as the first entry in both the Brushes dialog and the Patterns dialog. This provides an easy way to build an interesting temporary brush or pattern.
deletes the selected pixels in the current layer and copies them to the clipboard. The contents of the clipboard can be retrieved via the Paste command, but they’re also available as the first entry in both the Brushes dialog and the Patterns dialog. This provides an easy way to build an interesting temporary brush or pattern.
If the current layer has no transparency (no Alpha channel), then any deleted pixels are replaced with the current background color. If the layer has an Alpha channel, the deleted pixels become transparent. If there is no current selection, all the pixels of the current layer are deleted.
COPY or ![]() works like the Cut command, but it doesn’t delete anything. Note that every time you put something on the clipboard, the previous contents are discarded.
works like the Cut command, but it doesn’t delete anything. Note that every time you put something on the clipboard, the previous contents are discarded.
COPY VISIBLE or ![]() works like Copy, but it copies all the selected visible pixels regardless of whether they belong to the current layer. It acts as if the image was flattened.
works like Copy, but it copies all the selected visible pixels regardless of whether they belong to the current layer. It acts as if the image was flattened.
PASTE or ![]() places the current contents of the clipboard into the current image as a floating selection, discussed at the beginning of this section. Note that if you select a part of the canvas that is larger than the contents of the clipboard, the floating selection will be centered within that selection once you press
places the current contents of the clipboard into the current image as a floating selection, discussed at the beginning of this section. Note that if you select a part of the canvas that is larger than the contents of the clipboard, the floating selection will be centered within that selection once you press ![]() .
.
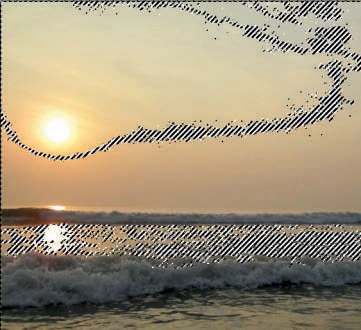
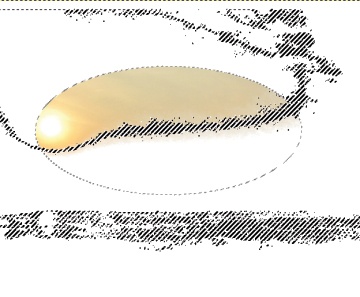
PASTE INTO works like Paste, except that the contents of the clipboard are only pasted within the current selection in the target image. Figure 13-94 shows a selection made with the Fuzzy Select tool. Figure 13-95 shows the result of pasting this selection into an elliptic selection on a white canvas.
PASTE AS opens the menu shown in Figure 13-96. The contents of the clipboard can be used to create a new image (also ![]() ), a new layer in the current image (equiva-lent to simply pasting and then creating a new layer for the floating selection), a new brush, or a new pattern. The last two entries make more permanent the temporary brush or pattern derived from the clipboard contents.
), a new layer in the current image (equiva-lent to simply pasting and then creating a new layer for the floating selection), a new brush, or a new pattern. The last two entries make more permanent the temporary brush or pattern derived from the clipboard contents.

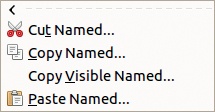

BUFFER opens the menu shown in Figure 13-97. These four commands operate on named buffers. You can have any number of such buffers, and you can name them anything you like. You can see any existing buffers in the Buffers dockable dialog, which can be opened via Image: Windows > Dockable Dialogs > Buffers if it’s not already open. Figure 13-98 shows this dialog after we created two buffers. The contents of the clipboard appear on top (named Global Buffer). The first three buttons along the bottom of the dialog allow you to paste the selected buffer into a selection or as a new image.
CLEAR (or the ![]() key) deletes the contents of the selection without affecting the clipboard.
key) deletes the contents of the selection without affecting the clipboard.
The next three commands in the Image: Edit menu offer a convenient means for filling the selection with the foreground color, the background color, or the current pattern without changing from the current tool. Their keyboard abbreviations—![]() ,
, ![]() , and
, and ![]() —are handy, and we suggest committing them to memory.
—are handy, and we suggest committing them to memory.
STROKE SELECTION works in exactly the same way as STROKE PATH (which appears next in the menu). This option is equivalent to changing the selection to a path and then stroking the path.
Once a selection is built using any of the techniques discussed in this chapter, you can modify the border of the selection to include or exclude pixels from the selected area. We’ve already introduced many of the tools to do this, here and in previous chapters, but now we provide a brief summary for quick reference:
If the selection was built with the Rectangle Select or the Ellipse Select tool, you can change its size or move it whenever the tool is active.
All the transformation tools discussed in Chapter 16 can be applied to selections. When using them, simply select the second choice in the TRANSFORM option in their options dialog. This modifies the selection, not the image contents (i.e., the selection changes, but the image is left unchanged). Note that these tools can also transform the current path, if you select the third choice.
The Move tool works the same way: It can move the current selection (or a path).
When building a new selection, combine it with an existing one by pressing
 or by changing the mode in the tool options.
As we discussed in The Select Menu, use the entries in the middle section of the Image: Select menu to change the boundaries of the selection.
The Quick Mask tool, which we discuss in Chapter 14, is an excellent tool for refining a complicated selection. It’s intuitive and simple, yet it allows you to make extremely precise adjusts to a selection.
The Selection Editor is a convenient tool for making various changes to the current selection, such as inverting it, saving it, and creating a path from it. See The Select Menu for more details.
With channels, which we cover in Chapter 14, you can manipulate a selection as if it were a grayscale image, using any of the GIMP tools. You can also create selections in this grayscale image, which allow you to make selections within a selection. The possibilities are endless.