
The upcoming examples and techniques require the precise selection of a part of the image, so simply clicking anywhere in the photo with the Select by Color tool will not be sufficient. Now, you have to really dig in to make minor corrections to your selections by hand. Do this using Quick Mask.


GIMP has eight selection tools that are located in the top two rows of the Toolbox (Figure 2-45). Let’s take a closer look at each one now.
Quick Mask, accessed by pressing the small button in the bottom-left corner of the Image window (see Figure 2-46), is an invaluable addition to these tools.

All of the selection tools offer the options shown in Figure 2-47, but most also have additional, unique options. Generally, you should leave the ANTIALIASING option checked. Check FEATHER EDGES when you want a smooth outline around a selection. RADIUS specifies the width of the smoothing border. MODE determines how a new selection interacts with an already existing selection:
In Replace mode, the existing selection is replaced by the new one.
In Add mode (also set if you press
 ), the new selection augments the existing one.
In Subtract mode (
 ), the new selection is subtracted from the existing one.
In Intersect mode (
 ), the final selection contains only the areas common to both the existing and the new selections.
As you have already seen, often you need to add to or modify a selected area before making image adjustments. You can do this even after switching among selection tools.
In the next section, we discuss the selection tools that are useful for retouching photographs. The Rectangle and the Ellipse Select tools are rarely helpful because they can only make simple geometric selections. Additionally, the Rectangle tool is tricky to use unless the target rectangle’s sides are exactly parallel to the image’s sides. The Paths tool is an indirect and complex way to build selections, so we don’t include it in this section.
Free Select (![]() ) is a very handy tool. We’ve already used it several times in this chapter. Free Select is best used with a graphics tablet stylus. Draw around the area to be selected and accept the selection by finishing very near the start point or by pressing
) is a very handy tool. We’ve already used it several times in this chapter. Free Select is best used with a graphics tablet stylus. Draw around the area to be selected and accept the selection by finishing very near the start point or by pressing ![]() . See examples in Figure 2-22 or Figure 2-30. Instead of drawing, you can also click several times around the outline of the shape you want to select. This builds a polygon around the target. Figure 2-48 shows a simple example where the Rectangle Select tool would not have worked.
. See examples in Figure 2-22 or Figure 2-30. Instead of drawing, you can also click several times around the outline of the shape you want to select. This builds a polygon around the target. Figure 2-48 shows a simple example where the Rectangle Select tool would not have worked.
The Fuzzy Select tool (![]() ), also known as the Magic Wand, was used in Figure 2-34. Fuzzy Select selects all the pixels adjacent and similar to the clicked pixel, according to a given threshold. Change the threshold in the tool options if the area selected is too large or too small. Generally, make the selection by clicking in several places along the outline of the target while pressing the
), also known as the Magic Wand, was used in Figure 2-34. Fuzzy Select selects all the pixels adjacent and similar to the clicked pixel, according to a given threshold. Change the threshold in the tool options if the area selected is too large or too small. Generally, make the selection by clicking in several places along the outline of the target while pressing the ![]() key. This tool is especially useful when selecting an area with a complex shape.
key. This tool is especially useful when selecting an area with a complex shape.
The Select by Color tool (![]() ) was used in Figure 2-43. It works in almost exactly the same way as the Fuzzy Select tool. The only difference is that the pixels need not be contiguous; this is an advantage if you want to select an area consisting of many small, separate parts that are all approximately the same color. Sometimes, however, unwanted pixels are included in a selection simply because they are similar enough to the target color. Thus, each tool is useful in different circumstances.
) was used in Figure 2-43. It works in almost exactly the same way as the Fuzzy Select tool. The only difference is that the pixels need not be contiguous; this is an advantage if you want to select an area consisting of many small, separate parts that are all approximately the same color. Sometimes, however, unwanted pixels are included in a selection simply because they are similar enough to the target color. Thus, each tool is useful in different circumstances.
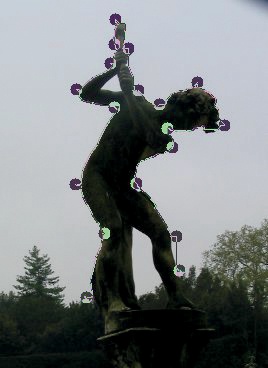
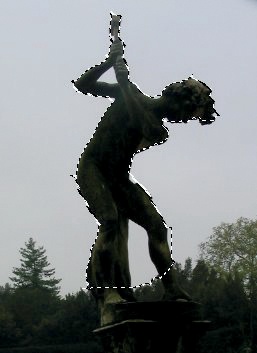
The Scissors Select tool (![]() ) is also known as Intelligent Scissors. As with the Fuzzy Select tool, click along the outline of the target area to make a selection. If the target area is delimited by strong contrasts with the background, then Scissors Select automatically follows the outline, however complicated it may be. Figure 2-49 shows the selection being built. Note that some points may be placed far apart as the selection will follow obvious contours. Figure 2-50 shows the resulting selection, obtained after closing the path and clicking in the center of the selection. In the example selection, we cut off the feet and include the area between the legs of the statue, but we could easily fix that by continuing the initial selection to the base of the statue and then removing the area between the legs using Subtract mode.
) is also known as Intelligent Scissors. As with the Fuzzy Select tool, click along the outline of the target area to make a selection. If the target area is delimited by strong contrasts with the background, then Scissors Select automatically follows the outline, however complicated it may be. Figure 2-49 shows the selection being built. Note that some points may be placed far apart as the selection will follow obvious contours. Figure 2-50 shows the resulting selection, obtained after closing the path and clicking in the center of the selection. In the example selection, we cut off the feet and include the area between the legs of the statue, but we could easily fix that by continuing the initial selection to the base of the statue and then removing the area between the legs using Subtract mode.

The Foreground Select tool is useful in a few specific situations; for instance, when you want to select a subject that’s in the foreground of an image and clearly separate from the background, like in Figure 2-51. Select the Foreground Select tool from the Toolbox and draw an approximate outline around the target, just as you would with the Free Select tool. When the outline is closed, the selected area appears as shown in Figure 2-52.
Without changing the selection tool (or else work done so far will be lost), draw a continuous path within the selection that touches on all of the colors to be included, as shown in Figure 2-53. We used red for the path, but you can choose any color as long as it is different from the colors in the intended selection.


When you stop drawing the path, the selection appears as in Figure 2-54. As you can see, the image is not yet perfect. Some of the face, including the eyes, has been omitted. You can add more brushstrokes to capture the missing areas, or you can press ![]() to surround the selection with marching ants and then click the Quick Mask button to continue editing the selection.
to surround the selection with marching ants and then click the Quick Mask button to continue editing the selection.
The result is shown in Figure 2-55. The unselected areas appear in red. You can continue to edit the selection using the Brush tool. While Quick Mask is on, select the Brush tool from the Toolbox and set the colors to black and white. If we paint in black, the painted pixels are removed from the selection and become red. If we paint in white, the painted pixels are added to the selection. To switch between black and white, use the ![]() key, which exchanges the foreground and background colors.
key, which exchanges the foreground and background colors.

When you’re satisfied, click the Quick Mask button again to reveal the selection, as shown in Figure 2-56.
As we already mentioned, scaling down a photograph, for example, to put it on a website or to print it, reduces sharpness. Therefore, we advise using the Image: Filters > Enhance > Un-sharp Mask at the very end of any transformation process. Ideally, you should do this periodically throughout the transformation process.
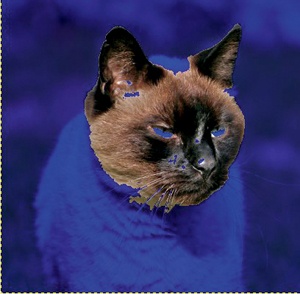
Sometimes reducing the sharpness of areas in a photograph increases the appearance of depth. Consider, for example, Figure 2-57. The cat blends into the background because its colors are similar to those of the rocks behind it, and at least some of the plants are as sharp as the cat itself, if not sharper. What we want to do is to make the background fuzzy so the cat stands out.

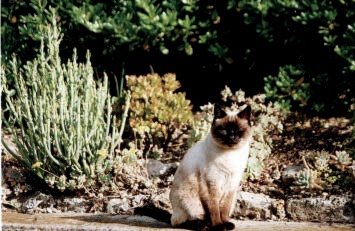
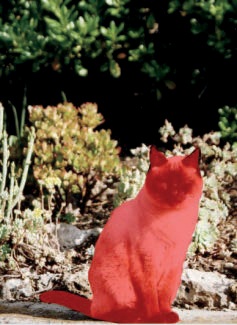
We first select the cat, which isn’t easy. Although the cat is in the foreground, the Foreground Select tool doesn’t work well because the lighter parts of the cat are almost the same color as the background and its dark ears are similar to the shadows in the bushes. To get the result seen in Figure 2-58, we carefully selected the cat using Quick Mask. We found it easiest to select the background, painting the cat in black with Quick Mask to remove it from the selection. The result is not perfect, yet it’s good enough to see the intended effect.
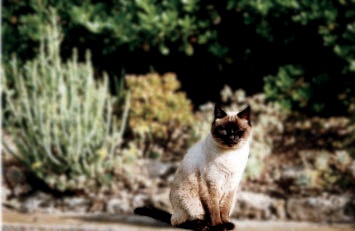
Making the selection was the hardest part. After that was done, we simply had to add a strong Gaussian blur using Image: Filters > Blur, with a radius of 20 pixels, to get the result shown in Figure 2-59. The background is now quite blurred, and the cat stands out.
Modifying the brightness of specific areas in a photo is another way to alter the apparent depth of an image, and it may also increase visibility in a picture with strong contrasts. This is the case for Figure 2-60.
Again, building the selection is the most difficult part. You need to select the window and its contents as well as the parts of the wall that are directly lit by the sun. You can use the Free Select tool for an initial, approximate selection, but then you need to spend time refining it with the Quick Mask tool to get the selection shown in Figure 2-61.

Once we’ve made the selection, we choose the Levels tool. Clicking AUTO won’t change much, but moving the Gamma triangle will accomplish what we want. The result is shown in Figure 2-62.
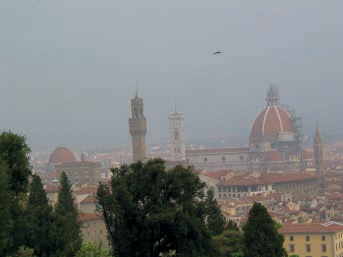
Our next example is a photograph with a number of major defects. As you can see in Figure 2-63, the image is tilted, the lighting is dim, the sky is hazy, and, in general, the image lacks contrast. We will not create a great picture out of this image, but we can at least make some improvements.
First, use the Rotate tool to straighten the image. Because you don’t have an easy way to measure the angle needed, zoom in on the roof of the cathedral, which you know should be horizontal. Select the Rotate tool, and in the tool options, choose a CORRECTIVE direction. Then, align the grid with the roof and press ROTATE. After cropping the resulting image, we get Figure 2-64.


Now let’s select the sky so we can enhance its color. The Fuzzy Select tool is useful, but the boundary between the sky and the town is too blurry. When we make our selection, we get not only the sky but also a fair amount of land near the horizon (see Figure 2-65). Note that we’ve inverted the selection.

Correct the selection using Quick Mask. This process is finicky. The border between the sky and the town requires some care. The bell tower must also be selected by hand by painting in Quick Mask. Handling the scaffoldings on the side of the dome perfectly is virtually impossible. Our final selection is shown in Figure 2-66.
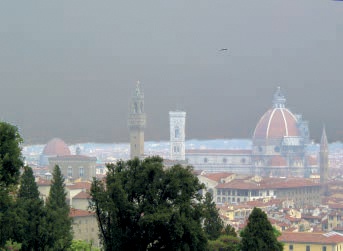
This selection allows us to add some light and color to the foreground, thanks to the Levels tool. Turn off Quick Mask and make sure the foreground, rather than the sky, is selected, and then adjust the levels until you’re satisfied. Our lightened image appears in Figure 2-67. Note that the general contrast could be improved by separating the trees in the foreground from the rest of the picture. Later in this tutorial, we do just that. For now, the results are adequate.

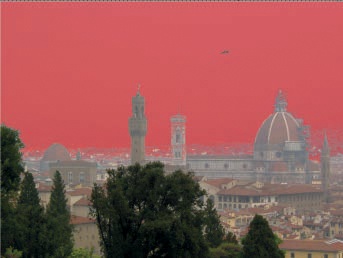
Next you need to invert the selection so it contains the sky. Click the Blend tool and choose the Horizon 1 predefined gradient. Press the ![]() key to draw vertically (pressing this key ensures that the angle of the line is a multiple of 15°). Click in the middle of the sky, and draw downward, past the bottom of the image. If you don’t draw far enough, part of the sky will appear brown. This process should result in Figure 2-68.
key to draw vertically (pressing this key ensures that the angle of the line is a multiple of 15°). Click in the middle of the sky, and draw downward, past the bottom of the image. If you don’t draw far enough, part of the sky will appear brown. This process should result in Figure 2-68.
To complete the corrections and obtain Figure 2-69, do the following:
With the Select by Color tool, select the trees in the foreground.
Invert the selection and choose the Levels tool.
Click the AUTO button. The resulting image has a strong red cast.
Select the Red channel and move the Gamma triangle to the right until you’re satisfied.
The Clone tool is one of the most powerful tools for changing details in a photograph. In this tutorial, we correct one photograph using features from another, more successful shot. Figure 2-70 shows the two images, open in our workspace. In one of the photographs, the red eye effect obscures the cat’s eyes. In this case, the effect is so dramatic that the red eye removal filter didn’t work. To fix the problem, copy the eyes from the first photograph to the second one.
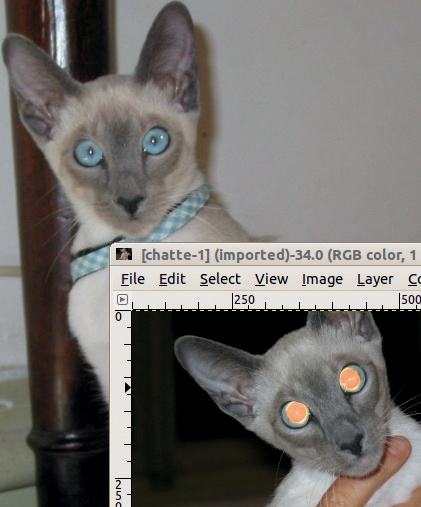
First, you must ensure that the eyes are the same size in both pictures. If this is not the case, change the scaling of the second image, using Image: Image > Scale Image.


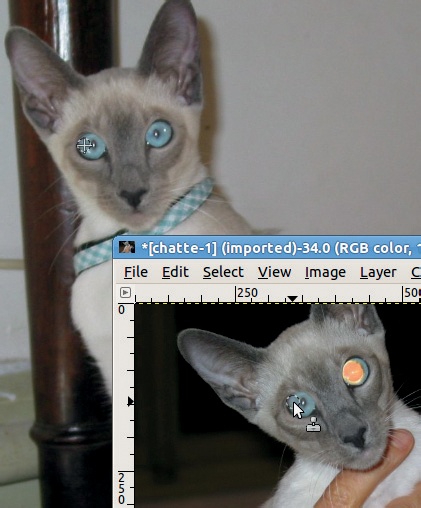
Next, choose the Clone tool (![]() ) with a
) with a Hardness 075 brush scaled to size 20. ![]() -click on a blue source eye and then paint over a red eye with the Clone tool as in Figure 2-71. Figure 2-72 shows the result.
-click on a blue source eye and then paint over a red eye with the Clone tool as in Figure 2-71. Figure 2-72 shows the result.
When taking a portrait, you often capture blemishes and spots that can detract from the subject’s natural beauty. You can remove blemishes in GIMP using the Clone tool, but the Healing tool is generally better when working with portraits. It works exactly like the Clone tool, except that instead of simply replacing target pixels, it blends them, thus blending the source more smoothly with the target. Figure 2-24 is a good example. After using the Healing tool on this portrait (tip and right side of the chin, bridge of the nose, lower lip, area over the eyebrows), we achieved the results shown in Figure 2-73.

Sometimes you may want to clone an object in an image so it appears several times at different distances from the viewer. To get the perspective effect, you need to size the cloned objects appropriately.
The Perspective Clone tool is tailor-made for this effect. Although most people rarely need this particular effect, when you do, the Perspective Clone tool is extremely useful.
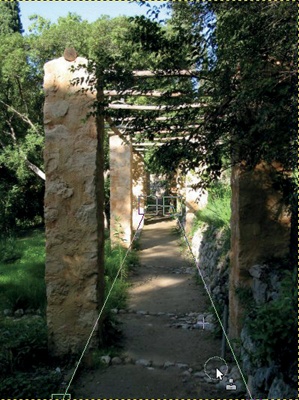
Take, for example, the photograph shown in Figure 2-74. We’ll show you how to duplicate the small cobblestone gutter that crosses the walkway. Select the Perspective Clone tool in the Toolbox (no keyboard shortcut is available). Check MODIFY PERSPECTIVE in the options dialog. Then click in the image. Squares appear in the corners, which you can move to define the perspective of the object that you’re about to clone. Move the squares so the guidelines align with the edges of the walkway.

Once you’ve set the perspective, check PERSPECTIVE CLONE in the options dialog. Now use the tool exactly as you would the Clone tool. First, ![]() -click on the gutter, or whatever you happen to be copying, and then use the
-click on the gutter, or whatever you happen to be copying, and then use the Hardness 075 brush in a large size to paint the area where you want another gutter. Figure 2-75 shows the work in progress, and Figure 2-76 shows the final result. This tool doesn’t work as well when the perspective angle is more dramatic.

In Removing Red Eye, we demonstrated the simplest way to handle red eye: the red eye removal filter. However, other, less automated techniques can yield better results, depending on the image. In Using the Clone Tool, we used the Clone tool to correct red eye using a second image as a source. Here, we demonstrate a few more techniques.
A rather challenging case of red eye can be seen in Figure 2-77. The red is very apparent, but not much contrast is available at the border between the gray iris and the red pupil. Zoom the image to 400% so the left eye is as large as possible. Use Image: View > New View to simultaneously view the same image at 100% zoom to better preview the final image as you work.
Select the Dodge/Burn tool (![]() ) and press the BURN button. Choose the
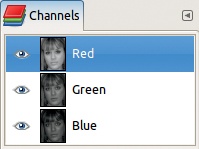
) and press the BURN button. Choose the Hardness 075 brush and set its size to 12. Finally, in the Channels dialog, click the Green and Blue channels to deselect them. All three channels remain visible, but the tool will change only the Red channel (see Figure 2-78).
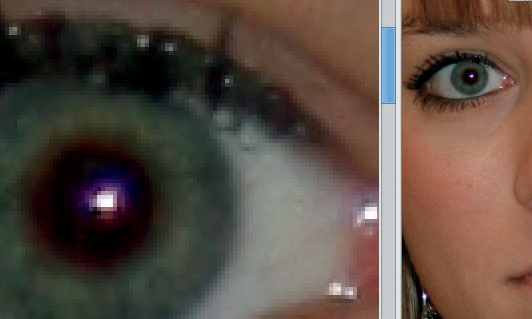
Now burn away the red spot. Click and/or paint the pupil with the Burn tool, taking care to avoid the bright reflection in the center of each pupil. As Figure 2-79 shows, you can check your work on the image at 100% zoom. Adjust the EXPOSURE in the tool options if the effect is too strong or too weak. The final result appears in Figure 2-80.
As the heading indicates, this next method requires that you select the red areas in the eyes. You can do this with the Free Select tool if you zoom in far enough, but in this case, the Ellipse Select tool actually works best.
Select it by pressing (![]() ). In the options, check the boxes EXPAND FROM CENTER and FIXED. Set the FIXED option to ASPECT RATIO, and check that the box below displays “1:1.” Click and drag from the center of the red spot to build a circle around it. When you’re satisfied with the selection, choose the Add mode under options and build a second circle for the other eye.
). In the options, check the boxes EXPAND FROM CENTER and FIXED. Set the FIXED option to ASPECT RATIO, and check that the box below displays “1:1.” Click and drag from the center of the red spot to build a circle around it. When you’re satisfied with the selection, choose the Add mode under options and build a second circle for the other eye.
When you’re finished, hide the selection (![]() ) and return the zoom to 100%. The color adjustment is made with Image: Colors > Hue-Saturation. Move the Hue cursor until you like the result. After selecting the red in the eyes, you could also use Image: Colors > Desaturate to remove the color. This doesn’t always work as well, but it did this time. If the image is too light, you may find it helpful to first use Image: Colors > Invert.
) and return the zoom to 100%. The color adjustment is made with Image: Colors > Hue-Saturation. Move the Hue cursor until you like the result. After selecting the red in the eyes, you could also use Image: Colors > Desaturate to remove the color. This doesn’t always work as well, but it did this time. If the image is too light, you may find it helpful to first use Image: Colors > Invert.
Next, we show you a safer way to handle red eye. Beginning with the red spots selected, try the following.
Duplicate the only layer. In the upper layer, create a layer mask: Layers: right-click > Add Layer Mask. Check SELECTION in the dialog that appears.
Select the upper layer by clicking the thumbnail. You should see a white border around the layer, rather than the mask, in the Layers dialog. With the mask in place, any change done to the upper layer will effect only the red spots. The lower layer will remain unchanged.
Now adjust the color of the red spots. Try Image: Colors > Desaturate and then Image: Colors > Brightness-Contrast. You may also find it useful to apply a slight Gaussian blur (Image: Filters > Blur > Gaussian Blur with a radius of 1 or 2 pixels).

In landscape photography, the appearance of the sky is very important. Unfortunately, capturing a beautiful sky can be challenging. In this chapter, you’ve seen several unsatisfying skies: one that was too pale (Figure 2-7), one that was too white (Figure 2-15), and one that was too hazy and gloomy (Figure 2-63). A dark blue sky over a mountain landscape on a clear, sunny day is a bit better, but a simple, uniform dark blue isn’t very interesting. A dark blue sky with a few well-placed clouds, however, adds just the right effect.
We generally find it’s impractical to wait around until the landscape that we want to capture has a perfect blue sky with fluffy white clouds. We show you how you can add a perfect sky to a landscape photograph that’s lacking in that department. We already showed you one way to do this (see Figure 2-69), but using a predefined gradient is not really an ideal solution. Here, we try another technique, demonstrated on Figure 2-81 using the sky from Figure 2-82.
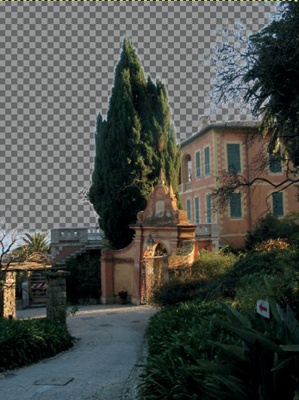
To begin, select the sky with the Select by Color tool (![]() ). This requires just one click in the center of the sky, followed by one or two in the corners as you press the
). This requires just one click in the center of the sky, followed by one or two in the corners as you press the ![]() key. Next, add an Alpha channel to the only layer (Layers: right-click > Add Alpha Channel). Cut out the selection (
key. Next, add an Alpha channel to the only layer (Layers: right-click > Add Alpha Channel). Cut out the selection (![]() ) to get Figure 2-83.
) to get Figure 2-83.
In this figure, you can see that the selection made using the Select by Color tool isn’t very precise. A blue halo remains around the cypress in the center of the image, as well as in the branches on the right. To correct this, undo the cut (![]() ) and use Image: Select > Grow, which extends the selection by a fixed number of pixels. Choose 2 pixels. Next, use Image: Select > Feather, which smooths the selection outline, and again choose 2. Now, add an Alpha channel to the layer if its name appears in boldface, and cut out the selection. The result is much better, as you can see in Figure 2-84.
) and use Image: Select > Grow, which extends the selection by a fixed number of pixels. Choose 2 pixels. Next, use Image: Select > Feather, which smooths the selection outline, and again choose 2. Now, add an Alpha channel to the layer if its name appears in boldface, and cut out the selection. The result is much better, as you can see in Figure 2-84.


Now you need to place the sky from Figure 2-82 as a bottom layer in the image. A simple solution is to open this image in GIMP and, while it is active, drag the thumbnail of its only layer from the Layers dialog to the image you are working on. Then drag this new layer to the bottom of the layer stack, as shown in Figure 2-85.
Once the sky layer is added, you can change the composition by repositioning the layer with the move tool (![]() ). This process works best when the sky image is larger than the landscape image, which gives you some latitude when choosing the composition. A possible final result appears in Figure 2-86. To further improve this landscape, we used the Eraser tool (
). This process works best when the sky image is larger than the landscape image, which gives you some latitude when choosing the composition. A possible final result appears in Figure 2-86. To further improve this landscape, we used the Eraser tool (![]() ) to remove some spindly little branches from the tree on the right. You could also hide a few other unattractive details using the Clone tool.
) to remove some spindly little branches from the tree on the right. You could also hide a few other unattractive details using the Clone tool.
