
Most photographs can be improved with digital processing, but finding a single photograph with every possible defect is difficult. Therefore, we’ll have to demonstrate the many useful photo-correction techniques you can do with GIMP on several different sample photographs.
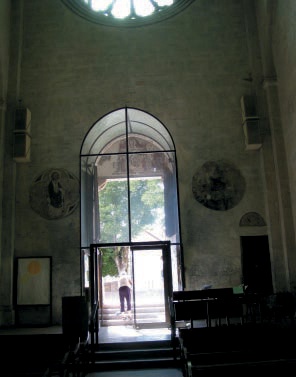
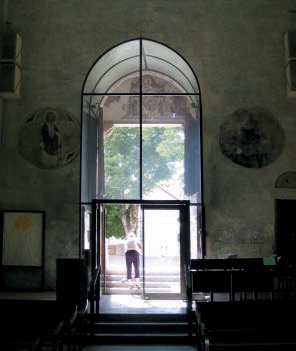
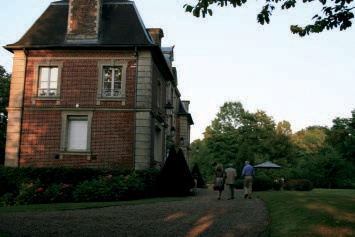
The photograph shown in Figure 2-1 needs to be cropped and straightened. We then need to restore the perspective. This image could also use some lighting correction to enhance visibility inside the church. First, however, we’ll straighten out the picture. To do this, we determine the rotation angle and then use the Rotate tool to level the image.
The rotation angle can be measured with the Measure tool (![]() ). In its options dialog, check the USE INFO WINDOW box. A good place to measure the angle is along the window frame. Zoom into the image and position it in the Image window so the top of the frame occupies the width of the Image window. To zoom, click the menu at the bottom of the Image window and select 100%. To reposition the image, use the crossed arrows in the bottom-right corner of the Image window. You can also reposition an image by holding down the
). In its options dialog, check the USE INFO WINDOW box. A good place to measure the angle is along the window frame. Zoom into the image and position it in the Image window so the top of the frame occupies the width of the Image window. To zoom, click the menu at the bottom of the Image window and select 100%. To reposition the image, use the crossed arrows in the bottom-right corner of the Image window. You can also reposition an image by holding down the ![]() key and moving the mouse or by using the scroll wheel on your mouse. The scroll wheel moves the image vertically, by default, or horizontally if you press
key and moving the mouse or by using the scroll wheel on your mouse. The scroll wheel moves the image vertically, by default, or horizontally if you press ![]() . Pressing
. Pressing ![]() while using the scroll wheel allows you to zoom in or out.
while using the scroll wheel allows you to zoom in or out.
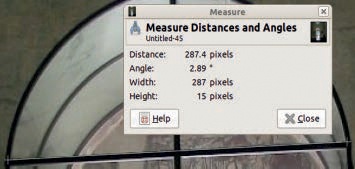
Once you have the image in view, using the Measure tool, click and hold on to the top-left corner of the frame. While pressing the mouse button, drag the cursor to the top-right corner of the frame. Figure 2-2 shows the two crosses that mark the measured distance, as well as the measured angle, which is 2.89°.
Now we’ll rotate the image so the frame is level. Choose the Rotate tool (![]() ) and click the image. In the dialog that appears, set the angle to 2.89 (see Figure 2-3). The center of rotation appears as a circle in the bottom of the figure (the center of the image). In the options dialog for the Rotate tool, PREVIEW has been set to IMAGE+GRID. Click ROTATE: The frame should now be horizontal.
) and click the image. In the dialog that appears, set the angle to 2.89 (see Figure 2-3). The center of rotation appears as a circle in the bottom of the figure (the center of the image). In the options dialog for the Rotate tool, PREVIEW has been set to IMAGE+GRID. Click ROTATE: The frame should now be horizontal.
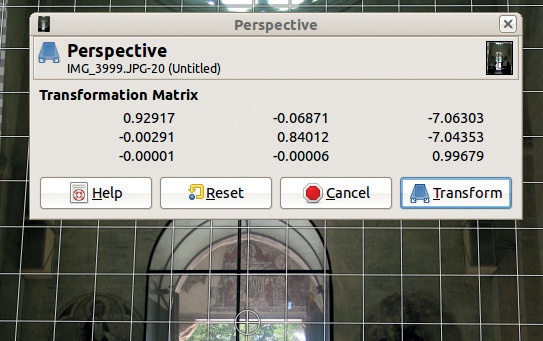
For the next transformation, we’ll use the Perspective tool (![]() ). Again, select the IMAGE+GRID PREVIEW option in the tool’s options dialog, and then click anywhere on the image. You cannot set the angle or dimension directly. Instead, you must click and drag in the image to warp the perspective. The grid provides a helpful frame of reference. Figure 2-4 shows the warping process. When you’re satisfied with the perspective, click TRANSFORM.
). Again, select the IMAGE+GRID PREVIEW option in the tool’s options dialog, and then click anywhere on the image. You cannot set the angle or dimension directly. Instead, you must click and drag in the image to warp the perspective. The grid provides a helpful frame of reference. Figure 2-4 shows the warping process. When you’re satisfied with the perspective, click TRANSFORM.

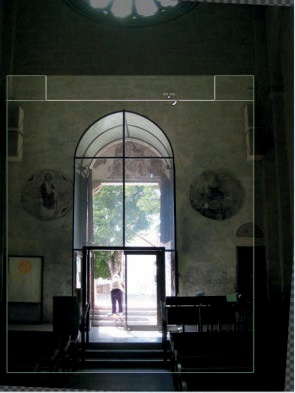
Next we’ll crop the image. Because the doorway was our intended subject, we want to shear off the top of the picture. To do this, use the Crop tool (![]() ). First, select the area that you want to keep, as shown in Figure 2-5. You can modify the area by clicking and dragging the sides or the corners of your selection. When you’re satisfied, click in the selected area or press
). First, select the area that you want to keep, as shown in Figure 2-5. You can modify the area by clicking and dragging the sides or the corners of your selection. When you’re satisfied, click in the selected area or press ![]() . The result appears in Figure 2-6.
. The result appears in Figure 2-6.
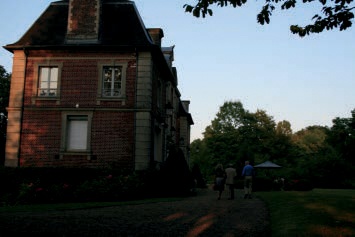
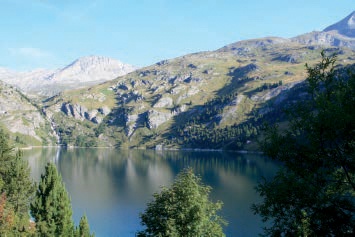
A good digital camera should always set a correct exposure. But what is the correct exposure for a scene with strong contrast? In Figure 2-7, for example, the photographer chose to point the camera at the sky, and thus the house is much too dark. Adjusting this in GIMP is fairly easy.
First select the sky. Because a disconnected bit of sky appears to the left of the building, the best tool to use is the Select by Color tool (![]() ). Clicking anywhere on the sky selects part of it, which you see now inside the marching ants (i.e., the moving dashes that follow the border of the selected area). To augment this selection, press
). Clicking anywhere on the sky selects part of it, which you see now inside the marching ants (i.e., the moving dashes that follow the border of the selected area). To augment this selection, press ![]() and continue to click in areas of sky that are not selected, especially around the corners of the image and near the trees in the center of the photograph. Figure 2-8 shows the sky correctly selected. In this case, you don’t need to refine the selection. In more difficult cases, you can use Quick Mask to refine your selection (see Making a Selection).
and continue to click in areas of sky that are not selected, especially around the corners of the image and near the trees in the center of the photograph. Figure 2-8 shows the sky correctly selected. In this case, you don’t need to refine the selection. In more difficult cases, you can use Quick Mask to refine your selection (see Making a Selection).
You’ve selected the sky, but what you really want is to select everything but the sky. Therefore, invert the selection (![]() ). Hide the marching ants with
). Hide the marching ants with ![]() to see the result more clearly, and then open the Image: Colors > Levels tool. Leave the color balance as it is, at least for now, and work only on the Value channel.
to see the result more clearly, and then open the Image: Colors > Levels tool. Leave the color balance as it is, at least for now, and work only on the Value channel.
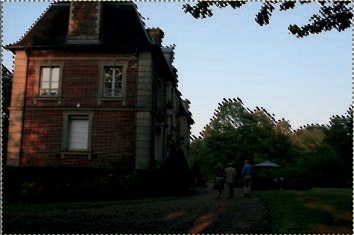
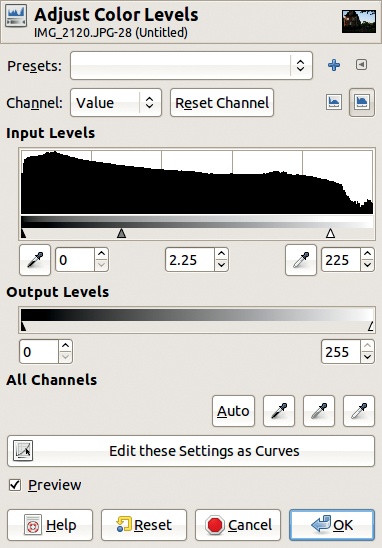
To better see the Input Levels histogram, select Logarithmic by clicking the button on the top right of the dialog, on the same line as CHANNEL. Move the rightmost white triangle under the histogram until it points to the first peak, as shown in Figure 2-9. The modification is too subtle, so also change the Gamma cursor. Move the middle, gray triangle to the left until you are satisfied with the result. The setting shown in Figure 2-9 yields the result shown in Figure 2-10. In Chapter 7 and Chapter 12, we introduce techniques that you could use to further improve this photograph. Similarly, the edited image shown in Figure 2-6 could benefit from additional exposure correction, but the techniques required are beyond the scope of this tutorial.

You can use another, simpler method to brighten an underexposed photograph. This technique doesn’t always work, but it may at least yield interesting results. Open the photograph from Figure 2-7 in GIMP, and immediately duplicate the only layer. You can do this in many ways:
Finally, at the top of the Layers dialog, change the MODE to Screen mode and adjust the opacity of this layer. The result appears in Figure 2-11. You can also combine the two methods if you aren’t satisfied with the results of either one.
As with exposure, even a very good digital camera may produce a photograph with a color cast. A number of factors, including user error, can lead to color cast in a photograph. Figure 2-12 shows a photograph with a blue cast. If you don’t like how that looks, here’s a tool you can use to correct it.

To correct the color cast, use the Levels tool again. Click Image: Colors > Levels to get started. Figure 2-13 shows the Levels dialog. Select the Blue channel. To adjust the input levels, move the black (leftmost) triangle slightly to the right to extend the blue color range, and then move the gray (central) triangle to the right until you are satisfied with the color cast reduction. Leaving the PREVIEW box checked lets you see the effect of these changes without committing to them. If you’re still not satisfied with the color balance, try making corrections in the other two channels. Figure 2-14 shows the photograph with color corrections applied.

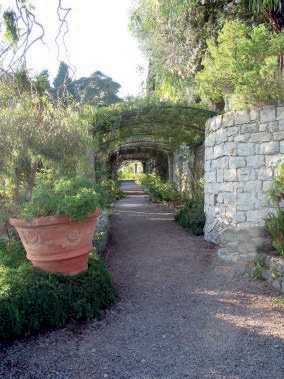
So far we’ve focused on ways to improve the overall quality of an image without actually altering the content. In this section, we show you how to remove an eyesore, in this case, a garbage can that pollutes the entrance to the pergola shown in Figure 2-15. Removing the unwanted obstruction is easy, thanks to the Clone tool. Select it by pressing the letter C on your keyboard. In the tool’s options dialog, reset all the options to their default values using the yellow arrow in the bottom-right corner of the dialog. Choose the Hardness 075 brush, and set its diameter to 76 pixels. Zoom in to enlarge the garbage container and place it in the center of the window. Now, “paint” over the unwanted container by cloning the surrounding scenery:
Figure 2-16 shows this process. The source point isn’t fixed; it’s relative. As you paint, the source point moves in the same way that your brush moves, which allows you to paint over a large area with a single ![]() click. However, in this example, changing the source point from time to time is still necessary, especially when erasing the bin supports.
click. However, in this example, changing the source point from time to time is still necessary, especially when erasing the bin supports.

With GIMP’s handy Clone tool, you are able to erase that ugly bin in a few seconds. Figure 2-17 shows the final image, after improving the lighting using the technique described in Correcting Exposure.
You might assume that if you use the ideal settings and select a high resolution, then you’ll be able to take sharp photographs with your digital camera. That’s not always the case, however, for several reasons. One reason is that the resolution of files that the camera can store is actually larger than the resolution of its sensors. In this case, the image you get is the result of an interpolation. The same thing happens when you use a scanner to create a digital image from a print. Any digitalized image can, therefore, benefit from the adjustments that we show you in this section. It’s important to note that you should make the following corrections during the final steps of image production, after you’ve made any adjustments to the image’s resolution.

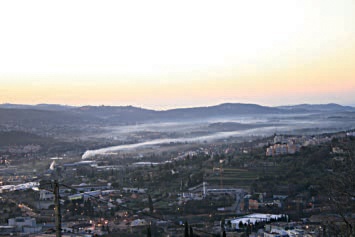
This phenomenon, motion blur, and the haze of smoke drifting across the landscape contribute to the fuzziness of our example image, shown in Figure 2-18.
Select the filter Image: Filters > Enhance > Unsharp Mask. Despite its name, this filter is an excellent tool for improving sharpness. The dialog shown in Figure 2-19 appears. Play around with the parameters. You can see the effect of your adjustments in the Preview window. When you’re satisfied, click OK. Our sharpened image is shown in Figure 2-20.
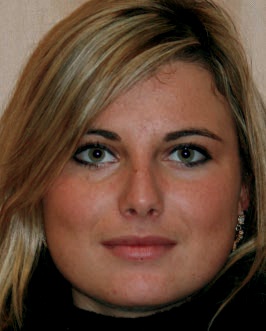
The red eye phenomenon is well known: When you take a portrait using a flash, the flash lights up the back of the eye, which appears red, at least for humans. This effect is most apparent when the subject is looking straight at the photographer and when the ambient light is dim, causing the pupils of the subject’s eyes to widen. To avoid red eye, most cameras have a very short preflash, which dazzles the subject’s eyes and causes her pupils to contract. If the pupil is small, the back of the eye is no longer visible. This doesn’t always work, however. Moreover, narrow pupils can make the subject look less attractive. Correcting the problem with GIMP may, therefore, be a better solution. Figure 2-21 is a good example of the red eye phenomenon.


GIMP has several techniques that you can use to correct red eye. We describe some of them in More Correction Methods for Red Eye. Here, we use the simplest one—the specialized filter: Select Image: Filters > Enhance > Red Eye Removal. If you select this filter without any preparation, the dialog appears with this message: “Manually selecting the eyes may improve the results.” If you ignore the message and click OK, the filter modifies the colors in places you didn’t intend, such as the lips of the model.
To avoid unintended color modifications, you need to select the eyes before applying the filter. Do this with the Free Select tool (![]() ). For the first eye, draw an imprecise outline that includes the whole iris. To include the second eye in the same selection, press and hold
). For the first eye, draw an imprecise outline that includes the whole iris. To include the second eye in the same selection, press and hold ![]() as you roughly outline the other eye. You can see the completed selection in Figure 2-22.
as you roughly outline the other eye. You can see the completed selection in Figure 2-22.
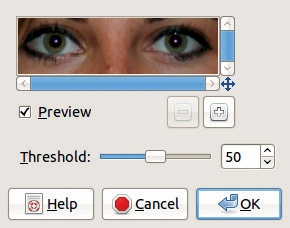
Now select the Red Eye Removal filter, which brings up the dialog shown in Figure 2-23. You no longer see a warning, and the preview looks good with the current settings. Click OK. The final image is shown in Figure 2-24.