Altering the Tools Palette
If you look in the Scripts/tool folder where Anime Studio is installed, you’ll find a simple text file named _tool_list.txt. This file controls the sections, names, colors, and keyboard shortcuts of all the tools found in the Tools palette.
If you edit this file, you can change the tool positions and colors, add or alter the keyboard shortcuts for each tool, and even add new tools to the Tools palette.
Caution
The _tool_list.txt file is a system file used by Anime Studio to create the Tools palette. If you make a mistake and delete some of the data from this file, the Tools palette may become corrupted and not work properly.
Tip
Before you change the _tool_list.txt file, create a backup of the original file and name it something like _tool_list_backup.txt so that you can revert to the original file if you need to.
Note
You will need to restart Anime Studio before you can see any changes made to the Tools palette.
Changing Keyboard Shortcuts in the Tools Palette
When you first look at the _tool_list.txt file shown in Figure 36.1, you’ll see that the file is divided into groups that hold tools and buttons.

Within each group are lines for each tool that include its type, the script name, and a keyboard shortcut. To change the keyboard shortcuts for the Tools palette, you simply need to change the letters in this file. If a tool has no shortcut, then it simply has three periods in a row. If you replace these periods with a letter, the tool will have the designated letter as its new shortcut.
Tip
If you change the keyboard shortcut for a tool, be sure that the new shortcut you are using isn’t used elsewhere. If two tools share the same keyboard shortcut, then the shortcut automatically defaults to the first tool on the list with that shortcut.
To change the keyboard shortcuts for tools, follow these steps:
1. | Open the Scripts/tool folder in which Anime Studio is installed. This folder includes a single text file, several Lua script files, and several .PNG icon files. |
2. | Locate and double-click the _tool_list.txt file to open it within a text editor. |
3. | Locate and replace the letter A found to the right of the lm_add_point text with the letter Q. Then locate and replace the three dots to the right of the lm_arrow text with the letter A. |
4. | Save the file and restart Anime Studio. The keyboard shortcuts for these two tools have been changed. |
5. | Move the mouse cursor over the Arrows and the Add Points tools and notice that the keyboard shortcut has changed. Select a vector layer and press the A key to see the Arrows tool highlighted and the Q key to see the Add Points tool highlighted. |
The keyboard shortcuts in the Tools palette are designed to use only single letters and digits. Entering more than a single letter or digit will cause the shortcut to be ignored.
Changing Group Names in the Tools Palette
Each tool section in the Tools palette is denoted in the _tool_list.txt file as a group followed by a localization string and a name. If you change the group name variable and its name (located to the right of equal sign), then the new name is displayed in the Tools palette. For example, if you change the text group MOHO.Localize (“/Tools/Group/Draw=Draw”) to group MOHO Localize (“/Tools/Group/Draw1=Draw_Cool”), then the section name of Draw is changed to Draw_Cool. If the text is too long, it will be truncated on either end. Figure 36.2 shows my updated Tools palette with unique tool group names.
Figure 36.2. New tool group names on the Tools palette.

Tip
Avoid changing the localization string.
Creating a New Group in the Tools Palette
If you copy and paste a group name to the bottom of the _tool_list.txt file, then a new section will be added to the Tools palette. This new section can hold any of the existing tools or any new tools that you add to the tool folder. If you’ve scripted a new set of scripts, you can add them to the Tools palette by simply adding a type and referencing the script name. If you add a keyboard shortcut to the right of the script name, then the shortcut will be used. Figure 36.3 shows a new section added to the bottom of the Tools palette that contains only selection tools.
Figure 36.3. The Tools palette with a new group of selection tools at bottom.

Tip
Rather than typing in the new group and script names, it is easier to simply copy and alter an existing group and script. By doing this, you can be sure the formatting will be consistent with what Anime Studio expects.
The keyword to the left of the script name is used to designate the icon type. The default Tools palette recognizes three icon types:
Tool: Displays the default icon and allows the icon to be selected. The selected icon is highlighted in yellow.
Button: Displays the icon that is executed immediately when clicked.
Spacer: Leaves an open space instead of an icon.
The Tools palette is set up to have a width of four icons across. Even if you remove the extra row in the _tool_list.txt file, the icons will still be displayed in order using a four icon width.
Adding a New Tool to the Tools Palette
All scripts added to the Scripts/tool folder are displayed in the Tools palette somewhere. If they are referenced in the _tool_list.txt file, they’ll appear within the designated group, but if they are not included within any of the groups, then they automatically appear in the Other category. For example, if you delete the _tool_list.txt file from the Scripts/tool folder, then the groups are deleted and all scripts are placed within the Other category alphabetically, as shown in Figure 36.4.
Figure 36.4. Unreferenced scripts are automatically placed in the Other section.

If a Lua script is added to the Scripts/tool folder, then the script automatically appears in the Other section of the Tools palette. But if the new script doesn’t have any associated icon, it simply appears with a default question mark icon, as shown in the bottom row of the palette in Figure 36.5.
Figure 36.5. Scripts with no icons are shown as question marks.

Tip
Only certain types of scripts can work in the Tools palette. To learn how to create new tool scripts, see Chapter 37, “Using Scripts and Lua.”
To create a new icon for a custom tool script, simply select and edit one of the existing PNG icon images and then save the new icon with the same name as the tool script that it represents. New icons should be 24 pixels by 20 pixels.
Tip
If you make the background of the PNG icon image transparent, the specified group color will show through when viewed in the Tools palette.
To create a custom icon for the Tools palette, follow these steps:
1. | Copy the completed tool script into the Scripts/tool folder. |
2. | Open one of the PNG icon image files within an image-editing application. Create a new icon using the same dimensions as the existing file. Rename the edited PNG image file to be the same name as the tool script and save the file in the Script/tool folder. |
3. | Open the _tool_list.txt file found in the Scripts/tool folder and copy the first group definition along with one of the icon definitions. Paste the copied text to the bottom of the file. Edit the group name to be the new section name that will hold the new script and change the referenced icon name to match the new tool script name. |
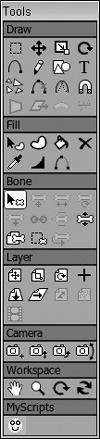
4. | Save the file and restart Anime Studio. With this change, the new group and the new icon should appear in the Tools palette in the My Scripts section, as shown in Figure 36.6. Figure 36.6. A new tool and group have been added to the Tools palette in the My Scripts section.
|