
Understanding Keyframes
A keyframe captures the state of the scene at the current frame. Keyframes will only work if two or more keyframes exist and if there is a difference between the two states. For example, suppose a key is set for a circle shape at frame 1, where the shape is located near the left edge of the working area, and then at frame 11 another key is set for the same circle that has the shape positioned over near the right edge of the working area. When the scene is animated, the circle will gradually move from its starting position in frame 1 to its ending position in frame 11. At frame 2, the circle will move 1/10 of the way toward the end position at frame 11, which is where the second key is located. With each successive frame, the circle will move closer to its end position.
In addition to the shape’s position, you can also set keys for the shape’s rotation and scale transformations. Keys can also be set for properties such as a shape’s line width, and even changing colors and the movement of bones can be animated over time.
The speed of an object’s movement or the rate that an object’s property changes depends on the distance between the adjacent keys. If an object moves across the working area over 20 frames with keys set at frame 1 and frame 21, then the same object will move twice as fast if the same keys are positioned at frame 1 and frame 11.
All animated actions can be broken down into a series of keyframes. The trick is to divide the motion into a series of small key positions. For example, consider a wheel rolling across the scene. If you create two position keys, the wheel will move the correct distance, but to improve the animation, you should also create keys that make the wheel rotate as it is moving across the scene. By combining different transformations, you can create complex motions.
All keys created in Anime Studio appear in the Timeline palette. From there, you can move, scale, copy, and paste them between frames. (More detailed information on using the Timeline palette is covered in Chapter 17.)
There are several different types of objects that can be animated in Anime Studio and the software distinguishes between these different types. Anime Studio classifies animated objects into the following groups:
Point Motion: Allows individual points to be moved. It gives you the most flexibility and is the simplest type of motion, but it can be time consuming if you need to move a lot of points.
Bone Animation: Allows multiple points to be animated at once using a bone construct.
Morphing: Defines several different morph targets and blends between these morph targets to move between the different states.
Layer Animation: Transforms the entire layer.
Using Point Motion
Perhaps the simplest animation method is to move individual points. This type of animation is good for making small tweaks to an existing animation, but if an animation requires a lot of points to move, this method may not be the most efficient.
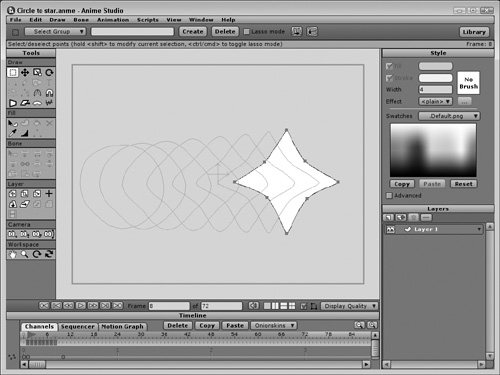
Point motion also makes it possible to convert one shape into another. For example, if you take a standard circle and gradually move the points on the circle to create a star, the shape of the object has changed, with a start shape and an end shape, as shown in Figure 16.1. The process of changing a shape is accomplished by using keys, but the entire process is called tweening because all the intermediate steps are automatically computed as “in-between” steps.
Note
Creating tweens in Anime Studio is automatic—you simply need to move the object’s points. This is quite different from creating tweens in other packages like Flash, which requires that you select two keyframes and choose a Tween command.
Using Bone Animation
Another common animation method is to animate objects by moving their bones. Bones are underlying linked structures that have influence over the surrounding points. By moving the bones, the points move along with them. Bones are an efficient way to move multiple points. Setting up bones and working with them is covered in Chapter 26, “Creating and Binding Bones.”
Morph Animation
Anime Studio Pro lets you define morph targets and once several morph targets are defined, you can blend between these targets to create a range of new motions. Morphing is often used to create subtle changes, such as facial animations. Morphing is covered in Chapter 21, “Morphing Objects and Using Actions.”
Using Layer Animation
More generalized animations can be accomplished by moving layers between frames. This method moves every object on the current layer and is much more efficient than moving all the individual points contained on a layer. For example, if you use bones to create an animation of a character walking down the sidewalk, you could use layer animation to slowly move the background layer to the side to emphasize the movement of the walking character.