
Drawing Freehand Curves
If you are tired of all these various buttons and you just want to doodle, then click the Freehand tool (F) (which looks like pencil) and you can draw curves by dragging in the working area, as shown in Figure 9.2. The drawn line and its points appear as you draw if the Show Paths checkbox at the bottom edge of the working area is enabled. If the Show Paths checkbox is disabled, then nothing appears as you draw, but when you release the mouse button, the line appears. The number of points that are created depends on the Freehand options you have selected. The available options for this and all tools are shown in the Options bar located beneath the menus.

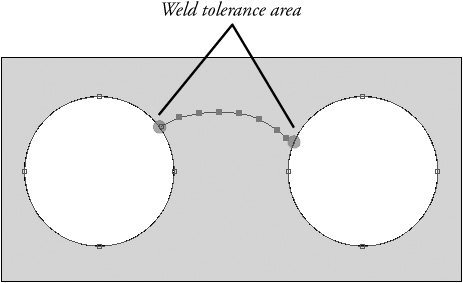
In the Options bar are several options that apply to freehand-drawn curves. The Auto-Weld option causes the endpoint of a drawn curve to be welded automatically to a curve or to a point that is within the tolerance area surrounding the endpoint. The tolerance area is highlighted as a light red circle, as shown in Figure 9.3. Holding down the Alt/Opt key when releasing the mouse button causes the Auto-Weld option to be ignored.
Figure 9.3. The weld tolerance area.
When Auto-Fill is enabled, the closed shape is automatically filled using the color and style defined in the Style palette. This only occurs when a closed shape is drawn. You can create a closed shape by enabling the Auto-Weld option and connecting the endpoint to the start point or by enabling the Auto-Close option.
The Auto-Stroke option automatically applies current stroke settings of color, width, and effect to the drawn curve. If this option is disabled, the new curve is drawn with a single pixel-width black line. The default lines are called paths. They can be made into a shape and rendered if you apply an stroke to them, but paths by themselves are not rendered.
The Auto-Close option automatically connects the last point to the first using a straight line to create a closed shape. The Auto-Weld option is disabled when the Auto-Close option is enabled.
Simplifying Freehand Curves
In addition to the checkbox options, the Freehand tool also includes a pop-up palette of options that you can access. The Freehand Options palette, shown in Figure 9.4, appears when you click the Freehand Options button in the Options bar.
Figure 9.4. Freehand options are shown here.

Tip
If you find that the Freehand tool is too sensitive, then try setting the Pixel Tolerance to 14 and the Angle Tolerance to 18.
The Pixel Tolerance is used to determine how close together adjacent points are to each other, which means the minimum distance in pixels between points. Higher pixel tolerance values result in curves that lose all their details, but lower values yield many points that run together. A value between 12 and 15 is a good place to start. If you need more detail, then lower the value, and if you are still getting too many points, then increase the value. The minimum Pixel Tolerance value is 2.
Note
The Freehand options are only applied to curves that are drawn after the settings are made and cannot be applied to existing paths.
Figure 9.5 shows three freehand lightning bolts. The left bolt was drawn with a Pixel Tolerance value of 2. Notice how the points are stacked on top of one another. The middle bolt has a Pixel Tolerance value of 10, which simplifies the points almost too much, and the right bolt has a Pixel Tolerance value of 20, making the bolt lose almost all its details.

Note
Since the Pixel Tolerance value is based on pixels, you’ll get a different density of points if you zoom way in on the working area rather than if you zoomed out.
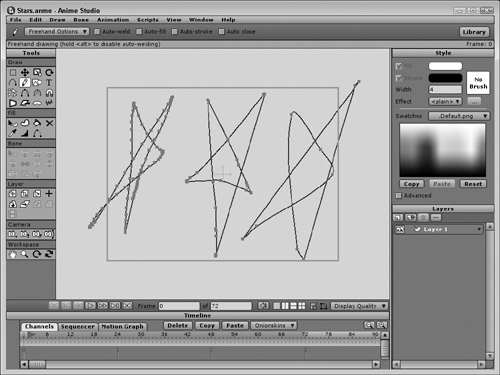
The Angle Tolerance value simplifies curves by removing points that deviate from the drawn curve by less than the designated angle. Setting the Angle Tolerance value to 0 results in no points being removed. This captures every subtle point, but a high Angle Tolerance value will remove all details from a drawn curve. The maximum allowed Angle Tolerance value is 30. Figure 9.6 shows three freehand stars. The left star has an Angle Tolerance of 0, which makes a large number of points visible. The middle star has an Angle Tolerance of 10, allowing a fair number of points, and the right star has an Angle Tolerance of 30, making the resulting curve very round and smooth with few points.
Tip
Keep in mind as you draw that more points means more memory, which is compounded as the object is animated frame over frame. Using the fewest number of points to create an object is a good practice.
The Variable Line Width settings include options to have the line thickness vary with the pen pressure of a graphics tablet or to randomly vary up to the designated Width Variation percentage. Figure 9.7 shows a simple arrow drawn with the Freehand tool (F) with the Random Variable Line Width option enabled.

Note
If you draw a curve with the Variable Line Width options enabled, the line width will only appear in the working area if the Auto-Stroke option is enabled. If the Auto-Stroke option is disabled, the variable line width is still retained, but it only appears when a stroke is added to the curve. Strokes are also only visible in the working area if the Strokes option in the Display Quality pop-up menu is enabled.
The Taper options set the beginning or end of a line to taper gradually. These options can be used with or without the Variable Line Width options. If the variable line width is set to None and the Taper options are enabled, then the line thickness will gradually increase to the maximum Line Width value, as set in the Style palette, and then gradually taper back to 0 at the end of the curve, as shown in Figure 9.8.

The Reset button at the bottom of the Freehand Options palette sets all the options to their default values.
Randomizing Line Width
When drawing a line using the Freehand tool, the settings specified in the Options pop-up palette are used. If these settings are incorrect, then you’ll need to redraw the line. But the Draw menu includes a couple of commands that you can use to reset the line thickness or randomize the line width.
New Feature
The Random Line Width and Reset Line Width menu commands are new in Anime Studio 6.
You can make the line width for the selected line random using the Draw, Random Line Width (Ctrl/Cmd+D) menu. This opens a simple dialog box where you can set the Minimum and Maximum Width values. This is applied immediately to only the selected points.
To remove the random line width, simply select the Draw, Reset Line Width (Ctrl/Cmd+L) menu. This command resets the selected points to the Width setting that was set when the line was drawn. It also removes any taper effect on the curve.
Note
The Random Line Width and Reset Line Width menu commands are only available in Anime Studio Pro.
Drawing with a Graphics Tablet
Anime Studio supports drawing with a graphics tablet using the Freehand tool. Several different types of graphic tablets are available, but the most common type are tablets that use a pen stylus. Wacom makes several different size graphic tablets ranging from the budget-conscious 4-inch-by-9-inch version to the professional level 12-by-19 version. Most can connect directly using the USB port and others are wireless, allowing you to draw from across the room. You can find more information about Wacom graphic tablets at www.wacom.com.
One of the benefits of using a graphics tablet is that the pen can sense the amount of pressure you are applying to the tablet. This pressure can be used to alter the line width of the freehand curve simulating the result of drawing with an actual pen or pencil.