
Using the Layer Tools
The fourth section in the Tools palette includes various tools for working with layers. These tools move, scale, rotate, shear, and flip the selected layer or layers. These tools are especially handy when you are animating objects. For example, if you have a character walking on one layer, you could easily create the illusion of walking by slowly moving the background layer to the side as the character walks.
Figure 4.20 shows the various Layer tools and each tool is described below.
Figure 4.20. Layer tools.

Translate Layer (1): This tool moves the entire layer or layers by simply dragging in the working area.
Scale Layer (2): This tool scales the entire layer or layers using a control that appears in the center of the working area. Drag on the corners to uniformly scale the layer or on one of the edges to scale in a single dimension.
Rotate Layer Z (3): This tool spins the entire layer or layers about the origin point.
Set Origin (0): When this tool is selected, you can select and reposition the origin point located in the center of the working area. The origin point is the point about which the layer is rotated and flipped.
Rotate Layer XY: This tool rotates the layer about the XY plane causing the layer to tilt upward and downward or side to side.
Shear Layer: This tool shears the layer causing all vertical and horizontal lines in the layer to become diagonal.
Switch Layer: This tool is only available when a switch layer is selected in the Layers palette. It places a drop-down list of the available sublayers in the Options bar at the top of the working area.
Particle Layer: This tool is only available when a particle layer is selected in the Layers palette. It places several options in the Options bar at the top of the working area, including a checkbox for disabling particles, a dialog box or particle options, and a Randomize button.
Note
The Rotate Layer XY, Shear Layer, and Particle Layer tools are only available in Anime Studio Pro.
Setting the Origin Point
The layer’s origin point is located in the center of the main window by default, and it is marked by two perpendicular arrows. The origin is used by the Scale and Rotation tools to mark the point around which the action occurs. It is also used by the Flip Horizontal and Flip Vertical buttons located in the Options bar to mark the point about which the layer is flipped. Using the Set Origin tool (0), you can change the location of this point. When this tool is selected, you simply need to drag the origin to its new location.
The coordinates of the new origin’s location are displayed in the Options bar. Clicking the Reset button causes the origin to return to its original location.
Transforming Layers
The first three layer tools let you transform the layer or layers relative to the other layers. These transforms include translation, scaling, and rotation about the Z axis, which spins the objects around the origin.
Translating Layers
The Translate Layer tool (1) lets you click and drag to move all the objects on the current layer or layers. The layer’s position relative to the origin is displayed in the X, Y, and Z fields in the Options bar. Clicking the Reset button causes the layer to return to its original position. You can also enable the Show Path option, which causes a line to be drawn from the origin to the layer’s final position. This line is just an indicator of how and where the layer moved, and it is not rendered. To the right of the Show Path option are buttons to flip the selected layers horizontally and vertically about the origin. Each button takes only a single click to activate and clicking either of these twice in a row causes the layer to right itself. These flip buttons are available on the Options bar for the Translate Layer, Scale Layer, Rotate Layer, and Set Origin tools.
New Feature
The Flip Layer Horizontally and Flip Layer Vertically buttons were layer tools in the previous edition and are now toolbar buttons to simplify the Tools palette. This change is new to Anime Studio 6.
If you hold down the Shift key while dragging a layer, then the layer movements will be constrained to be horizontal or vertical in a straight line. Holding down the Alt/Opt key causes the layer to move along the Z-axis, which is forward and back from the viewer. This makes the object’s size appear to change, but only the view is changing, the size remains constant.
You can also nudge the layer by holding down the Ctrl/Cmd key and pressing the arrow keys. This causes the layer to move in the direction of the arrow key using small increments. If you hold down the Ctrl/Cmd and Shift keys, the layer will be nudged using larger increments. Nudging is helpful for positioning a layer precisely after a mouse move gets it close to where it needs to be.
Scaling Layers
The Scale Layer tool (2) places a red box in the center of the main window. This box has handles on each side and corner and by dragging this box’s handles, you can change the size of the layer’s contents. Dragging a corner handle changes the layer’s size equally in both directions, which is helpful in keeping circles looking like circles.
If you drag one of the side handles, then the scaling is constrained to the horizontal or vertical directions, causing the layer objects to be deformed. But, if you hold down the Alt/Opt key while dragging on one of the side handles, the volume of the layer contents is maintained, causing the objects to squash and stretch.
Tip
If you continue to reduce the size of a layer by dragging its corner, the layer will eventually reduce to nothing and then return flipped both vertically and horizontally.
Rotating Layers
The Rotate Layer Z tool (3) spins the entire layer about the origin point regardless of where the origin is located. Holding down the Shift key causes the rotations to be constrained to 45-degree increments.
The Rotate Layer XY tool causes the layer contents to tilt so that one-half of the layer is coming out toward the viewer and the opposite half is receding. Moving the mouse left and right causes the sides of the layer to be distorted and moving the mouse up and down causes the top and bottom of the layer to be tilted. For both directions, the point of tilting occurs at the origin point.
Figure 4.21 shows four image layers. The upper-left image shows the original layer, the lower left has been rotated with the Rotate Layer Z tool, and the upper-right and the lower-right images have been rotated with the Rotate Layer XY tool.

Shearing Layers
The Shear Layer tool lets you shift the layer by moving one edge of the layer in one direction and its opposite side in the opposite direction to create a diagonal movement. Dragging the Shear Layer tool up and down moves the top and bottom edges of the layer and dragging the tool to the side moves the left and right edges of the layer.
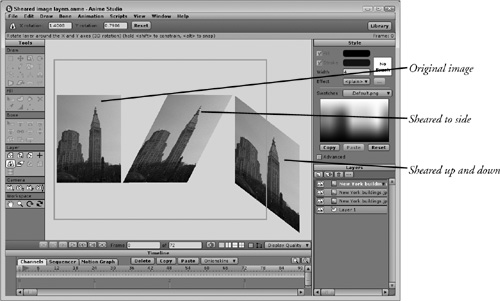
Figure 4.22 shows three image layers. The left layer shows the original layer, the middle image has been sheared with the Shear Layer X tool, and the right image has been sheared with the Shear Layer Y tool.
New Feature
The Rotate Layer XY and Shear Layer tools were split into separate tools for each direction in the previous version and have been combined into a single tool for Anime Studio 6.
To move, rotate, and scale layers, follow these steps:
1. | Open the Variety.anme file from the Chapter 4 folder on the included CD. This file includes several layers, each with a single letter. |
2. | Select the V layer and click the Translate Layer tool (1); then drag in the working area to move the letter to the left. Click the Scale Layer tool (2) and drag outward on one of the corner handles in the working area to resize the letter. |
3. | Select the A layer and move it with the Translate Layer tool (1) next to the V letter. Then use the Scale Layer tool (2) and drag inward to decrease the size of the A letter. |
4. | Continue to select, move, and scale the remaining letters until the word is spelled out using the various letters. |
5. | |
6. | Select the group layer and name it word in the Layer Settings dialog box. Then click the Duplicate Layer button at the top of the Layers palette and name the new group word shadow. |
7. | With the word shadow layer selected, click the Flip Vertically button to flip the shadow text. Then select the Shear Layer X tool and drag to the right in the working area to shear the letters. Then select the Translate Layer tool (1) and move the shadow text to line it up with the lowest point on the original text, as shown in Figure 4.23. |
