
Anime Studio’s Vector Implementation
Anime Studio isn’t the first software package to enable vector-based graphics. Other popular vector-based software packages include Adobe Illustrator, Adobe Flash, and CorelDRAW. But, unlike these popular drawing packages, Anime Studio includes some unique features that make it especially easy to use for animating.
Note
If you’re comfortable with any of these other vector-based programs, you’ll be happy to know that Anime Studio can import Illustrator’s AI and EPS formats. More on importing these formats is presented in Chapter 7, “Importing Content and Downloading New Content.”
Curves and Points and That’s All!
One of the key differences between the other vector-based drawing packages and Anime Studio is in its simplicity. The other packages deal with many different types of objects, but Anime Studio deals only with simple curves and points; all the various shapes are boiled down to these simple elements. This makes animating with Anime Studio incredibly easy, and it also gives you the ability to edit all shapes, whether it’s a simple line or a fragment of text, in the same consistent manner.
Points are designated by simple hollow squares, as shown in Figure 8.3. When selected, these hollow squares become solid red squares. Curves are simple lines that run between two points. Points can exist by themselves, but curves always have a point at either end.
Figure 8.3. Points and curves.

Anime Studio includes an assortment of tools and features for drawing and editing points and curves. These various tools and features are covered in the rest of the chapters in this part.
Welding Points
The simplicity of dealing with only curves and points is helped by another great feature—welding. Any point can be welded instantly to another point or anywhere on a curve within the same layer. By welding points and curves together, you can link the two so that moving one will move the welded curve with it. This not only makes it easy to keep objects secure, but it also helps as you deform the objects during an animation.
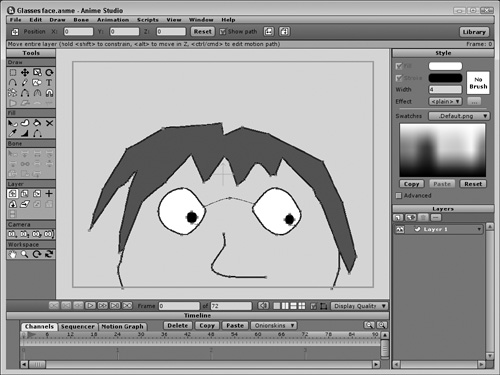
For example, Figure 8.4 shows a simple face. The eyeballs and pupils are connected with hidden lines that aren’t rendered, but they connect the two eyes together, making it easy to select and move both eyes together. This keeps the relative distance between the eyes constant.
Combined Fill and Stroke Tools
All curves in Anime Studio are referred to as strokes, and these strokes have several different properties that you can change, including width, color, and style. When a stroke creates a complete loop so that the beginning and end points coincide, the object becomes a closed curve or a shape.
Shapes are unique because they can hold a fill. A fill is a color or pattern that appears inside of the shape, and fills have their own properties that can be set. The properties of strokes and fills are presented in greater detail in Chapter 13, “Filling Shapes and Using Strokes.” Default shapes are created using the Draw Shape (E) tool, or you can create a custom shape using one of the other drawing tools by welding the beginning point to ending points to close the shape.
Figure 8.5 shows three raindrops. The left raindrop shows only the paths and points. These lines are not rendered. The middle raindrop shows a raindrop with only strokes, and the right raindrop has a stroke and a fill.
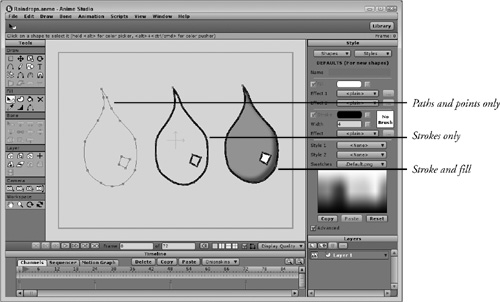
Figure 8.6 shows these raindrops when rendered. The right raindrop includes a shade effect that is only visible when the file is rendered. Notice that the leftmost raindrop isn’t rendered since it didn’t include a stroke color.

Moving Groups of Points with Bones
Another huge feature in Anime Studio that distinguishes it from other vector-based packages is the ability to bind layers and groups of points to a nonrendered bone object. Once bound, you can move all the bound points quickly by moving the bone object. Bones can be used to animate characters quickly and easily. You can learn more about using bones in Chapter 26, “Creating and Binding Bones,” and animating with bones in Chapter 27, “Animating with Bones.”