Transforming Points
The Tools palette includes three transformation tools located at the very top of the Tools palette. When a set of points is selected, you can use the Translate Points (T), Scale Points (S), or the Rotate Points (R) tools to transform their position, size, and orientation with respect to one another.
Selecting Points with the Transformation Tools
The Point Transformation tools can also be used to select points. If the Shape Select option in the Options bar is enabled, then you can select points with the Translate, Scale, or Rotate Points tools without having to select and use the Select Points tool.
With the Shape Select option set for these tools, you can click a single point to select it, or you can click a line segment between points to select all points on the curve, or you can click the center fill of a shape to select all points that make up the shape. If the Shape Select option is not enabled, then clicking and holding down the mouse will select a single point that is closest to the cursor.
Note
The Translate Points tool lets you make point, line, and shape selections regardless of whether the Shape Select option is enabled.
New Feature
The ability to select points, paths, and shapes with the Transform tools is new to Anime Studio 6.
When any of the Transformation tools are selected, defined selection sets can be chosen from the Select Group drop-down list.
Resetting Points
When a selection of points is moved using any of the transformation tools for any frame besides frame 0, a key is automatically set and the points will move from their default location to the new location over the range of frames between frame 0 and the frame where the key is set. The Reset button on the Options bar that appears when one of the transformation tools is selected is used to move the selected points back to the same position as defined in frame 0. More on setting keys is covered in Chapter 16, “Understanding Keyframes and Tweening.”
Flipping Points
At the right end of the Options bar when the Select Points tool or one of the transformation tools is selected are two buttons used to flip the selected points horizontally or vertically. When the points are flipped, they are flipped about the center of the selection, so the flipped object is typically not moved from its current location, but you can use the Translate Points tool to move the flipped object. Figure 11.7 shows a caterpillar that has been copied and flipped both horizontally and vertically.

Tip
The Edit, Copy and Edit, Paste commands can be used to create a copy of the object before flipping if you want to keep the original object.
New Feature
In the previous versions, the Flip features were buttons in the Tools palette, but moving these features to the Options bar was done to simplify the Tools palette, which is new to Anime Studio 6.
Using the Translate Points Tool
The Translate Points tool (T) is used to move a single point or a set of selected points around the working area, as shown in Figure 11.8. For precise positioning, the X and Y coordinate values for the center of the selected points is displayed in the Options bar. These coordinates are absolute coordinates in reference to the working area origin. You can also enter the translation values manually in the text fields located in the Options bar.

Holding down the Shift key while dragging the points causes the movement to be constrained to only horizontal or vertical movement.
Nudging Points
Holding down the Ctrl/Cmd key and pressing the arrow keys lets you nudge the selected points in the direction of the pressed arrow key. Holding down both the Ctrl/Cmd and Shift keys nudges the selected points a greater amount.
Note
The normal nudge with the Ctrl/Cmd key moves the selected points 1 pixel for every arrow press and the greater nudge with the Ctrl/Cmd and Shift keys moves the points 10 pixels. There isn’t a preference to change these nudge amounts.
Auto-Welding Points
When a single endpoint is selected and the Auto-Weld option in the Options bar is enabled, you can weld the endpoint of a curve to any other point or line in the layer by dropping the point on another point. A small green circle will appear when the endpoint is positioned over a point and a small red circle appears when the endpoint is over a portion of the curve where it will be welded. A tone will sound when the welding is complete. If the selected point isn’t an endpoint, then you can still weld it to another point or directly to a curve segment that the cursor is over by pressing the Spacebar.
If the Auto-Weld option is enabled, you can disable the welding of points by holding down the Alt/Opt key when releasing the mouse.
If two endpoints of a curve are welded together to form a closed shape and the Auto-Fill option is enabled, then the new shape is created and filled with the set fill color.
Note
If you have a bunch of overlaying points that need to be welded, you can select to the points and use the Scripts, Draw, Auto-Weld command to weld them all at once. More on this script is covered in Chapter 9, “Using the Drawing Tools.”
Using the Scale Points Tool
The Scale Points tool (S) is only available when two or more points are selected. If a single point is selected, the tool is dimmed. When this tool is selected, a red bounding box with handles at each corner and edge appears, as shown in Figure 11.9. Dragging these handles causes the selected points to be scaled relative to each other. Dragging a side handle scales the points along a single axis, but dragging a corner scales along two axes.

Dragging a corner handle maintains the aspect ratio of the object, and holding down the Alt/Opt key while dragging a side handle maintains the volume of the filled object.
Tip
Using the Scale Points tool with the Alt/Opt key simulates the squash and stretch effects common for exaggerated animations.
For more precise scaling, you can use the Scale X and Scale Y values in the Options bar. Click the Modify button to apply the designated values. You can click the Modify button multiple times. Values of 1 result in no change. Scale values less than 1 reduce the scale of the selected points; values greater than 1 increase the scale of the points. The Scale values can accept negative values to move the points past one another.
Using the Rotate Points Tool
The Rotate Points tool (R) lets you spin the selected set of points around its local center, as shown in Figure 11.10. The center point around which the rotation takes place is marked with a red plus sign that appears when the tool is selected. This tool is only available when two or more points are selected. It wouldn’t make any sense to rotate a single point around itself.

The Options bar lets you choose a selection set, enter a rotation value, and apply the rotated value with the Modify button. Holding down the Shift key rotates the selected points at 45 degree increments.
Tip
All point rotations with the Rotate Points tool are done about the center of the selected points, and currently there is no way to change this rotation center, although some modified tool scripts are available that make this possible. You can learn more about these modified tool scripts in Chapter 37, “Using Scripts and Lua.”
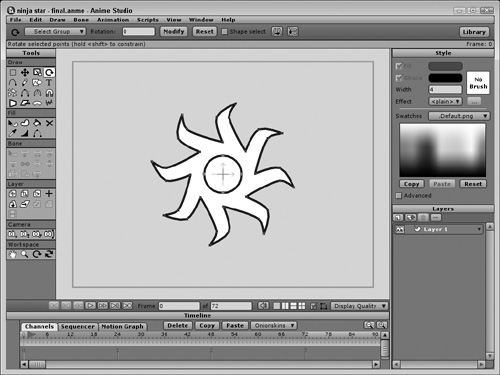
To create a ninja star, follow these steps:
1. | Use the File, New menu command to create a new project. |
2. | Select the Scripts, Draw, Star menu command and in the Star dialog box that opens, enter 8 as the number of points and click the OK button. This creates an eight-pointed star in the center of the working area. |
3. | With all points selected, select the Scripts, Draw, Split Curve menu command. This opens the Split Curve dialog box. Enter a Point Count value of 1 and click the OK button. This adds a midpoint to each line segment. |
4. | Click the Select Points tool (G), enable the Lasso Mode option in the Options bar, and drag around the star points closest to the center to select them. |
5. | Select the Rotate Points tool (R) and drag in the working area to rotate the selected points about their center point. |
6. | Choose the Select Points tool (G) again and drag around all the points except for the points on the outer tips on the star with the lasso. Then select the Edit, Select Inverse menu command (Ctrl/Cmd+I) to invert the selection so that only the outer tip points are selected. |
7. | Select and drag with the Rotate Points tool (R) in the opposite direction from the first drag. Then choose the Scale Points tool (S) and drag the corner handle to pull the tip points in tighter to the star center. |
8. | Complete the star by selecting the Oval tool (L) and dragging in the center of the star to create a circle. The completed star is shown in Figure 11.11. |