
Using Fill Effects
Directly beneath the Fill color swatch on the Style palette are two effects that you can select. The available effects include the following:
Shaded: This effect adds a gradient along one edge of the object to make it appear to be raised.
Soft Edge: This effect blurs the edges of the shape.
Halo: This effect adds a colored glow that surrounds the stroke of the shape.
Gradient: This effect adds a two-color gradient across the surface of the shape.
Image Texture: This effect fills the shape with a selected texture.
When a fill effect is selected, a dialog box of options automatically opens. After the dialog box is closed, you can reopen it at any time by clicking the button with three dots on it to the right of the Effect list. The Options dialog box includes a preview pane that displays a circle showing the new effect with the current settings.
You can apply two effects channels to the current fill. When two effects are applied, they are stacked with Effect 2 on top of Effect 1. However, if you place a solid effect such as a gradient without any transparency in Effect 2, it will obscure any effect placed in Effect 1.
Note
Although the preview pane in the Effect Options dialog box shows what the effect looks like, when the effect is applied to a shape, the effect isn’t visible in the working area. The actual effect won’t be displayed until the scene is rendered.
Tip
Anime Studio only allows two effects to be applied at one time, but if you use the Style 1 and Style 2 drop-down lists, each applied style could have an additional two effects for a total of six effects in a single style.
Using a Shaded Effect
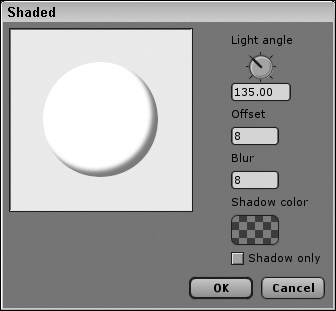
The Shaded effect is used to add some highlight shading to the selected shape. It is useful, for example, when you want to make buttons that appear raised. The options for the Shaded effect, shown in Figure 15.8, include a Light Angle, which controls where the shading appears. You can change the angle by dragging within the Light Angle control.
Figure 15.8. Shaded effect options.
The Offset value sets the size of the shadow. Figure 15.9 shows a preview of a circle with an offset value that changes from left to right to 0, 8, 24, 56, and 96.
Figure 15.9. Changing offset values.

The Blur value determines how sharp the line between the shape color and the shaded color is. Figure 15.10 shows the preview circle with a blur value that changes from left to right to 0, 8, 24, 56, and 96.
Figure 15.10. Changing blur values.

The Shadow color swatch opens the Color Picker where you can choose a new color for the shaded portion. The default color is black with a 128 alpha value. This color is a light gray color that is half transparent, thus allowing the fill color to show through.
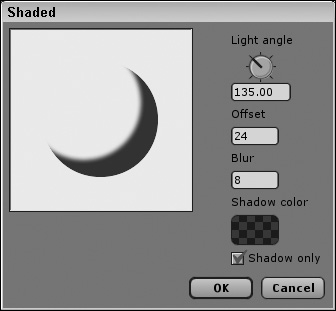
If you enable the Shadow Only option as shown in Figure 15.11, then only the shaded portion is visible.
Figure 15.11. Enabling shadow only.
Using a Soft Edge Effect
The Soft Edge effect is used to feather the edges of the selected shape by blurring its edges. The options for the Soft Edge effect, shown in Figure 15.12, include a Blur Radius, which defines the number of pixels that are used to blur the edge.
Figure 15.12. Soft Edge effect options.

Using a Halo Effect
The Halo effect is used to add a glow around the shape. The options for the Halo effect, shown in Figure 15.13, let you set the halo color and its size.
Figure 15.13. Halo effect options.

The Inset Radius value can range between 1 and 30, depending on the size of the shape. This value sets the number of pixels from the shape’s edge that are solid shaded with the halo color. The Blur Radius value defines where the blur starts. Figure 15.14 shows the preview circle with inset radius values of 2 and 8 and blur radius values of 1, 16, and 64.
Figure 15.14. Changing inset and blur radius values.

The Halo Only option removes the fill color and displays only the halo color, as shown in Figure 15.15.
Figure 15.15. Enabling halo only.

Using a Gradient Effect
The Gradient effect is used to fill the shape with a gradient that transitions gradually among a range of colors. The options for the Gradient effect, shown in Figure 15.16, let you choose the Gradient Type and set the gradient in a color bar. The available Gradient Types include Linear, Radial, Reflected, and Angle.
Figure 15.16. Gradient effect options.

New Feature
The Gradient features have been improved in Anime Studio 6 to include Reflected and Angle gradient types along with a color bar for adding multiple gradient stops and colors. Gradient effects can be animated.
Tip
The Gradient effect is applied on top of the fill color. If one of the gradient colors is semi-transparent, then the fill color will show through.
The Linear gradient type runs by default from left to right, causing a gradual change in color from one side of the shape to the other. Using the interactive control, you can change the direction of the linear gradient. The Radial gradient type starts with one color at a center location and gradually changes in concentric circles as the distance from the center is increased. The Reflected gradient type transitions from the end color to the start color at a center location and back to the end color in a linear direction. The Angle gradient type sweeps about a center point from one color to another. Figure 15.17 shows an example of each of the gradient types.
Figure 15.17. Linear, Radial, Reflected, and Angle Gradient types.

The color swatch sets the color for the selected color stop. The selected color stop has a black arrow above it. The gradient color bar starts with two color stops at either end of the bar, but you can add more color stops by clicking below the gradient color bar. Clicking an existing color stop makes it the selected color stop and displays its color in the color swatch. Double-clicking a color stop opens the Color Picker for the selected color stop. You can also move the color stops to the left or right by dragging them. Figure 15.18 shows a gradient with multiple gradient stops.
Figure 15.18. Gradient with multiple color stops.

Using an Image Texture Effect
The Image Texture effect is used to fill the shape with a bitmap texture. The options for the Image Texture effect, as shown in Figure 15.19, let you select the bitmap texture to use from a File dialog box and also choose from two fill modes. The Tile fill mode tiles the bitmap by placing it end to end until it fills the entire fill area. The Don’t Repeat fill mode fits the bitmap within the shape by aligning its edges to the edges of the shape.
Figure 15.19. Texture effect in Tile fill mode.

Positioning and Rotating Gradients and Images
If either the Gradient or Image Texture effects are added to a shape, then an interactive control line with circles at either end appear when the Select Shape tool is selected. This interactive control, shown in Figure 15.20, lets you position and rotate the gradient or image.

New Feature
The interactive control that lets you move and rotate gradients and images is new to Anime Studio 6.
One end of the interactive control is a solid circle. This marks the center of the gradient or image. Moving this end of the control repositions the gradient or image. The opposite end has an open circle. Dragging this end will rotate the gradient or image about the circle at the opposite end. Figure 15.21 shows the repositioned image. By moving the solid circle down, the center of the image has been repositioned and by dragging the open circle to the side, the entire image has been rotated.

The distance between the two ends represents the scale of the image. By moving the two circles closer together, you can reduce the image’s scale or tighten the length of the gradient. Moving the two circles farther apart will increase the image’s scale or stretch out the gradient. Figure 15.22 shows a change in the image’s scale. With the Tile option set for the texture image, the image is repeated end to end both horizontally and vertically.

Removing an Effect
To remove an effect from a style, you simply need to select the Plain option from the Effect drop-down list.