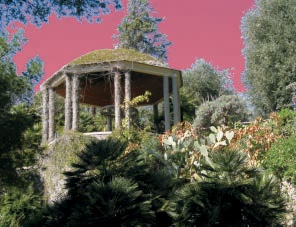
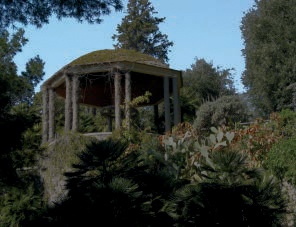
Figure 14-1 shows a photograph where we made a selection with the Select by Color tool (![]() ). In the tool options, we increased the Threshold value to 20.0 to select the entire sky. Then we applied Image: Select > Save to Channel.
). In the tool options, we increased the Threshold value to 20.0 to select the entire sky. Then we applied Image: Select > Save to Channel.
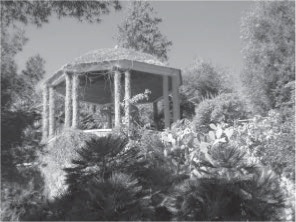
Figure 14-2 shows the Channels dialog, which is a dockable dialog initially located in the multi-dialog window. The first three rows correspond to the image’s Red, Green, and Blue channels. These channels are grayscale images; each of their pixel values corresponds to the value of that color component in the image itself. That’s why the thumbnail appears as a grayscale image. Click and hold the thumbnail to see a somewhat larger, color thumbnail (see Figure 14-3).


Click and drag the Red channel thumbnail to the Toolbox to create a new grayscale image, as shown in Figure 14-4. Or drag the thumbnail to the Image window to add the channel as a new layer of the image.
Clicking a channel toggles it on and off. If a channel is deactivated, none of the changes made to the image affects that particular channel. Use this to your advantage, for example, by selecting only the Red channel when removing red eye in a photograph. If no channels are active, you won’t be able to change the image at all, leading to confusion and frustration. We recommend always keeping the Channels dialog open and checking it if the adjustments you make don’t yield the results you expect.
Clicking the eye next to a channel toggles that channel’s visibility. For example, Figure 14-5 shows the result of hiding the Green channel. Note that visibility and activating a channel are two different things: You can blindly alter a channel that’s not visible and vainly attempt to edit a channel that’s visible but inactive.

As soon as you add an Alpha channel or a second layer to an image, the global Alpha channel, which represents the transparency of the whole image, appears in the Channels dialog.
Below the rows for the three or four actual channels, a horizontal strip separates the dialog into two parts. You find the layer pixels lock icon (which you saw in Chapter 11) in this strip. Activating the lock prevents changes to the mask. The lower part of the dialog holds the selection masks. Figure 14-2 has only one, and its name was chosen by GIMP. Change this name the same way you do with layers: by double-clicking the name itself, selecting Channels: right-click > Edit Channel Attributes, or clicking the leftmost icon at the bottom of the Channels dialog, which brings up the dialog shown in Figure 14-6. Here, change the channel name and adjust its opacity and color to make it temporarily visible in the image.

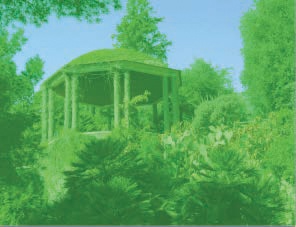
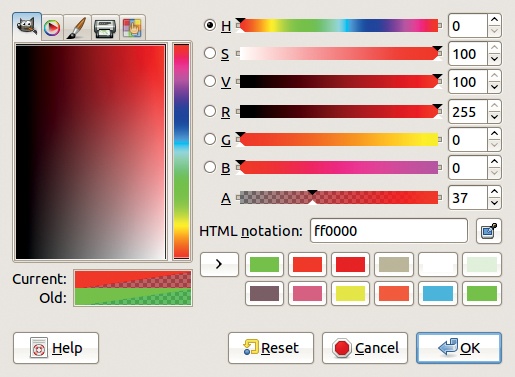
These last two attributes are used when you click the eye icon for the Red, Green, or Blue channel. If you use the settings shown in Figure 14-6, you get the result shown in Figure 14-7: The mask is 50% opaque and is shown in black. In Figure 14-8, you see the result when the opacity is set to 37% and the color is set to a bright green. Note that the Color chooser dialog, which pops up when you click the box on the right of the Edit Channel Attributes dialog, has more components than usual. As shown in Figure 14-9, you can change the Alpha value by using the bottom slider.
Between each channel’s eye icon and thumbnail, notice room available for an additional icon: the chain. The chain links selection masks together. If you have several selection channels and link some of them together by selecting the chain icons, any changes applied to one of them also affect the others.
To access the Channels menu, either click the configuration button in the top-right corner of the Channels dialog or right-click one of the rows. This menu has the same options as the seven buttons in the dialog’s bottom row (see Figure 14-2). These buttons allow you to do the following:
Edit the channel attributes.
Create a new channel. This option brings up the dialog shown in Figure 14-10, which is identical to the one shown in Figure 14-6 except for the additional INITIALIZE FROM SELECTION checkbox. Checking this box saves the current selection to a channel. Press
 while clicking CREATE A NEW CHANNEL to use the last parameter values.
Move the current channel up or down. This option has no effect on the image itself.
Duplicate the current channel.
Create a selection with the current channel. The
 and keys work the same way as they do when using the selection tools.
In the Channels dialog menu are four entries that create a selection from the channel, each corresponding to the different selection modes.
Delete the current channel.

All of these menu options, except New Channel, are available only when a selection mask is active.
Only one selection mask can be active at a given time, and when a mask is active, GIMP’s various drawing and transformation tools work on the mask, not on the image itself. In fact, if you switch to the Layers dialog, you can see there is no active layer. Conversely, if you activate a layer in the Layers dialog, the selection mask deactivates. If you’re trying to change the current image and nothing is happening, make sure a layer is actually selected in the Layers dialog. You could be inadvertently changing a mask!
You can create a selection mask using one of two methods, each with several possible pitfalls. The first method is to use the selection tools (covered in Chapter 13) and then to save the selection to a channel. After doing this, no layer is active, the image mask is active but might not be visible in the image, and the selection used for creating the mask is still active.
As a result, if you try to paint on the image, you’re actually painting on the mask. When you create the mask, the Channels dialog appears, even if it was previously hidden. This should alert you that the mask is active. But the selection also remains active—even if it’s hidden—so if you try to paint on the mask, you’re only able to alter areas that fall within the selection.
The second method for creating a selection mask is to use the Channels dialog directly. Create a new channel by clicking the appropriate button, and it immediately appears in the image. Then use the drawing tools to edit it. Painting white on the mask selects pixels, and painting black deselects pixels. Use the Blend tool and paint with various shades of gray to partially select pixels. You can also use colors other than gray, although only the color’s value component is used.
For example, we took the photograph shown in Figure 14-11 and made a selection with the Select by Color tool. But we set the THRESHOLD cursor to 15.0, which is too low for a clean selection. Figure 14-12 shows a part of the image after saving the selection to a channel and making this channel visible.


The mask needs to be cleaned up, which you can do with the Paintbrush tool. First set the foreground and background colors to their default values of black and white. The simplest way to do this is to click the small buttons in the lower-left corner of the Toolbox (see Figure 14-13) or to press ![]() . Then select the Paintbrush tool (
. Then select the Paintbrush tool (![]() ) and an appropriate brush. Paint the parts that shouldn’t be selected black and the parts that should be selected white. Switch between the foreground and background color by pressing
) and an appropriate brush. Paint the parts that shouldn’t be selected black and the parts that should be selected white. Switch between the foreground and background color by pressing ![]() .
.
You want either full selection or no selection at all, so if you’re using a tablet pen, set the Paint Dynamics so that pressure changes the brush size, rather than the opacity. This dynamic allows you to press down to fill large areas quickly or zoom in and press gently to touch up the mask’s finer details.
If you want to create a complicated selection, but don’t need to save it for later, use the Quick Mask tool. Toggle it via Image: Select > Toggle Quick Mask, by clicking the button in the bottom-left corner of the Image window (see Figure 14-14), or by pressing ![]() .
.
When the Quick Mask is active, it appears in the Channels dialog as an active and visible red selection mask. Figure 14-15 shows a part of our photograph after making a selection with the Select by Color tool, using a THRESHOLD of 20.0. To edit the selection, paint the mask with black or white. When satisfied, toggle the Quick Mask again, which has the following effects:
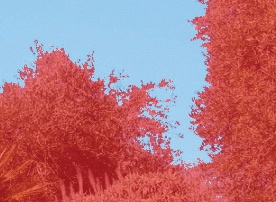

The mask is converted to a selection.
The selection mask is removed from the Channels dialog.
The current layer is reactivated.
This is a very simple and convenient way to make changes to a selection without formally creating a selection mask. Also note that using a Quick Mask doesn’t prevent saving the final selection to a channel.
Right-clicking the Quick Mask button brings up the menu shown in Figure 14-16. This menu allows us to toggle the mask, change its color and opacity, and invert the coloration, as shown in Figure 14-17. The color inversion reveals that quite a bit of blue sky in the top-left portion of the photograph remains unselected. Painting in black still adds red pixels to the mask, but now the red pixels are selected. If you toggle Quick Mask off, you see the selection wasn’t inverted. The sky is still selected.