Filtering removes noise from an image. In this section, we’ll introduce the concept behind filtering and show you some common techniques.
Noise occurs in images for several reasons:
The photograph was taken in poor conditions; there was not enough light, as in Figure 7-47, or the photographer moved, as in Figure 7-48.
The camera was a very low-cost model with too few CCD sensors, which generated strong RGB noise, as shown in Figure 7-49.
The sampling frequency was too low, as shown in Figure 7-50. This noise is typical in a photograph taken from a mobile phone.
The printed photograph has been scratched or otherwise damaged, as in Figure 7-51.


The most common way to reduce the noise in an image is to use filtering. The idea is to reduce the amplitude of the perturbations in areas that should be consistent, such as a wall or the surface of an object, while preserving the transition areas, which are the borders between objects and their surroundings. If possible, these transition areas should actually be emphasized.
Filtering changes every pixel value, depending on the values of neighboring pixels. A filter is defined by the formula or mathematical mechanism that computes this new value.


We will consider only the simplest and most frequently used filters from among those available in GIMP. The noise reduction filters are found in various submenus of the Image: Filters menu. The most general one is Image: Filters > Generic > Convolution Matrix, which brings up the dialog shown in Figure 7-52.
The MATRIX is an array of numbers with five rows and five columns. Initially only the center point contains a value different from zero, in this case 1. This means every pixel is replaced by itself (i.e., it is unchanged).

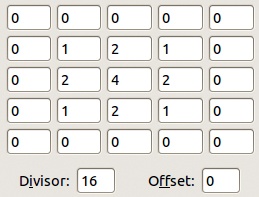
You can modify matrix entries to create various effects. If you change one entry, pressing the ![]() key takes you to the next one, and its content is selected. If you then key in a new value, it replaces the previous one. In Figure 7-53, we set the eight entries that surround the center entry to 1, which means the new pixel is computed as the sum of itself and its eight immediate neighbors. To calculate the pixel value as the average of these nine values, set the DIVISOR to 9.
key takes you to the next one, and its content is selected. If you then key in a new value, it replaces the previous one. In Figure 7-53, we set the eight entries that surround the center entry to 1, which means the new pixel is computed as the sum of itself and its eight immediate neighbors. To calculate the pixel value as the average of these nine values, set the DIVISOR to 9.
As the preview shows, this filter reduces the noise and smooths the image. Figure 7-54 shows the result on the image from Figure 7-49. The Convolution Matrix filter is easy to use, but be warned: The resulting image is blurred. Because its matrix has five rows and five columns, you could define a larger filter by adding the four points in the middle of the matrix sides. The DIVISOR would then be 13. The neighboring pixels used by the filter should be evenly spaced around the central target pixel.
You can use the same filter with different values in the matrix. For example, Figure 7-55 shows the values for a Gaussian blur, where the pixels closer to the central pixel are weighted more heavily. Of course, the DIVISOR must be adjusted appropriately. This filter blurs the image even more than the preceding one.

Of the many filters in the Image: Filters menu, several are genuine preprocessing filters. For example, take the Image: Filters > Blur menu. The Blur entry is not very useful because you can’t change the settings. Focus Blur and Motion Blur are used for specialized effects. The most useful entries for preprocessing are the two Gaussian filters. Figure 7-56 to Figure 7-58 show various results of using these filters on the image in Figure 7-49. As you can see, the Selective Gaussian Blur filter worked best for this image.
Another useful filter is Image: Filters > Enhance > Despeckle. The Despeckle filter is called a median filter. It doesn’t use the same method as the Convolution Matrix, although it relies on a matrix too. Figure 7-59 shows its dialog, and Figure 7-60 shows the result of applying the Despeckle filter to the image in Figure 7-51. You could hide the remaining scratches by adjusting the parameters. As a matter of fact, simply checking the RECURSIVE checkbox, which repeats the filter’s last action, would work, but doing so would increase the blurring as well. Still, aesthetically, the result could be considered an improvement over the initial photograph.


The preprocessing filters that we’ve tried so far all have the same drawback: They blur the image to some degree. The blurring is because, by averaging the values of neighboring pixels, these filters decrease the image quality at strong transitions, which delimit the various regions of the image. Sharpening, on the other hand, strengthens the transitions.


Sharpening can be done by building a specific convolution matrix with a more complicated pattern than what you used before. You can also apply Image: Filters > Enhance > NL Filter, but choosing the correct parameters is challenging. The best sharpening filter by far is the familiar filter with the paradoxical name: Image: Filters > Enhance > Unsharp Mask. Its dialog is shown in Figure 7-61.


RADIUS sets the thickness of the image edges. AMOUNT sets the effect intensity of the mask. Keeping the amount value low (0.25 to 0.5) is generally best. If necessary, repeat the action two or more times. This is what we did with Figure 7-48 to get the result shown in Figure 7-62.