
If you need help installing GIMP, refer to Appendix E. From this point on, we assume that you have GIMP properly installed.
Tip: When you want to quit GIMP, use Image: File > Quit or ![]() . If you try to quit by closing windows, you might lose a valuable dialog in the process.
. If you try to quit by closing windows, you might lose a valuable dialog in the process.
When GIMP starts for the first time, three different windows pop up on your screen, as shown in Figure 1-1. These windows are the Toolbox, the Image window, and a dialog dock. By default they occupy the full width of the screen, regardless of the size of your monitor. This screen layout can be arranged to suit your taste, and one of the first actions that many GIMP users take is to rearrange the screen layout so that it’s intuitive and pleasing to them. If you don’t like the multi-window interface, GIMP now offers a single-window interface, which we introduce in The Single-Window Interface.
If you come up with a screen layout that suits you perfectly, you can save it so it will look the same the next time you start GIMP. To do this, select Image: Edit > Preferences and choose the WINDOW MANAGEMENT menu entry. You’ll see the dialog shown in Figure 1-2. Click SAVE WINDOW POSITIONS NOW and then OK.
The WINDOW MANAGEMENT tab also contains a section called Window Manager Hints, which changes how the Toolbox and the dialog docks behave. In Figure 1-2 it’s set to Utility window, which means that the Toolbox and the dialog docks will always remain above other windows and be visible when the Image window is active. In other words, you cannot minimize utility windows. You can also choose to treat the Toolbox and dialogs like normal windows or to simply keep them above other windows.

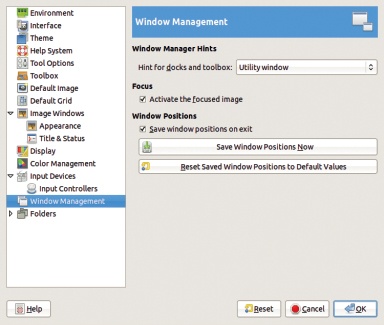
Figure 1-3 shows a common (although exaggerated) predicament that new GIMP users may find themselves in when working in multi-window mode. The screen is packed with windows: eleven of them in this case. Screen clutter can occur when you’re using several different tools at once, when one tool has multiple windows associated with it, or when you’re editing more than one image at a time.
When you add these extra windows to the standard dialogs for brushes, patterns, gradients, layers, and channels, you can easily wind up with a dozen or more open windows.
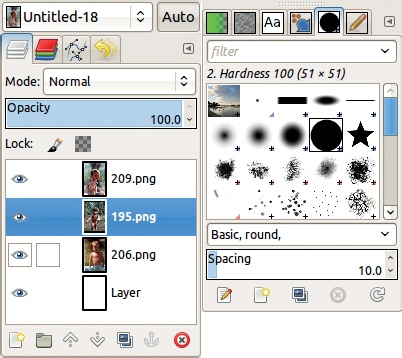
This is why GIMP uses dockable dialogs—small, interactive windows that can be grouped together into a multi-dialog window, as shown in Figure 1-4 (its two parts are laid out side by side). You can customize these windows to include any combination of the dockable dialogs, and you can have more than one open at a time.
Tip: If your screen gets too crowded, you can temporarily hide everything except the Image windows by pressing the ![]() key. Pressing
key. Pressing ![]() again makes the hidden windows reappear in their original positions. This makes it very easy to optimize your screen space, even when working on a smaller monitor.
again makes the hidden windows reappear in their original positions. This makes it very easy to optimize your screen space, even when working on a smaller monitor.
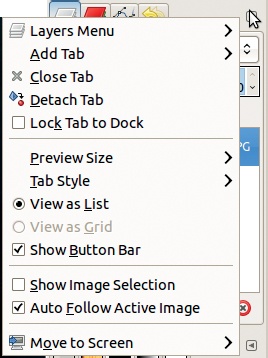
The window in Figure 1-4 contains two main sections. The left section contains four dockable dialogs: Layers, Channels, Paths, and Undo History. You can switch between them by clicking the tabs. The name of the current tab appears near the top of the dialog if there are one or two tabs, but it is replaced by an icon if there are three or more tabs. The right side of the window initially shows Brushes, Patterns, and Gradients, but we’ve added the Paint Dynamics and Fonts tabs. Each dialog tab has a main window, a row of buttons along the bottom of its window, and a small triangular button (to the right of the tabs). The buttons give you quick access to features like saving and loading preferences, and the triangular button brings up a full menu of options specific to that dialog, as shown in Figure 1-5.

If you close a dockable dialog window, you can reopen it using Image: Windows > Recently Closed Docks. You can drag a dockable dialog out of the dock by clicking and dragging on its tab. You can then drop it anywhere on the desktop to make it an independent window, or you can drop it into another multi-dialog window as a new tab or as a new division at the bottom, top, or side of the window. Figure 1-6 shows the Channels dialog being moved to the bottom of the window.

The Toolbox is split into two sections. The upper section of the Toolbox window is the Toolbox itself. By default, it contains icons for the most useful tools, though you can customize which are included and in what order. If you hover over any of these icons, GIMP displays the tooltip, which is the tool name, a brief description, and the keyboard shortcut. The current tool, if present in the Toolbox, is highlighted.
The lower half of the Toolbox window is actually a dockable dialog called Tool Options. It contains the Options dialog for the current tool. Although you can change this setup, it’s best to leave it the way it is so that you can easily adjust the options of the tool you’re working with.
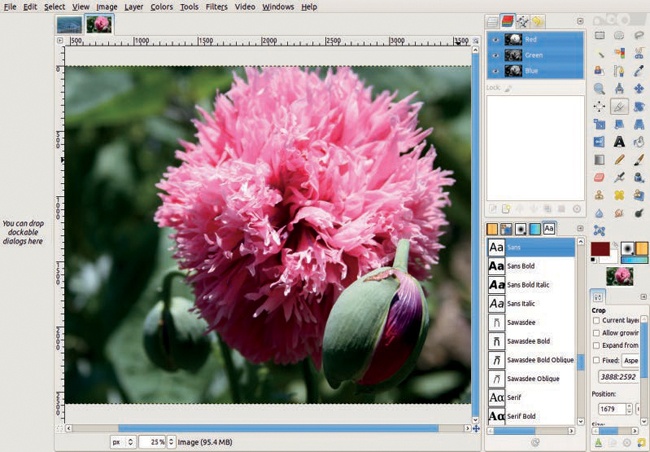
Version 2.8 of GIMP includes a feature that has been anxiously anticipated by many of the GIMP users who work on Windows and Mac OS systems: the single-window interface. If you choose Image: Windows > Single-Window mode, all the current GIMP windows pack into a single window. If you start with the default multi-window arrangement, the single window will look like Figure 1-7. The Toolbox is a narrow column on the left, the multi-dialog window is on the right, and the center space is available to display an image. The single-window interface is designed to occupy the whole screen, but you can shrink it so as to view your desktop or other running programs at the same time.
Most components of this interface can be resized or moved, as we did using the multi-window interface. Figure 1-8 shows an example of the single-window interface in action. When there are two images open, or two views of the same image, you can switch between them using tabs, but you cannot view them at the same time. Figure 1-9 shows the same set of images and dialogs in the multi-window interface, for comparison.
As with multi-window mode, pressing ![]() hides everything except the current image, but you can still access tools using menus or keyboard shortcuts.
hides everything except the current image, but you can still access tools using menus or keyboard shortcuts.
Note that while in single-window mode the Toolbox cannot be moved or closed. It can be more difficult to adjust the size of the Image window, since it’s constrained by all the docks and dialogs. Also, when you open a new dialog, it either extends to the full height of the window (and takes up a lot of space) or, sometimes, doesn’t start out as a part of the main window, so you’ll have to move it into place.


Although we recommend multi-window mode, you can use whichever mode you prefer while reading this book. Your choice of mode will rarely effect how the examples in this book work.