
Enabling Shadows
Several visual attributes are only visible when the project is rendered, including fill effects, motion blur, depth of field, complex masks, and layer shadows. Layer shadows and layer shading are added using the Shadows panel in the Layer Settings dialog box, shown in Figure 33.4.
Figure 33.4. Shadows panel in the Layer Settings dialog box.

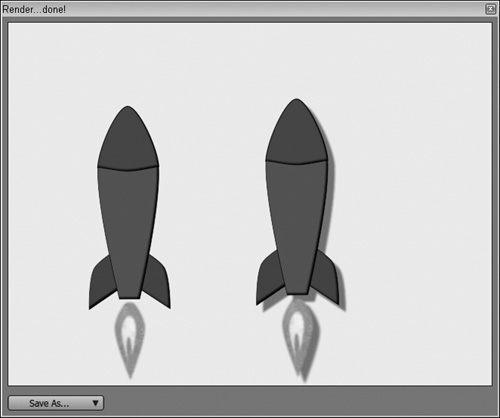
When the Shadow On or the Shading On option is enabled, then all layer objects are automatically given a shadow or are shaded when the project is rendered. Note that this shadow is only a drop shadow that helps to raise the object from the surface, as shown by the right rocket in Figure 33.5.
When the Shadow On option is enabled, the other settings become active. The Offset value defines the distance from the original that the shadow is moved in a diagonal path. Figure 33.6 shows the shadow on three flowers with Offset values of 16, 32, and 64.

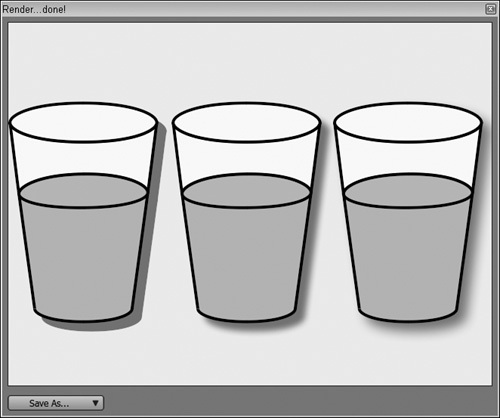
The Blur value defines the amount of pixels used to blur the shadow. Higher values result in a greater amount of blur and a less noticeable shadow. Figure 33.7 shows three glasses with blur shadow values of 0, 16, and 32. Notice how a blur value of 0 leaves a strong shadow line.
The Expansion value sets the number of pixels to increase the shadow. For example, if you set the Offset value to 0 and the Expansion value to 10, then you’ll get a nice 10-pixel halo around the entire object. The Expansion value can range from 0 to 30. Figure 33.8 shows four swords with an Offset value of 0 and Expansion values of 2, 4, 8, and 16. The Shadows panel also includes a setting for altering the shadow color. Clicking the color swatch opens the Color Picker where you can select a color and a transparency value. There is also a Shadow Direction control for setting the direction the shadow is cast.

Tip
A good technique is to use layer shadows to create a strong black stroke that surrounds the layer’s objects. For this effect, use an Offset value of 0, a Blur value of 0, and an Expansion value of 5. This creates a strong, thick stroke around the objects.
In addition to the layer shadows, the Shadows panel also includes an option for enabling shading. This shading is the same as the Shading fill effect, except it is applied to all the objects in the current layer.
Caution
If the Shading fill effect is applied along with the Shading layer effect, then the effect is doubled on the object.
The Shading settings of Offset, Blur, Shading Color, and Shading Direction work exactly the same as the Layer Shadow settings, but the Contraction is a little different. It defines the size of the shading in pixels and can range from 0 to 30. Figure 33.9 shows examples of layer shading applied to an apple with values of 0, 8, 16, and 30.

Note
The Layer Shadow and Layer Shading settings can be animated.
To add a layer shadow to a spinning logo, follow these steps:
1. | Open the Spinning logo.anme file from the Chapter 33 folder on the CD. This file is taken from an earlier tutorial and features a spinning logo. |
2. | Select and double-click the single layer in the Layers palette to open the Layer Settings dialog box. Click the Shadows panel and enable the Shadow On option. |
3. | Set the Offset to 0, the Blur to 8, and the Expansion to 12; then click the Shadow color swatch and change the color to a bright neon green. Then close the Layer Settings dialog box. |
4. | Drag the Time Slider to frame 24 and select the File, Preview menu command (Ctrl/Cmd+R) to see the resulting glow, as shown in Figure 33.10. |
