Using External Lip-Sync Packages
Anime Studio also works with several different lip-syncing packages. Some are companion add-ons like Papagayo and others are scripted plug-ins. Some of these packages automate the creation of the Switch Data File for you. The available lip-syncing add-ons to Anime Studio include the following:
Papagayo: An add-on package with a surprising array of features. This package can be downloaded from the Smith Micro Web site.
Myna: A scripted solution created by an Anime Studio user. It converts output from Microsoft’s lip-sync tool to a format that Anime Studio can read. Information on this script can be found at the Lost Marble forum. This tool is only available for Windows users.
Magpie Pro: A commercially available tool for handling lip-syncing. Information on this tool is available at www.thirdwishsoftware.com/.
JLipSync: This tool is similar to Magpie, but it is written in Java, which makes it accessible on all platforms. Information on this tool is available at http://sourceforge.net/projects/jlipsync/.
Poser: e frontier’s Poser 8 includes a Talk Designer module that can be used to automate the lip-syncing process. The files can then be exported to Anime Studio. More information on Poser can be found at the Smith Micro Web site at www.smithmicro.com/.
Using Source Data Files
The default method for doing lip-syncing in Anime Studio is to link the audio file to the Switch layer, but previous versions of Anime Studio used a simple text file (with the .DAT extension) that told the program which Switch sublayer to use and at which frame to use it. This feature is still supported by Anime Studio and is selected as an option in the Select Audio Sync Source drop-down list in the Switch panel.
The DAT file includes a list that tells the program which sublayer to display at which frame. You can learn more about generating these DAT files in Chapter 24, “Using Switch and Note Layers.” Remember to use the correct sublayer names within the DAT file.
After you’ve created a DAT file, you can link it to the Switch layer using the Switch panel in the Layer Settings dialog box. Click the Select Audio Sync Source button and select the Switch Data File option from the pop-up menu, as shown in Figure 20.7; then choose the DAT file from the File dialog box.
Figure 20.7. Switch Data File option.

Using Papagayo
Papagayo is a lip-syncing program that creates DAT source files that work with Anime Studio. It can be downloaded for free from the Smith Micro Web site. Versions are available for Windows, Mac, and Linux. Papagayo is licensed under the GNU license. The source code is even available for you to review and make changes if you want.
Note
Although Papagayo is freely available, it is being phased out now that the new phoneme features are available within Anime Studio.
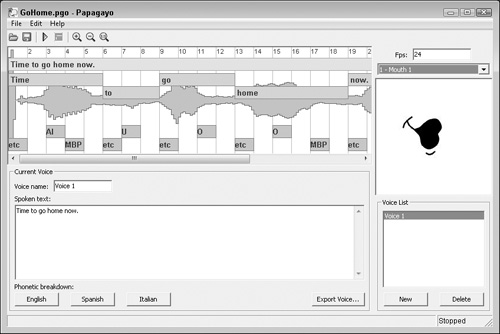
Once installed, Papagayo loads as a separate program. Figure 20.8 shows the Papagayo interface. You can load an audio file, and it automatically breaks it down into phonemes that you can match with mouth keyframes. The software even supports audio in English, Spanish, and Italian.

To get the software to work, you first need to load an audio file. You can then type in the dialogue of the spoken audio and press the English button to get a phonetic breakdown of the spoken audio. The audio may need some tweaking. You can adjust the sentences, individual words, and finally the phonemes by dragging on either end of their bars in the interface. After the various phonemes are identified and aligned, you can export the results to a switch data file with the .DAT extension using the Export Voice button.
Note
Before adjusting the audio file in the Papagayo interface, make sure the frames per second are set to a value equal to your animation file.
Figure 20.9 shows what the DAT file looks like. This file can be loaded into Anime Studio using the Source Data button in the Switch panel of the Layer Settings dialog box. Notice how the DAT file is looking for several layers named O, AI, L, E, and so on. These layer names match the various sounds, or phonemes, that make up the spoken sentences.
Figure 20.9. DAT file from Papagayo.

To lip-sync audio using Papagayo, follow these steps:
Open the Lip Sync.anme file from the Chapter 20 folder on the CD. This file includes a simple girl’s face minus the mouth.
Select the File, Import, Mouths menu command. In the Insert Object dialog box that appears, select Mouth 1 and click the OK button. This places the mouth object in the center of the working area.
With the Mouth 1 Switch layer selected, resize the mouth on the face with the Scale Layer tool (2).
Open the Papagayo program and select the File, Open menu command. In the File dialog box that opens, select the GoHome.wav file in the Chapter 20 folder on the CD and click the Open button. The waveform for the audio file is displayed in the interface. Then click the Zoom In button to expand the waveform to fill the top pane.
In the Spoken Text pane, type in the words for this audio file, “Time to go home now.” Then click the English button. Papagayo makes its best guess at the position of the words and phonemes in the audio file.
Move to the end of the audio file and notice how the green sentence bar doesn’t go all the way to the end of the waveform. Select and drag the right end of the sentence bar to align with the end of the waveform. Next adjust the orange word bars to coincide with the waveform bumps for each word. Notice how the last word, now, is drawn out much longer than the rest. Finally, adjust the pink phoneme bars at the bottom of the waveforms. The resulting adjustment should look like the one in Figure 20.10.
After the audio file is adjusted, click the Export Voice button at the bottom of the Papagayo interface and name the file GoHome.dat. Then save the Papagayo file in case you need to adjust the file some again.
Back in Anime Studio, select and double-click the Mouth 1 Switch layer to open the Layer Settings dialog box. In the Switch panel, click the Source Data button and choose the GoHome.dat file from the Chapter 20 folder on the CD. This is the same file that Papagayo exported. Then close the Layer Settings dialog box.
Select the File, Import, Audio File menu and load the GoHome.wav file into the Anime Studio project. Then click the Play button (Spacebar) to see the resulting character speak, as shown in Figure 20.11.