
Adding Credits to Your Project
The Scripts, Other, Credits menu command runs a script that opens a file dialog box where you can select a simple text file that includes the credits for the current project. Before the file dialog box opens, the Credits dialog box, shown in Figure 10.6, appears and lets you choose the style for the credits text, including its font, duration, delay, and fade.

The text file that is added to the Credits script can include several lines of text. Each separate line of text gets its own slide and can fade in and out for the given duration. To create a separate slide of text, you need to add a blank line to the text file. For example, if you have a text file with one line of text followed by a blank line and then two lines of text, and if the duration is set to 24 frames and the Delay is set to 10, then the first line of text will appear from frames 1 to 24, the text will disappear for 10 frames, and then the second two lines of text will appear for another 24 frames.
Tip
The Credits script can be used to insert multiple lines of text into the current project.
Caution
The Credits script won’t work with standard word processor files like Microsoft Word unless they are saved as text files.
When text is entered into the scene using the Credits script, each separate slide of text is placed on a vector layer and all the slides together are grouped under a group layer named Credits, as shown in Figure 10.7. Selecting an individual vector layer causes the text to appear in the main window and the text’s animation keys to appear in the Timeline palette.
Figure 10.7. Credits in Layers palette.

Tip
Even though the Credits script lets you insert multiple lines of text, if you include a large text file, it can really slow down your system because all letters are converted to points and paths.
To use the Credits script, follow these steps:
1. | Open a text file and enter the following text. Be sure to include the blank lines and save the file as a text file when finished. Thanks for viewing this twisted display And, next time, try not to forget the tip. |
2. | Choose a vector layer in the Layer palette and select the Scripts, Other, Credits menu command. The Credits dialog box appears. |
3. | Set the Duration to 10, the Delay value to 5, and the Fade value to 2. Before closing the Credits dialog box, change the Fill color in the Style palette to black. Choose a font in the Credits dialog box and then click the OK button. A file dialog box appears. |
4. | In the file dialog box, select the saved text file and click the Open button. The first two lines of text appear in the center of the working area, as shown in Figure 10.8. Tip If the text appears jagged in the main window, click the Display Quality pop-up menu in the lower-right corner of the main window and enable the Anti-aliasing option to smooth the text. |
5. | Drag the current frame bar in the Timeline palette forward to see the first slides of text disappear and the next slide of text appear, as shown in Figure 10.9. Since the text entered in the text file has blank lines, the text is split into several slides. Figure 10.9. Dragging the current frame bar in the Timeline palette makes the other slides of text appear.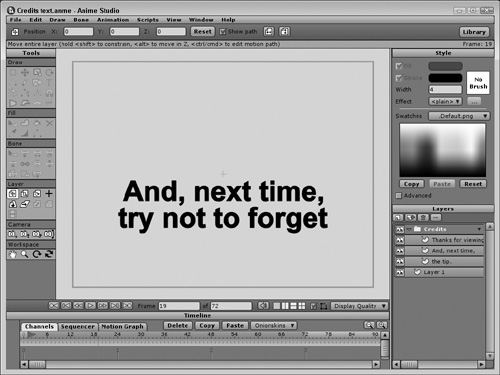
Note A third way to add text to a project is with the Note layer that is specified to be rendered. Note text isn’t as versatile as normal text. More on using note text is covered in Chapter 24, “Using Switch and Note Layers.” |
