
Inserting Text
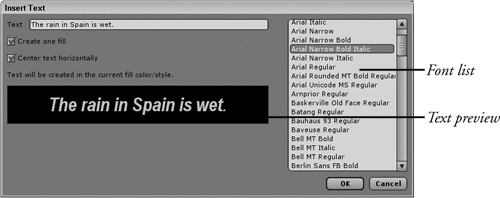
To add text to the current project, select the Insert Text tool in the Tools palette or choose the Draw, Insert Text menu command. This opens the Insert Text dialog box shown in Figure 10.1. Simply type the text that you want to add to the scene into the Text field and choose the font from the available system fonts displayed in the list to the right.
Note
The Insert Text tool and the Draw, Insert Text menu command is only available if a vector layer is selected in the Layers palette.
A preview of the text you entered is displayed in the selected font in the middle of the dialog box. This preview text is updated whenever you change the text or select a new font.
Note
When converting text to paths, Anime Studio automatically uses enough points to accurately create the text in the current font. Complex fonts will result in more points than using simple fonts.
When text is created, it is automatically filled using the current fill settings and stroked using the current stroke settings, as shown in Figure 10.2. If the Create One Fill option is enabled, then you can select all letters in the text selection by clicking the fill of just one of the letters. If this option is disabled, then each letter is independent of the others.

Tip
As long as the Insert Text dialog box is open, you can change the fill and stroke properties in the Style palette, but once the OK button is clicked, the style properties are used on the new text.
When text is created, it is aligned with the first letter at the main window’s origin, but if the Center Text Horizontally option is enabled, then the center of the text is aligned to the window’s origin.
Note
When text is created, it is converted automatically to points and paths, which means if you misspell a word, you’ll need to insert the missing letter manually.
To create and edit text, follow these steps:
1. | Choose a vector layer in the Layer palette and select the Draw, Insert Text menu command or click the Insert Text tool. The Insert Text dialog box appears. |
2. | |
3. | With the text selected, scale the text down to fit within the working area using the Scale Points tool (S). The text remains centered as it is scaled. |
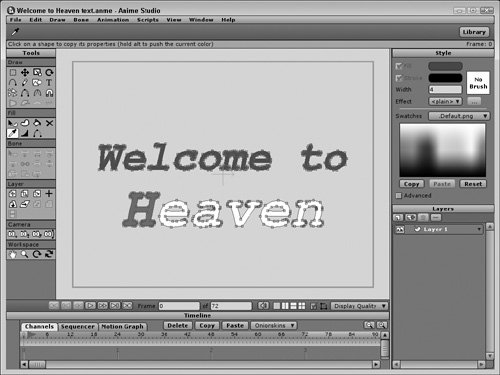
4. | Choose the Draw, Insert Text menu command again and enter the word Heaven in the text field. Then disable the Create One Fill option and click the OK button. The text is added to the working area on top of the existing text. |
5. | With the new text selected, move the text below the existing text with the Translate Points tool (T). |
6. | Choose the Select Shape tool (Q) and click one of the letters in the first line of text and then change the fill color in the Style palette. Since the text was created as one fill, all the letters were selected and filled when you clicked on just a single letter. |
7. | With the Select Shape (Q) tool still selected, click the first letter of the second line of text and change the fill color in the Style palette. Since the second line of text was created with the Create One Fill option disabled, each letter is selected independently of the others. Figure 10.3 shows the resulting text with only the first letter colored differently. |
Copying and Pasting Existing Text
In addition to typing text into the Text field of the Insert Text dialog box, you can also copy text from another application and paste it directly into the Text field.
Caution
There isn’t a published limit on the size of the text string that can be entered into the Text field, but keep in mind that letters can create a large number of points and a long string of text can easily become a memory burden that can choke the program.
Converting Text to Paths
If you look for a converting to text feature, you won’t find it. Text in Anime Studio is automatically converted to paths when it is added to a vector layer. This gives you an easy way to edit the text as individual characters, but it makes it hard to edit the text and correct any typos. Once the text is added to the vector layer, it loses its text nature and simply becomes a bunch of points and paths.
Changing Font and Text Size
Since the text is automatically converted to points and paths, you can quickly change its size using the Scale Points tool (S), so the Insert Text dialog box doesn’t include any Font Size value. When scaling a selection of text, dragging with a corner handle maintains the text’s proportions.
Caution
The Insert Text dialog box populates its list of fonts from the Library/fonts folder. If you use a font-handling tool like Suitcase, then your fonts might be located in a different folder where Anime Studio can’t find them. If this happens, the Font list in the Insert Text dialog box will be empty. To have the fonts appear, make sure they are located in the Library/fonts folder.
If you select a graphic font such as Wingdings, you can easily create a number of unique shapes, such as those displayed in Figure 10.4.
Figure 10.4. Special characters can be copied and pasted in the Insert Text dialog box.
