
Preparing 3D Objects for Exporting
Taking some steps to prepare your 3D objects for exporting will help your objects make a clean transition to Anime Studio. If these steps aren’t taken, you could end up with an item that is resized too large to be useful or that has no color and texture.
Triangulating Models
Some 3D programs can deal with polygon faces that have multiple edges forming a square, a pentagon, or even more. The problem with polygons that have four or more faces is that they might be curved, which often causes trouble during the exporting process. To make sure that no polygons are concave or convex, you can triangulate all the polygon faces in the 3D object.
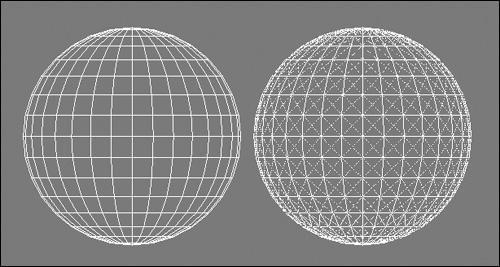
A triangular face has only three edges, so it is impossible for it to be bent. By forcing all polygon faces to be triangles, you can eliminate any concave or convex faces. Most 3D programs have a simple command to triangulate the entire 3D object. Figure 30.1 shows two 3D sphere objects. The one on the left uses polygons with four edges called quads and the one on the right is triangulated.
Figure 30.1. Nontriangulated and triangulated spheres.
The drawback to triangulating a 3D object is that it can increase the number of polygons by two to four times the current number. If your model is fairly simple, such as an undistorted sphere, cube, or some other primitive shape, then you may benefit more by forcing the model to be exported using quads. Some 3D packages include an option to export the model using quads.
Sizing Models and System Units
One common error that is often made when exporting a 3D model is to have the system units set to something that is incompatible with the project scene in Anime Studio. Of course, 3D models can be scaled to match the size of the other objects in the project, but doing so can be a hassle. If you make sure that the system units in your 3D program are set to centimeters, then all exported objects should be within scale.
Tip
If your imported 3D object is out of scale, you can use the Scripts, 3D, Auto-Scale menu command to resize the 3D object to fit the project scale.
Baking Textures and Lighting
The OBJ 3D format supports saving texture images with the .MTL image extension, but another way to handle textures is to bake the texture and lighting directly into the model using the vertex color channel. The method for doing this is different in each 3D package, but if you look in the help file for the specific package you are using, you should be able to figure this out.
In addition to texture effects, you can also bake in lighting to the model’s vertex channels. Anime Studio has no way of lighting a 3D object, so it is best if you can light the object in its original 3D package and then bake the lighting into the object. Notice how the hawk model in Figure 30.2 has been prelit and the lighting is saved to the hawk’s texture.
