
Binding to Bones
After you’ve created a skeleton that matches the shape of the objects that the bones will control, you need to bind the bones to the object. This can be done by using Anime Studio’s automatic binding feature or manually if you want more control. If you elect to manually bind the points to the bone, then you have the option of binding either the layer or the points. Once bound, the selected points or layer will move when the bone is moved.
Using Automatic Flexible Binding
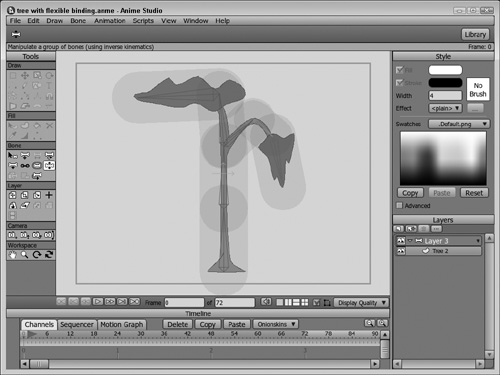
Automatic binding, which is also known as flexible binding, occurs whenever you add bones to a bone layer and place the matching sublayer of content within the bone layer. You can test out the automatic binding by selecting the Manipulate Bones tool (Z) and dragging the bones around. As you move the bones, the bound objects will move with the bones, as shown in Figure 26.6.
Note
When the Manipulate Bones tool (Z) is selected, each bone is surrounded by a shaded area that shows the bone strength.
Tip
The Manipulate Bones tool (Z) impacts all bones within the skeleton. If you want to isolate the movement or rotation of a single bone, use the Translate Bone tool (T) or the Rotate Bone tool (R).
Flexible binding works well as a first start, but it has an effect over all points in the sublayer. The points that are closest to the bone will move the most and the points farther away will move only a small amount if at all. This type of binding works fine if each of the bones moves in a separate direction, but if two bones are fairly close to one another, then moving one bone will pull at the points near it even if they belong to another part of the object. Figure 26.7 shows this problem. Some flexible bound bones were added to the lion’s tail, but the tail is close to head, so moving the tail bones also moves the points at the top of the lion’s head resulting in some undesirable deformation.

Tip
Flexible binding works best when all the bones point in different directions, and it should be avoided if the bones run parallel to each other or if two bones are fairly close to one another.
Using Automatic Region Binding
Flexible binding is the default option, but if you select the Bones panel in the Layer Settings dialog box, shown in Figure 26.8, you can enable the Region Binding option. The Bones panel is only available when a bone layer is selected in the Layers palette.
Figure 26.8. The Bones panel.

When the Region Binding option is selected in the Bones panel of the Layer Settings dialog box, then only those points within the shaded area that surrounds the bone are moved with the bone. This binding option lets you control which points get moved with the bone.
The shaded influence area that surrounds the bone is called the bone strength, and it can be altered using the Bone Strength tool. When this tool is selected, you can drag in the working area to increase or decrease the size of the strength area around the bone. Points near the bone’s base will be within one or more bone strength areas. These points are influenced by each of the bones that it is within.
Caution
If you adjust the bone strength area, be careful not to make the area too small. If some points get left out of the area, they will be left behind when the bone moves.
To alter the bone strength for the bones of a tree, follow these steps:
1. | Open the Tree with region binding.anme file from the Chapter 26 folder on the CD. This file includes a tree object with several bones for controlling its movement. |
2. | Click the Manipulate Bones tool (Z) and drag the lower limb’s bone. Notice how the upper tree branch moves with the lower branch. Select the Edit, Undo menu command (Ctrl/Cmd+Z) to undo the movement. |
3. | Double-click the bone layer in the Layers palette to open the Layer Settings dialog box. Open the Bones panel and select the Region Binding option; then close the Layer Settings dialog box. |
4. | Select the Bone Strength tool and click and drag on the upper tree branch’s bone. Resize the bone strength area until it just contains the tree branch object, as shown in Figure 26.9. Repeat this step for the other bones. |
5. |

Manually Binding Layers
All objects in the current layer can be manually bound to a bone using the Bind Layer tool. To use this tool, just select a bone and a layer that is a sublayer of the bone layer and click the Bind Layer tool. Once bound, the entire layer and all its contents will move and rotate along with the bone. Figure 26.10 shows a clock on which each hand is controlled by a bone. Because each clock hand doesn’t need to be parented to the other, the clock actually includes two bone layers with a layer for each hand. This lets the hands move independently around the center of the clock.

Note
Each layer can only be bound to a single bone at a time.
Caution
Binding layers to a bone works well if you are controlling an image layer with a bone, because they are less likely to distort when the entire layer is moving and rotating together.
Manually Binding Points
If the vector layer includes multiple points, you can use the Bind Points tool (I) to select and bind specific points to a specific bone. To use this tool, first select a bone, and then within the vector layer, choose the points that you want to be bound to the selected bone with the Bind Points tool. If you hold down the Ctrl/Cmd key, you can access the Lasso tool to select points.
Caution
The Bind Points tool will only be available when the vector sublayer is selected.
After all the points you want to bind are selected, you need to press the Spacebar or click the Bind Points button in the Options bar at the top of the working area to complete the binding.
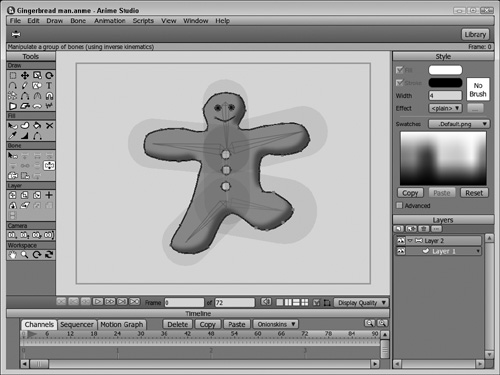
To manually bind points to a gingerbread man character, follow these steps:
1. | Open the Gingerbread man.anme file from the Chapter 26 folder on the CD. This file includes a simple gingerbread man character with several bones added to it. |
2. | Choose the Select Bone tool (B) and click the head bone to select it. Then choose the vector sublayer in the Layers panel and drag over all the head and face points with the Select Points tool (G). Select the Bind Points tool (I) and press the Spacebar to bind the points to the selected bone. |
3. | Repeat step 2 for each of the remaining bones being careful to only attach the points closest to the selected bone. |
4. | Click the Manipulate Bones tool (Z) and drag the gingerbread man’s limbs. Notice how only the bound points move with the bone, as shown in Figure 26.11. |
Note
If the selected bone already has bound points, then when you select the Select Bone tool (B), the bound points are displayed.
Manipulating Bones
After a layer or points are bound to a bone, you can move the bones around using the Manipulate Bones tool (Z). If you click a bone with this tool, the bone is selected, and you’ll be able to rotate the bone tip by dragging in the working area. When this tool is selected, the area of influence of each bone is displayed as a semi-transparent area that surrounds the bone.
Note
When manipulating bones at frame 0, the skeleton is automatically reset when another tool is selected.
Adjusting Bone Strength
The bone strength area is designated by a semi-transparent area that surrounds the bone. This area is visible for all bones when the Manipulate Bones tool (Z) or the Bone Strength tool is selected. This area denotes the bone strength and can be altered using the Bone Strength tool. All points that are contained within this area will be moved with the bone and any points outside of this area will remain in their position when the bone is moved. With this tool, you can drag in the working area to change the influence area of the selected bone. You can change the bone strength using the Bone Strength field in the Options bar. Figure 26.12 shows the bone strength for the left leg being reduced.

Note
The Bone Strength tool is only available when a bone layer is selected in the Layers palette.
Releasing Layers and Points
If you select a set of points that you want to release from its current bound bone, you can use the Bone, Release Points menu command or the Bone, Release Layer menu command. Once a layer or a set of points is released, it will no longer be controlled by the bone.
Reapplying Automatic Binding
If you use the Bind Points or the Bind Layer tools to manually bind the bones and then decide that you want to use the automatic binding method instead, you can choose the vector sublayer and select the points to apply a flexible binding to and choose the Bone, Flex-Bind Points or the Flex-Bind Layer menu command. This throws away the manual binding for the selected points or layer and reapplies the automatic flexible binding to the selection.