
The Proposal Page
Elance has a workroom specifically designed to manage the proposals received for your job. You will refer to this page often as you sort through the contractors. To get to it, click on the little house in the far-left corner of the main toolbar. This home button always takes you to your My Jobs page listing your projects. Then click on the heading of the project you want to view the proposals on.
I’ll go through each of the key workroom areas.
Overview
At the top of the page you’ll see a basic overview of what project you posted, what your actual posting said, and how many contractors have bid. This layout will appear each time you open this page.
In the box on the right, tabs run along the top. The first says Overview and is what you see in Figure 12.1. You get the summary of what’s going on overall, and can see who you invited and how many of them responded.

Figure 12.1: The Overview area of the workroom gives you a clear snapshot of the project and who’s bidding.
The Project Summary tab brings up your project description. This is a handy way to remind yourself what exactly you said and asked for. Can’t remember all the details you listed for your website? You’ve got it all here.
In the Public Messages tab, you can add a message to your job posting that will also be sent directly to all contractors who’ve placed a bid. This is a great way to clarify specs or terms, or answer any questions that are consistently popping up.
The Attachments tab is where you upload an attachment. Maybe you have more project details or sample work that would more clearly explain what you’re looking for. Remember, communication is key. Don’t be shy about using these extra ways to be clear about your project.
After you add an attachment it will be updated on the job post, but be sure to post a public message as well to let contractors know. They won’t be notified that an attachment has been added otherwise.
Under Team, you can view everyone involved on the client side of the project. All your team members as well as their roles will be listed here.
Finally, the Settings tab lets you adjust your bidding and payment parameters. For example, this is where you would go if you wanted to cancel a project or extend or end the bidding time. You can also adjust basic payment settings.
The Proposals
Each bid you receive on your job will include the actual proposal the contractor writes, plus myriad extra details that appear in the workroom, as shown in Figure 12.2.
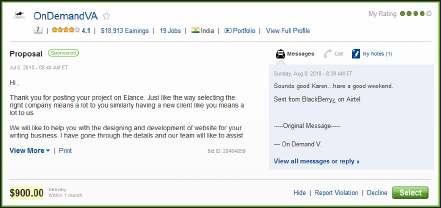
Figure 12.2: Each bid you receive will arrive in the form of a summary and will be listed in the workroom.
The proposal itself is displayed on the left side of the box. With the click of a mouse, it can be expanded to full view.
| BEST PRACTICES |
Given the quantity of contractor bids coming in, it’s best to use the note-taking feature early and often. Don’t rely solely on your memory or on that little sticky note clinging precariously to your monitor. The more regularly you write down relevant details, questions, and concerns, the easier it will be to find your answers and select the right contractor.
On the top you have the basic summary of this contractor’s statistics. You know where they’re located, how many jobs they’ve had over the course of the last 12 months, and what their average rating is. There’s also a direct link to their portfolio samples and their profile.
On the right side you’re able to message them directly and privately. This is enormously useful in the selection process. There’s also an area for making your own notes, which the contractor cannot see. This is great for listing questions or concerns you want to follow up on.
The bottom-right corner is where you can take specific action. You can hide the bid, which is useful if you’ve decided against them and don’t want to scroll past every time. If you decline their bid they will be notified directly, as they will if you click the green Select button and choose them for the job.
One of the clever features of the proposal summary box is the ability you have to sort and rate your contractors. On the top-right corner you have a rating system from 1 to 5. Use this early!
Many clients make a first assessment of the proposals and right off give them a 1, 3, or 5 green-dot rating. This helps them make an initial sort. Later, they can go through each one more carefully.
Two additional avenues exist to sort your proposals, as shown in Figure 12.3. On the top-right corner, two drop-down menus (Filter By and Sort By) are available. Now you can manage your prospective contractors by sorting for feedback, bid amount, your own ratings, and more. This is a super-convenient way to stay on top of things.
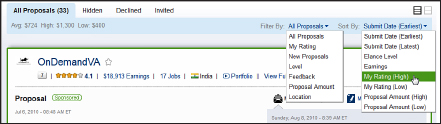
Figure 12.3: These two drop-down menus give you several interesting ways to sort through your proposals.