
Certificate Types for Lync Server
,Certificates have traditionally been a difficult subject for earlier versions of Communication Server. For many administrators, OCS 2007 was likely their first exposure to Subject Alternate Name (SAN) certificates. A SAN certificate differs from traditional certificates in one way: SAN certificates contain multiple names where traditional certificates contain only one name. By containing multiple names, a SAN certificate can correctly answer to a hostname, a service name, or a load-balanced name. This greatly simplifies load balancing and geographic redundancy by allowing a system to respond to multiple names using a single certificate when a secure connection is desired.
Lync Server provides a wizard for requesting, installing, and assigning certificates. This wizard is reachable when installing CS system components. For example:
1. Launch Setup from the Lync Server install media.
2. Click Install or Update Lync Server System.
3. Assuming the Local Configuration Store is installed and at least one component has been installed, click Run on Step 3 to request a new certificate.
4. Click Request to request a certificate.
5. The Request Wizard launches. Click Next.
6. If you are going to use a third-party certificate, choose Prepare the request now, but send it later (offline certificate request). If you utilize your own CA, you can select Send the request immediately to an online Certificate Authority.
7. In this example, you use an offline CA. When prompted, browse to a location where you can store the certificate request file. After it is selected, click Next.
8. By default, the wizard creates a request for a WebServer (SSL) certificate. Click Next.
9. Enter a friendly name for the certificate. This makes it easier to identify later. Choose a bit length for the certificate. If you need to export the private key later, select the check box. This is typically used when a single SAN cert is imported onto multiple computers. Click Next.
10. Enter information for organization and organizational unit. With most external CAs, these values have been defined as naming constraints and must match values you’ve already defined with your certificate provider. Click Next.
11. Pick your country from the drop-down menu, and then enter information for the State/Province and City/Locality options. Click Next.
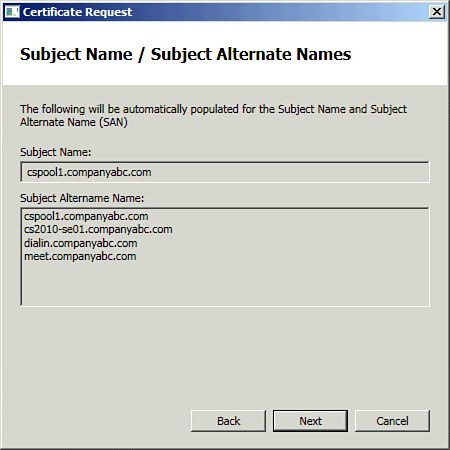
12. Review the names that are populated into the certificate as shown in Figure 10.9, and then click Next.
Figure 10.9 Reviewing Subject Alternate Names
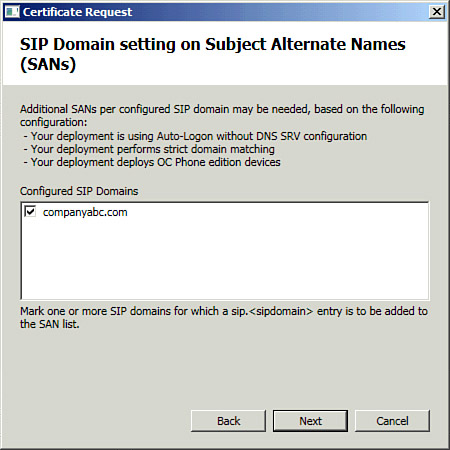
13. If you use auto-logon without DNS SRV entries, if you perform strict domain matching, or if you plan to deploy OC Phone edition devices, you need to check the box to add additional SANs per SIP domain as shown in Figure 10.10. Click Next.
Figure 10.10 Configuring SIP Domains on SANs
14. Any additional Subject Alternate Names outside those determined by the wizard can be added. After they are added, click Next.
15. Review the Certificate Request Summary, and then click Next.
16. After the commands are executed, click Next.
17. This generates the certificate request file. Depending on your certificate provider, you might upload this file or copy and paste the text contained in the file when requesting your certificate. The text version of the request is shown in Figure 10.11. Click Finish.
Figure 10.11 Text Version of a Request File

After the certificate has been returned signed by the vendor, it is necessary to import the certificate and assign it:
1. From the Start menu, click All Programs, Microsoft Lync Server, Lync Server Deployment Wizard.
2. Click Install or Update Lync Server System.
3. Click Run on Step 3: Request, Install or Assign Certificates.
4. Click Import Certificate in the lower portion of the wizard.
5. Click Browse and navigate to the certificate that the vendor sent. If there is a private key contained in the file (for example, if it was exported by a different Lync Server) select the appropriate check box, and if a password was set on the export, enter it in the field provided. Click Next.
6. Review the summary and click Next.
7. When the command has executed, click Finish.
8. In the Certificate Wizard, click Assign.
9. Click Next.
10. Choose the certificate you want to assign as shown in Figure 10.12, and then click Next.
Figure 10.12 Assigning Certificates
Tip
This is where the friendly name comes in handy. If you aren’t sure which certificate to use, you can view certificate details and look for the correct Subject Alternate Names.
11. Review the certificate summary, and then click Next.
12. After the command has executed, click Finish.
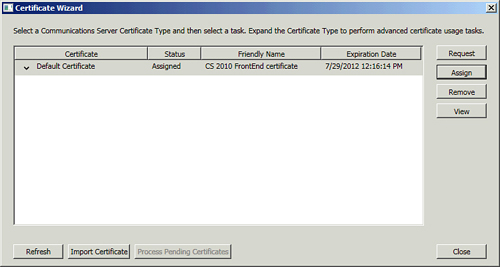
Lync Server now has an assigned default certificate, as shown in Figure 10.13.
Figure 10.13 Viewing the Assigned Certificate

13. Click Close to end the Certificate Wizard.