 Installing Certificate Services
by Tom Pacyk, Andrew Abbate, Alex Lewis
Microsoft® Lync Server 2010 Unleashed
- Title Page
- Copyright Page
- Dedication
- Contents at a Glance
- Table of Contents
- About the Authors
- Acknowledgments
- We Want to Hear from You!
- Reader Services
- Introduction
- Part I. Overview
- Chapter 1. What Is Microsoft Lync Server?
- Chapter 2. What Is New in Microsoft Lync Server?
- Introducing New Management Tools
- Topology Changes
- New Enterprise Voice Features
- New Call Management Features
- Integrated Mediation Server
- New Presence Features
- New Conferencing Features
- DNS Load Balancing
- Survivable Branch Appliances
- Operating System Support
- New Lync Client Features
- Client Appearance
- The “Me” Area
- Enhanced Contacts
- Privacy Relationships
- Integration with Office and Windows 7
- Whiteboarding and Application Sharing
- Improved Meeting Join Experience
- Conferencing Attendant and Scheduling
- PSTN Dial-In Conferencing Improvements
- Video Improvements
- Manager/Admin Improvements
- Improved Phone Experience
- Summary
- Chapter 3. Feature Overview of Microsoft Lync Server
- Chapter 4. Benefits of Microsoft Lync Server 2010
- Part II. Microsoft Lync Server 2010 Server Roles
- Chapter 5. Microsoft Lync Server 2010 Front End
- Chapter 6. Microsoft Lync Server 2010 Edge
- Chapter 7. Microsoft Lync Server 2010 Monitoring
- Overview
- Installation
- Configuration
- Administration
- Troubleshooting
- Best Practices
- Summary
- Chapter 9. Director
- Part III. External Dependencies
- Chapter 10. Dependent Services
- Chapter 11. SQL
- Chapter 12. Firewall and Security Requirements
- Part IV. Administration and Management
- Chapter 13. Monitoring Microsoft Lync Server 2010
- Overview
- OpsMgr Lync Server 2010 Monitoring
- What Is New in OpsMgr R2?
- How OpsMgr Works
- OpsMgr Architecture
- How to Use OpsMgr
- OpsMgr Component Requirements
- Advanced OpsMgr Concepts
- Understanding OpsMgr Deployment Scenarios
- Multiple Configuration Groups
- Deploying Geographic-Based Configuration Groups
- Deploying Political or Security-Based Configuration Groups
- Sizing the OpsMgr Database
- Defining Capacity Limits
- Defining System Redundancy
- Monitoring Nondomain Member Considerations
- Securing OpsMgr
- Installing Operations Manager 2007 R2
- Installing Edge Component Monitoring Certificates
- Installing the Lync Server 2010 Management Pack
- Best Practices
- Summary
- Chapter 14. Backup and Restore of Microsoft Lync Server 2010
- Chapter 15. Administration of Microsoft Lync Server 2010
- Chapter 13. Monitoring Microsoft Lync Server 2010
- Part V. Migrating from Older Versions
- Part VI. Voice
- Chapter 17. PBX Integration
- Chapter 18. Enterprise Voice
- Chapter 19. Audio Conferencing
- Part VII. Integration with Other Applications
- Chapter 20. Exchange 2010 and SharePoint 2010 Integration
- Overview
- Exchange 2010 Unified Messaging
- Call Answering Rules
- Exchange 2010 Unified Messaging Architecture
- Unified Messaging Users
- UM Web Services
- Supported IP/VoIP Hardware
- Unified Messaging Protocols
- Unified Messaging Installation
- Postinstall Configuration
- Data Storage in Unified Messaging
- Exchange 2010 Outlook Web Application
- SharePoint 2010 Integration
- Best Practices
- Chapter 21. UCMA
- Chapter 20. Exchange 2010 and SharePoint 2010 Integration
- Part VIII. Clients
- Chapter 22. Microsoft Communicator Client for Macintosh
- Chapter 23. Windows, Browser, and Silverlight Clients
- Chapter 24. UC Endpoints
- Part IX. Planning for Deployment
- Chapter 25. Virtualization
- Chapter 26. Planning for Internal Non-Voice Deployment
- Chapter 27. Planning for Deploying External Services
- Chapter 28. Planning for Voice Deployment
- Index
Installing Certificate Services
,Although certificate services are offered by a number of vendors, this chapter covers only the installation of Microsoft Certificate Services because it is the most commonly used CA for Microsoft products. In smaller scenarios, an Enterprise Root CA can be provisioned, although in many cases, those smaller organizations might still want to consider a standalone Root and a subordinate Enterprise CA. For the single Enterprise Root CA scenario, however, the following steps can be taken to provision the CA server:
1. Open Server Manager (click Start, All Programs, Administrative Tools, Server Manager).
2. In the Nodes pane, select Roles, and then click the Add Roles link in the tasks pane.
3. On the welcome page, click Next.
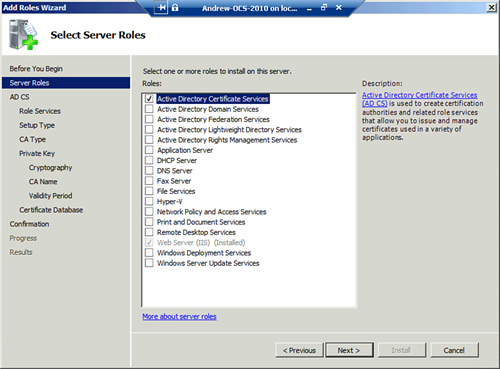
4. On the Select Server Roles page, check the box for Active Directory Certificate Services, and then click Next.
5. Review the information about AD CS on the Introduction page, and then click Next to continue.
6. On the Select Role Services page shown in Figure 10.5, choose which role services are required. A base install needs only the Certificate Authority role. Click Next to continue.

7. Select whether to install an Enterprise (integrated with AD DS) CA or a Standalone CA on the subsequent page. In this example, you install a domain-based Enterprise Root CA. Click Next to continue.
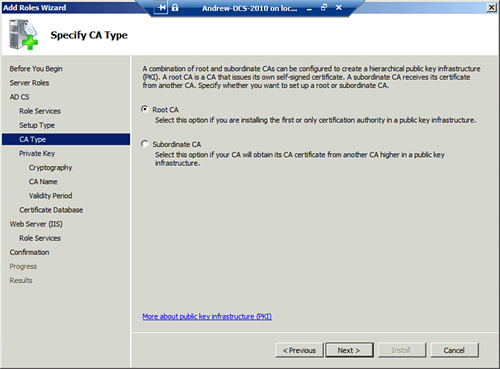
8. On the Specify CA Type page, specify the CA type, as shown in Figure 10.6. In this case, you install a Root CA on the server. Click Next to continue.
Figure 10.6 Specifying a CA Type

9. On the following Set Up Private Key page, you can choose whether to create a new private key from scratch or reuse an existing private key from a previous CA implementation. In this example, we create a new key. Click Next to continue.
10. On the Configure Cryptography for CA page, enter the private key encryption settings, as shown in Figure 10.7. Normally, the defaults are fine, but there might be specific needs to change the Crypto Service Provider (CSP), key length, or other settings. Click Next to continue.
Figure 10.7 Choosing Cryptography Settings

11. Choose a common name to identify the CA. Keep in mind that this name displays on all certificates the CA issues. For this example, enter the common name CompanyABC-CorpCA. Click Next to continue.
12. Set the validity period for the certificate to be installed on this CA server. If this is a Root CA, the server has to reissue the certificate chain after the expiration period has expired. In this example, a 5-year validity period is used, although many production scenarios have a 20-year CA created for the root. Click Next to continue.
13. Specify a location for the certificate database and log locations, and then click Next to continue.
14. Review the installation selections on the confirmation page, as shown in Figure 10.8, and then click Install.
Figure 10.8 Reviewing AD CS Installation Options

15. Click Close when the wizard is complete.
16. After you install AD CS, additional CAs can be installed as subordinate CAs, and the administration of the PKI can be performed from the CA console (choose Start, All Programs, Administrative Tools, Certification Authority).
-
No Comment