 Topology Builder for Microsoft Lync Server Monitoring Role
by Tom Pacyk, Andrew Abbate, Alex Lewis
Microsoft® Lync Server 2010 Unleashed
Topology Builder for Microsoft Lync Server Monitoring Role
by Tom Pacyk, Andrew Abbate, Alex Lewis
Microsoft® Lync Server 2010 Unleashed
- Title Page
- Copyright Page
- Dedication
- Contents at a Glance
- Table of Contents
- About the Authors
- Acknowledgments
- We Want to Hear from You!
- Reader Services
- Introduction
- Part I. Overview
- Chapter 1. What Is Microsoft Lync Server?
- Chapter 2. What Is New in Microsoft Lync Server?
- Introducing New Management Tools
- Topology Changes
- New Enterprise Voice Features
- New Call Management Features
- Integrated Mediation Server
- New Presence Features
- New Conferencing Features
- DNS Load Balancing
- Survivable Branch Appliances
- Operating System Support
- New Lync Client Features
- Client Appearance
- The “Me” Area
- Enhanced Contacts
- Privacy Relationships
- Integration with Office and Windows 7
- Whiteboarding and Application Sharing
- Improved Meeting Join Experience
- Conferencing Attendant and Scheduling
- PSTN Dial-In Conferencing Improvements
- Video Improvements
- Manager/Admin Improvements
- Improved Phone Experience
- Summary
- Chapter 3. Feature Overview of Microsoft Lync Server
- Chapter 4. Benefits of Microsoft Lync Server 2010
- Part II. Microsoft Lync Server 2010 Server Roles
- Chapter 5. Microsoft Lync Server 2010 Front End
- Chapter 6. Microsoft Lync Server 2010 Edge
- Chapter 7. Microsoft Lync Server 2010 Monitoring
- Overview
- Installation
- Configuration
- Administration
- Troubleshooting
- Best Practices
- Summary
- Chapter 9. Director
- Part III. External Dependencies
- Chapter 10. Dependent Services
- Chapter 11. SQL
- Chapter 12. Firewall and Security Requirements
- Part IV. Administration and Management
- Chapter 13. Monitoring Microsoft Lync Server 2010
- Overview
- OpsMgr Lync Server 2010 Monitoring
- What Is New in OpsMgr R2?
- How OpsMgr Works
- OpsMgr Architecture
- How to Use OpsMgr
- OpsMgr Component Requirements
- Advanced OpsMgr Concepts
- Understanding OpsMgr Deployment Scenarios
- Multiple Configuration Groups
- Deploying Geographic-Based Configuration Groups
- Deploying Political or Security-Based Configuration Groups
- Sizing the OpsMgr Database
- Defining Capacity Limits
- Defining System Redundancy
- Monitoring Nondomain Member Considerations
- Securing OpsMgr
- Installing Operations Manager 2007 R2
- Installing Edge Component Monitoring Certificates
- Installing the Lync Server 2010 Management Pack
- Best Practices
- Summary
- Chapter 14. Backup and Restore of Microsoft Lync Server 2010
- Chapter 15. Administration of Microsoft Lync Server 2010
- Chapter 13. Monitoring Microsoft Lync Server 2010
- Part V. Migrating from Older Versions
- Part VI. Voice
- Chapter 17. PBX Integration
- Chapter 18. Enterprise Voice
- Chapter 19. Audio Conferencing
- Part VII. Integration with Other Applications
- Chapter 20. Exchange 2010 and SharePoint 2010 Integration
- Overview
- Exchange 2010 Unified Messaging
- Call Answering Rules
- Exchange 2010 Unified Messaging Architecture
- Unified Messaging Users
- UM Web Services
- Supported IP/VoIP Hardware
- Unified Messaging Protocols
- Unified Messaging Installation
- Postinstall Configuration
- Data Storage in Unified Messaging
- Exchange 2010 Outlook Web Application
- SharePoint 2010 Integration
- Best Practices
- Chapter 21. UCMA
- Chapter 20. Exchange 2010 and SharePoint 2010 Integration
- Part VIII. Clients
- Chapter 22. Microsoft Communicator Client for Macintosh
- Chapter 23. Windows, Browser, and Silverlight Clients
- Chapter 24. UC Endpoints
- Part IX. Planning for Deployment
- Chapter 25. Virtualization
- Chapter 26. Planning for Internal Non-Voice Deployment
- Chapter 27. Planning for Deploying External Services
- Chapter 28. Planning for Voice Deployment
- Index
Topology Builder for Microsoft Lync Server Monitoring Role
,Lync Server uses the published topology to process traffic and maintain overall topology information. To ensure the topology is valid, it is recommended you run the Topology Builder before each topological change. This example shows the steps necessary to add a Monitoring Server to your Lync Server deployment. Remember, if you change the topology later, it should be republished to ensure consistency.
When you launch Lync Server Topology Builder, a pop-up message asks whether you want to download the existing topology. Click OK to continue.
To add a Monitoring Server in Topology Builder, follow these steps:
1. Expand your site in Topology Builder.
2. Select the Monitoring menu item, as shown in Figure 7.1.
Figure 7.1 Monitoring Role Selected

3. On the right side, in the Action pane, click New Monitoring Server. Enter the appropriate information, as shown in Figure 7.2, and then click Next to finish the wizard.
Figure 7.2 Define a Monitoring Server

Note
Note that Lync Server sites are not related to Active Directory sites. They are completely separate and unique to Lync Server.
4. Select the site name and choose Publish, as shown in Figure 7.3.
Figure 7.3 Choose the Publish Action
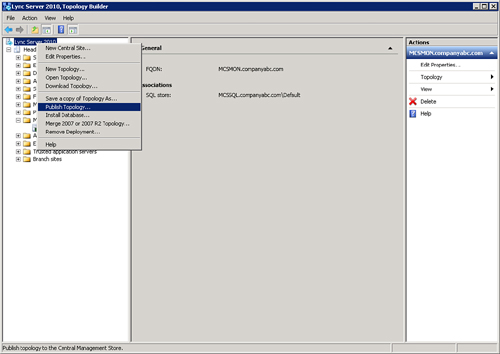
5. Click Next to publish the updated topology to the central management store, as shown in Figure 7.4.
Figure 7.4 Publishing the Updated Topology

6. Click Finish to return to the main Topology Builder screen.
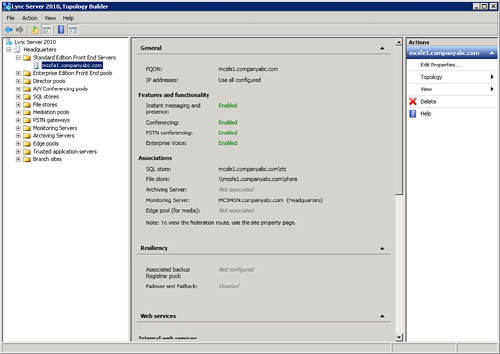
7. Expand the appropriate section, either Standard Edition front ends or Enterprise Edition front ends, and then select a pool.
8. In the main window, expand the General tab and ensure the Monitoring Server is assigned to the pool as shown in Figure 7.5.
Figure 7.5 Monitoring Server Is Assigned to the Pool
-
No Comment