
Walkthrough of the UCMA 3.0 Components
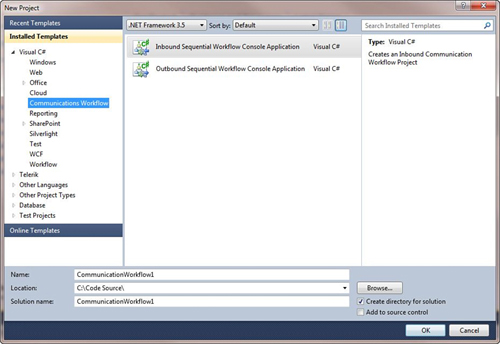
After the UCMA SDK is installed, look at the UCMA components in Visual Studio 2010. After opening VS 2010, clicking File, New, Project gives you the New Project Wizard, as shown in Figure 21.5. To start a UCMA 3.0 project, expand the Visual C# tree and select Communications Workflow. At first you might be surprised to find that there are no templates showing under Communications Workflow. If nothing is shown, select .NET Framework 3.5 in the drop-down at the top of the wizard.
Figure 21.5 New Project Wizard
Note
Currently, UCMA 3.0 does not support .NET Framework 4.0.
Next, select the Inbound Sequential Workflow Console Application. In the bottom half of the wizard, name your application and select a location for the application. Click OK and Visual Studio asks you to select a language for your project. The language options available depend on what languages you have installed on your computer. After selecting the correct language for your project, Visual Studio creates your application and presents you with a screen that looks like the one shown in Figure 21.6.

Note
At first glance, the Visual Studio interface looks similar to any other project that you have created in the past. In a typical Visual Studio layout, notice your workflow in the center along with the Solution Explorer showing the files in your application. You also see the toolbox showing the various components of the UCMA Workflow.
First, let’s look at the default Workflow. Notice that the first component is an acceptCallActivity. This component does exactly what its name implies: It accepts a call. But you need to be aware that in the case of a UCMA Workflow application the call can be either a voice call or an IM request. Yes, this component can handle both and that means you can design your application so that it can handle both types of calls by branching in your code based on the call type. The next component is a communications SequenceActivity. This component executes a series of activities in order and is necessary to control the call.
In the Solution Explorer, notice that the project consists of a WPF piece that controls the markup for your Workflow (along with the accompanying C# code behind) as well as a Program.cs file. The logic part of your application is split between these two files, with the Program.cs file running when your application starts. It handles the setting up of the endpoints for the call as well as the trust relationship (using certificates) between the application and the Lync machine. It is also responsible for the initialization of the Workflow and setting up the collaboration with Lync. It is the setting up of the endpoints that enable Lync to direct calls to your application (for example, the endpoint).
After the console application runs and the endpoints are established, the application simply waits for calls to get directed to it. When the application receives a call, it fires up the Workflow piece of your application, which is where your call flow resides. It is this part of the application that interacts with the caller receiving input from the caller and providing feedback to the caller. Figure 21.7 shows a visual description of the Workflow.
