
Annotating with Project and Shared Parameters
Every element in Revit has a list of parameters that has been assigned to it by default. Some of these parameters, such as Assembly Code and Mark, can be consistent throughout all the elements in Revit. Others, such as Length, Height, and Volume, are specific to element groups that could contain those kinds of parameters. The list of default parameters is available to describe most of what you need, but periodically you will want to add parameters to elements. These new elements, like the default ones, can be tagged and scheduled.
Depending on how you'd like to use a custom parameter, you can add them to your elements in Revit in a few ways:
- If all you want to do is schedule the new parameter, you have a couple of options:
- Add the parameter directly within the schedule itself. This will add a new parameter to your element family. Adding your parameter using this method adds it only to the element family in the schedule. For example, say you want to schedule the STC (Sound Transmission Class) of a wall. You could add this property directly within the wall schedule and the new parameter would only be available to objects in the Walls category.
- Your second option if you only want to schedule parameters is to add the parameter directly into the project itself. Using this method, you can still schedule the new parameter, but you will have the option to add it to multiple categories. So, if you want to add a parameter for Unit Cost, you can add that to both your door and window categories at the same time.
- If you want to be able to both schedule and tag your parameter, you will need to create what is called a shared parameter. This parameter is created as part of a separate file that is shared between the tag family and the element family you've created. An example use of this kind of tag might be for door hardware security. You can create a tag that will allow you to designate whether or not a door has a card reader to gain entrance to a room.
In the following sections, we will discuss how to create both of these parameter types as well as the pros and cons of each.
Creating Custom Project Parameters
You can create custom project parameters at any time in the project cycle. Depending on how you create the parameters, you can assign them to one or more element categories within the model. You can also assign them to elements that have already been created or to element categories for elements that you have yet to create.
The following steps will allow you to make a custom parameter that will be schedulable but not taggable. For this example, pretend you are working on an existing building and reworking a space. Much of what is onsite will need to be demolished, but you would like to reuse all the elements that are salvageable. As you are documenting the existing conditions, you will want to schedule the elements you'd like to keep. To do this, you'll make a parameter called Reuse:
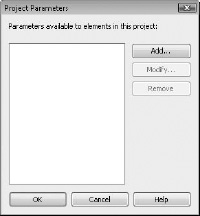
- To add a new project parameter, click the Project Parameters button on the Manage tab. This will display the Project Parameters dialog box (Figure 19.49). Click the Add button.
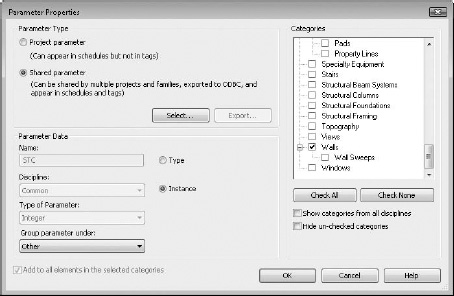
- In the next dialog box, Parameter Properties, you will be asked to define a list of properties for the new parameter. Let's step through what these selections will be. Figure 19.50 shows a view of the completed dialog box.
FIGURE 19.50 Setting the parameter properties

- Project Parameter or Shared Parameter is the first choice you'll need to make. We'll get to shared parameters later, so for now, leave it at the default of Project Parameter.
- Name is used for describing the parameter. For this example, name the parameter Reuse.
- The Discipline drop-down menu will give you three choices: Common, Structural, and Electrical. Leave the default selection, Common, for your parameter.
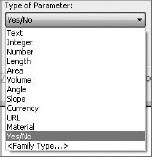
- Type Of Parameter dictates what kind of parameter you have. As you can see in Figure 19.51, there are a variety of parameter types. It's important to understand some of these options and, more specifically, their differences. If you start creating formulas with your parameters, you'll quickly understand how imperative it is to use the proper type. For instance, you cannot multiply Angle × Volume. Text cannot be added to a formula. Integers do not have decimal values. Many of these values are easy to understand if you apply a bit of logic. For our example, use the Yes/No type.
- Type Or Instance Parameter controls the uniqueness of the parameter itself. Probably the best way to explain the difference between these two options is to describe a couple of use cases:
- Type parameters are used for parameters that will be consistent across a type. This type is defined as a subset of a family. Let's take a door family, for instance. In the door family, you will want to define types that are 36″ [926 mm], 34″ [876 mm], 32″ [826 mm], and 30″ [726 mm] doors. To do so, you'd use a type parameter. When you insert the door, you can choose between these predefined types in the Type Selector drop-down.
- Instance parameters are used in cases where you might have too much variety or uniqueness of an element property to want to define a series of types. A good use for an instance parameter is to specify the length of a countertop. When you insert the countertop into your model, you'll be able to drag the length of the counter to fit your needs rather than have to choose a predefined length from the Type Selector.
Both parameter types can be mixed within a given family. In this example, use an instance parameter because you want to designate on an element-by-element basis whether something is reusable.
- Group Parameter Under is an organization tool. When you open your element properties, depending on how many parameters you add you can acquire a long list. This tool allows you to group new parameters into any given category.
- Category is where you define all the category types that our Reuse parameter will be associated with. There are 58 categories in Revit to which you can assign this parameter. For our example, choose Doors, Windows, and Furniture. Categories are flexible. If you decide you need to change categories after you create your parameter, you can easily come back and modify your selection.
- Once you're finished, click OK. This will take you back to the original dialog box where you can choose to add another parameter or, in our case, just click OK to exit the Parameter Properties dialog box completely.
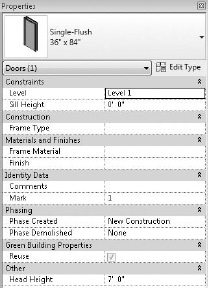
Back in the model, you can now select a door (because it is one of the categories you chose) and see that you have added a Reuse parameter to it in the form of a check box (Figure 19.52).
FIGURE 19.52 The Reuse parameter in the family
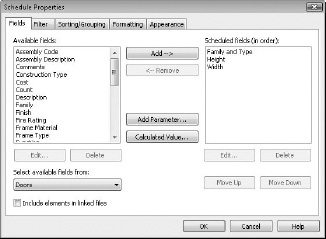
Now that you've created a custom parameter in the project, it's even easier to create one while in a schedule. You can create a custom parameter while creating a schedule or after the fact by modifying one. To create a parameter, click the Add Parameter button in the Schedule Properties dialog box (Figure 19.53). Doing so opens the same dialog box that you see when you click the Project Parameter button, with the exception that the Categories selections will be grayed out because you can only create parameters in schedules for the element being scheduled.
FIGURE 19.53 Adding a parameter while in a schedule
Creating Custom Shared Parameters
When you want to schedule and tag a custom parameter, you will need to use shared parameters. In the earlier example, you learned that shared parameters are useful for creating a tag for the STC rating on a wall, scheduling which doors have security systems as part of the door hardware set, or specifying which equipment in a lab will require special gases (oxygen, argon, and so forth). None of these parameters exist by default in any of the Revit families, but they are all values that you might want to tag or schedule, depending on the type of project you are working on.
These parameters do not exist in any of the tags as well, so in order to tag these parameters, you need to create the parameter type both in the tag and in the element family.
Don't worry—it's not as complicated as it all sounds, but you will need to follow some steps fairly closely. Once you have added a shared parameter to your project, you cannot modify it. If you want to change it, you'll need to delete it and readd the parameter. So, it behooves you to make your choices thoughtfully.
Let's look at the workflow behind creating a shared parameter. You'll do this with an example of creating a custom wall parameter called STC so you can tag the sound transmission class of the wall types. To get started, navigate to the book's companion web page and download the JenkinsMusicBldg.rvt file in the Chapter 19 folder.
CREATING THE SHARED PARAMETER
The first thing you need to do is create a new, shared parameter file. This file translates the values of the shared parameter between the tag, family, and project.
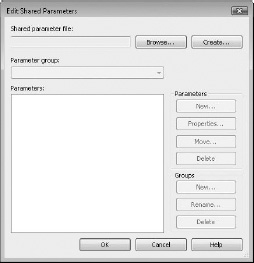
- To create a shared parameter, click the Shared Parameter button on the Manage tab. Doing so opens the Edit Shared Parameters dialog box (Figure 19.54).
- Click the Create button to open the Save As dialog box. Name your shared parameter file. For our example, we've named it STC; however, if you plan to make more than one shared parameter, you might want to name it something more universal. All of the shared parameters for a given project will ultimately live in the same file. Give the file a name and location that will make sense to the project team. Then click Save.
- Now that you've saved the TXT file, you'll return to the Edit Shared Parameters window, where you'll assign this parameter to a group by selecting New under the Groups option (this keeps like elements grouped together). This group is a hierarchical collection. So, for the wall's STC, you will want to create a group called Wall Properties (Figure 19.55). This grouping allows you to easily sort different parameters within project categories. Once you name the group, click OK.

- Once you have a group, you'll see the Parameter buttons are now active. Click the New button, and let's create a shared parameter. Name the parameter STC. Leave the Discipline setting at Common. For Type Of Parameter, choose Integer. Since STC ratings are whole numbers, you can use the Integer type and eliminate any decimal places you'd have if you used Number as the type (Figure 19.56). Once you've entered the settings, click OK.
FIGURE 19.56 Naming the parameter and setting the type

- You should see the new STC parameter in the Edit Shared Parameters dialog box. Click OK to exit this dialog box.
You've now created a shared parameter. The next step is to assign it to a category.
ASSIGNING THE SHARED PARAMETER TO A CATEGORY
The shared parameter is now defined, but you don't have it associated with any categories yet.
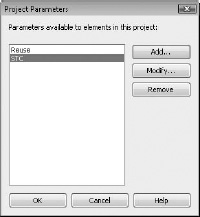
- Click the Project Parameters button on the Manage tab to open the Project Parameters dialog box. You'll see the Reuse parameter you created earlier (Figure 19.57). You want to add a new parameter, so click Add. Notice that STC has been added as well.
FIGURE 19.57 Putting the shared parameter into the project

- The Project Parameters dialog box opens. This time, select the Shared Parameter radio button, and then click Select. In the resulting dialog box, browse to the STC file you just created. Select the file and click OK. You'll see that many of the fields are now grayed out. This is because you have already preselected this information. For a category type, select Walls (Figure 19.58).
FIGURE 19.58 Assigning the shared parameter to a category
- Click OK to exit the dialog box. You'll see the new shared parameter (STC) next to your previous project parameter (Reuse) in the Project Parameters dialog box (Figure 19.59).
FIGURE 19.59 The shared parameter is now part of the project.
- Now that the STC parameter is part of the project, you can begin assigning values to it. Open Level 3 and select one of the walls. By scrolling down in the Properties palette, you'll notice that the STC parameter is now at the bottom (Figure 19.60). Enter a value of 45 and click Apply or simply move your mouse out of the palette.
FIGURE 19.60 Giving the new parameter a value in the project

TAGGING THE SHARED PARAMETER
So far, you've created a shared parameter and added it to the Walls category, and you're able to add values to it. These are all features you could have leveraged with a project parameter. The benefit of using a shared parameter is being able to tag it. The final step in this process is creating a tag and tagging the STC parameter in the wall.
- The first thing you'll need is a new tag. Since you're tagging a wall, there isn't a default wall tag type, so you'll need to make a generic tag and apply it to a wall condition. Click the Application menu and select New
 Family. In the New Family – Select Template File dialog box, open the Annotations folder, select Generic Tag.rfa, and click OK (Figure 19.61).
FIGURE 19.61 Selecting the Generic Tag file

- Next, you'll assign the correct category to the tag. By default, a generic tag is just that: generic. You want it to report information from the Doors category, so at the top of the Home tab, click the Family Category And Parameters button (it has a small file folder in the lower-right corner) shown in Figure 19.62.
FIGURE 19.62 Opening the Family Category And Parameters dialog box

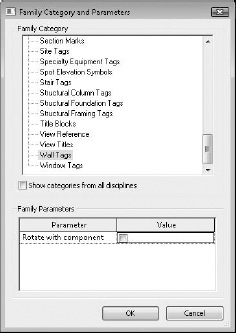
- With the Family Category And Parameters dialog box open, choose Wall Tags from the bottom of the list (Figure 19.63), and click OK.
- With the proper category selected, you need to add a label for your tag. Click the Label button on the Text panel of the Home tab (Figure 19.64).
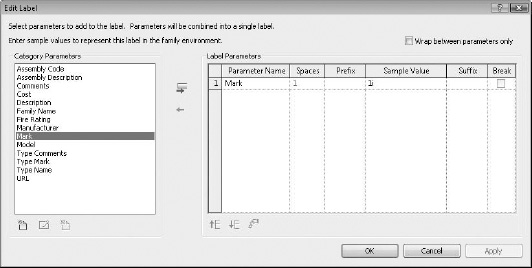
- For our first label, you want to add a mark (Figure 19.65). This will call out the wall type from the Wall schedule in your documents and help you associate the proper wall with the STC rating. Select the Mark parameter and place it above the green grid in the family.
FIGURE 19.63 Selecting the Wall Tags category
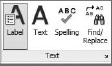
FIGURE 19.65 Adding the Mark parameter
- With the Mark parameter placed, let's add the STC parameter. Choose the Label tool again, and this time, click the Add Parameter button at the bottom of the Category Parameter column
 . This opens the Parameter Properties dialog box (Figure 19.66). Click Select to open the Edit Shared Parameters dialog box. Select STC and click OK, and then click OK again.
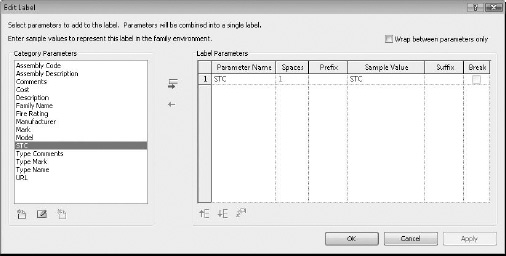
- You'll now see the STC parameter in the list. Select it and add it to the right side of the dialog box (Figure 19.67). Click OK to close the dialog box and place this label under the green dashed line and under the mark.
FIGURE 19.67 Adding the STC parameter to the tag
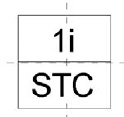
- With all the labels added, you can brush up the tag with a bit of linework to help differentiate the tag from the rest of the drawing. For our example, we've created a simple, divided box, shown in Figure 19.68. Once this is done, you're ready to load it into the project by clicking the Load Into Project button.
FIGURE 19.68 The sample door tag
- Back in the project, you're ready to tag the wall. Choose Tag By Category from the Annotate tab, and select the wall you have already given a value of 45 to for the STC. You'll see the wall type and STC rating populate within the tag (Figure 19.69).
FIGURE 19.69 The shared parameter now shows up in the tag within the project.


And that's it. Once you've stepped through this workflow a few times, it will quickly become old hat, and you'll be able to add custom parameters to projects and tag them without a second thought. One thing to keep in mind, however, while you're doing all this is that once you have added a shared parameter to your project, you will not be able to change any of the properties of the parameter itself. If you set the parameter to Integer and really wanted Number, you'll need to go back, delete the parameter, and start over. Also remember when working with a team, shared parameters work much like keynotes with their external TXT files. If you are sharing the project file with the idea that it will be edited by another team, be sure to include the shared parameter file.