Building a Shelf Using Formulas and Type Catalogs
The real challenge in modeling in 3D is being able to predict and elegantly maintain change and iteration. Once you're able to do this, you really start to work effectively.
To get to this point, you need to understand nesting, family types, formulas, and type catalogs, and in the following sections, we'll walk you through an exercise that includes these techniques. Specifically, you'll build a simple shelf. A shelf is something we're all familiar with, and designing a shelf that elegantly changes with your design is a wonderful thing. Once you learn these techniques, you can apply them to many other concepts in Revit when you're creating elegant content.
The shelf family you will create in the following exercises will contain many brackets, so the brackets will be nested. Which bracket is used will depend on Family Type parameters. Then, the number of brackets will be controlled by formulas that add brackets as the shelf increases in length. Finally, you'll use type catalogs to select only the desired permutations.
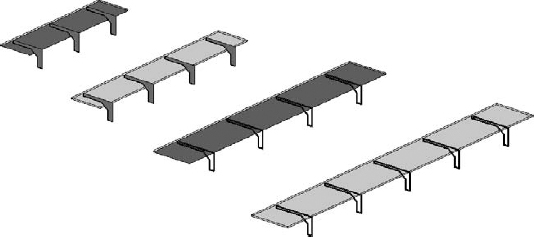
Figure 15.45 shows some possibilities for the final shelf.
FIGURE 15.45 Finished shelf examples

Modeling the Brackets
You'll start by building one of the two brackets:
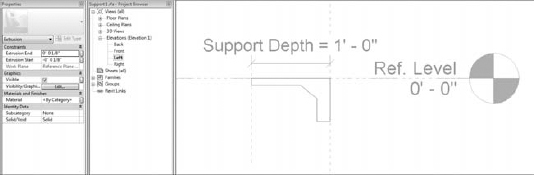
- Open a Generic Model template. Starting in the Left Elevation view, create a reference plane to the left of the Center Front/Back reference plane to control the support depth.
- Add a dimension from the Center Front/Back Reference plane (which is also the insertion point) to your new reference plane.
- Parameterize the Length value as a type parameter, calling it Support Depth. When you're done, you should have what looks like Figure 15.46.
FIGURE 15.46 Parameterized reference planes

- Their proximity to the reference planes will cause them to flex. We'll also change the overall thickness of the bracket to ¼″ [6 mm], being careful to distribute half the bracket thickness to either side of the Center Left/Right reference plane.
FIGURE 15.47 Sketch and Properties settings
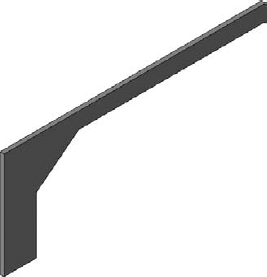
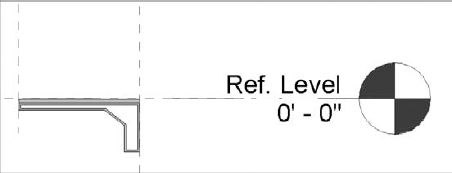
- Save the bracket as Support 1.rfa. It should look like Figure 15.48.
As a general principle, if you have to model an iteration that is similar to an existing example, don't start from scratch. Instead, open the existing example and modify it.
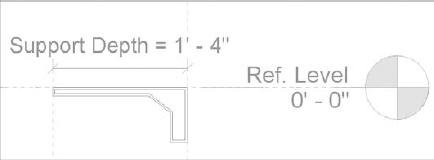
- Click Save As, and call this new family Support 2.rfa.
- Go back to the Left elevation and edit the previous extrusion. Offset the sketch lines ¼″ [6 mm], as shown in Figure 15.49. Generally speaking, try offsetting sketch lines to create openings rather than adding voids. The results are flexible and faster to model.
FIGURE 15.49 Offset and copy the sketch lines.
- When you finish the sketch, your new bracket should look like Figure 15.50. Now save the family, and you're ready to nest these two brackets in your shelf family.

Nesting the Brackets
To nest these two brackets in your shelf family, follow these steps:
- Open a Furniture template (this is a shelf, after all) and go ahead and nest both brackets into this template. Don't place them—just load them for later.
- Close the bracket families, leaving only the Furniture family open. Save this new family, calling it Parametric Shelf.rfa.
- Let's start in a plan view. As a rule, try to create all your reference planes and associated parameters in as few views as possible. This will save you time later.
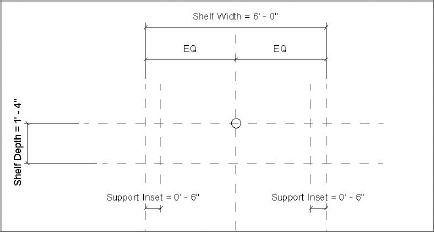
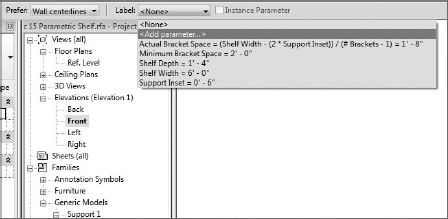
- Create the additional reference planes, dimensions, and type parameters as shown in Figure 15.51. For reference, we've put a temporary circle at the default insertion point. Also note that when the shelf flexes, it will distribute evenly to either side of the Center Left/Right reference plane because of the EQ dimension below the Shelf Width length parameter (Figure 15.51).
FIGURE 15.51 Parameterized reference planes
- Now let's model the shelf geometry from this same view. Again, there's no need to lock any sketch lines to the reference planes. Also, note the Constraints in Figure 15.52. Extrusion Start is 0″ and Extrusion End is negative ½″. This means that the shelf is ½″ thick. As a result, the top of the shelf will initially be aligned with the level it's placed on in the Revit project.
FIGURE 15.52 Extrusion sketch for shelf

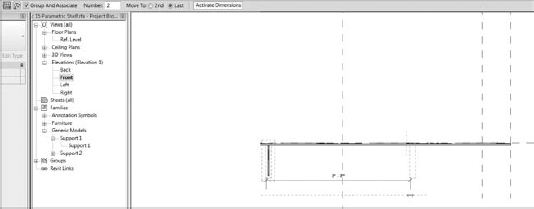
- Return to your plan view and place the Support 1 bracket. Then go to the Right elevation and move the bracket into place, as shown in Figure 15.53, so that it's under the shelf. Just place one bracket. The rest will come later! Also, you don't need to apply Align/Lock to the bracket.
FIGURE 15.53 Support 1 bracket under the shelf

- Now associate the Bracket parameter with the parameter that controls the depth of the shelf. Select the bracket and then select Edit Type to bring up the Type Properties dialog box shown in Figure 15.54. Note that the Support Depth value isn't associated with anything.
FIGURE 15.54 Nesting the support depth

- Click the square button to the far right of the Support Depth parameter. This will bring up another dialog box. Select the Shelf Depth parameter, as shown in Figure 15.55.
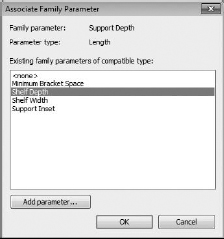
Now when the Shelf Depth length changes, the bracket will grow to match.
Assigning Family Type Parameters
Now that you've nested the brackets and tested the parameters, you'll continue by adding Family Type parameters, which will allow you to select between the nested bracket families.
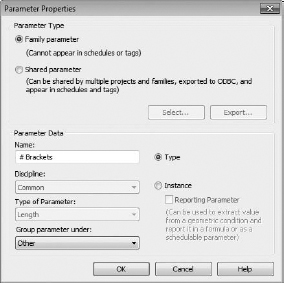
 Select the bracket and look toward the top of the view. There's a value called Label. Pull down the menu and select Add Parameter, which will open the dialog box shown in Figure 15.56. In the Name field, enter Support Type.
FIGURE 15.56 Parameterized family type

- Select between brackets in the Family Types dialog box. Set the Bracket Support value to Support 2. It's already associated because both brackets are of the same Generic Model category (Figure 15.57).
FIGURE 15.57 Family type Support 2.rfa
- While you're in this view, select the Edit Type option, associating the Support Depth value of Support 2 with the Shelf Depth of this family (just as you did a moment ago for Support 1).
Creating Parametric Arrays
Now that you've associated Family Type parameters to the brackets, you'll continue by creating a parametric array in order to control the number of brackets on a case-by-case basis once the family is loaded into the project environment.
- Return to the Front elevation. Select the bracket; then select the Array command, and make an array with the settings shown in Figure 15.58. Put the second bracket on the right side of the Center Left/Right reference plane.
FIGURE 15.58 Creating the array
- Now you're going to parameterize the array. Select either of the brackets, and you'll notice they're now in groups. Select the line that extends above the shelf and extends to either side of the groups. When you select this line, you'll be given an option to parameterize the grouped array (Figure 15.59).
- Select Add Parameter, and complete the dialog box as shown in Figure 15.60. By default, the array has two brackets, which is fine for now. You'll parameterize this later.
FIGURE 15.60 Parameterizing the number of brackets
- Go back to the Front elevation and align/lock the brackets to the reference plane that is associated with the support inset. If you'll remember, we modeled the bracket on the Center Left/Right reference plane in its family. This reference plane is now a reference that you can use when the family is nested. As a result, you'll be able to use this reference when aligning and locking to the reference plane in the shelf project (Figure 15.61).
FIGURE 15.61 Be sure to lock the shelf bracket when aligning.
After you've aligned and locked both brackets, their locations should flex when you change the Shelf Width parameter. Test this now. As a best practice, it's a good idea to test the parameters after every few steps.
Using Formulas
Next let's create a formula that adds brackets as the length of the shelf increases. We'll show how to do this simply at first, and then we'll add some complexity.
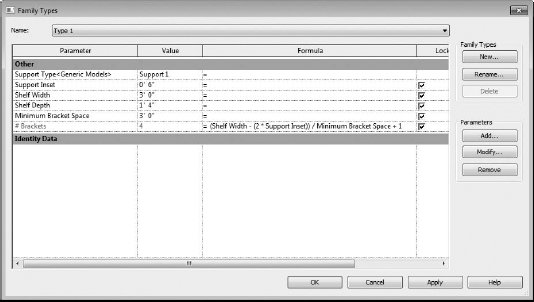
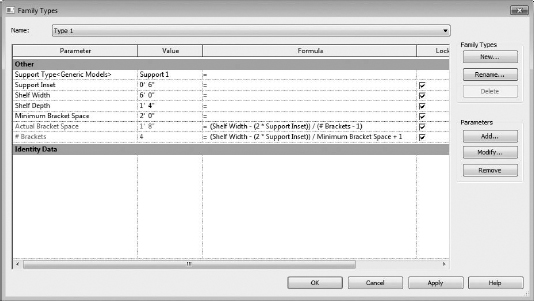
- Open the Family Types dialog box. Rather than specify the number of brackets (# Brackets), add a formula to the right of this value under the Formula column:
(Shelf Width / 3′ [1m]) + 1
The reason that you add one to the end of the line is that if for some reason the width of the shelf is less than the specified width between brackets (3′ [1 m] in this example), then the number of brackets might result in one. But you're not permitted to have an array of less than two. A value of one would cause the formula to fail. Besides, a shelf with one bracket tends to be a bit unstable. By specifying the first and last location of the array, you guarantee a bracket at each end of the shelf.
Now that you've got down the basics, let's make the array more sophisticated.
- Remove both the Support Inset values from the overall Shelf Width value:
(Shelf Width –(2 * Support Inset)) / 3′ [1m] + 1
This is better. However, this formula also will lock the relative spacing between the brackets to 3′ [1 m]. If you want to keep the value flexible, you'll create a Length parameter that allows you to reiterate the bracket spacing.
FIGURE 15.62 Creating the Minimum Bracket Space parameter

- Open the Family Types dialog box, and in the Parameters option select Add; then input the values shown in Figure 15.62.
- Click OK, and close the dialog (Figure 15.63).
- Reopen the Family Types dialog box, and use the parameter you've just created in place of the fixed 3′ [1 m] value. Give the Minimum Bracket Space parameter a value (otherwise, when you apply the formula it won't work). In this case, give the Minimum Bracket Space a value of 3′ [1 m].
- Substitute Minimum Bracket Space + 1 for 3′ [1m]+1 the text in the formula. Remember that spelling and case are important, so copy and paste will help (Figure 15.64).
FIGURE 15.64 Completed formula
- Flex the family and experiment with different bracket spacing, shelf width, and support inset values.
It's not possible (or desirable) to set the actual or real bracket spacing. But it may be helpful to know this value as real-time feedback. So next you'll create the formula that will report this value.
- Open the Family Types dialog box, and click Add to create a new Length parameter, as shown in Figure 15.65.
FIGURE 15.65 Creating the Actual Bracket Space parameter

- Then add the following to the Actual Bracket Space formula field:
(Shelf Width – (2 × Support Inset)) / (# Brackets – 1)
This will report the real value of the bracket spacing, not just the minimum specified (Figure 15.66).
FIGURE 15.66 Creating the Actual Bracket Space parameter

Associating Materials
Now let's associate the material of the shelf with a parameter to control the material:
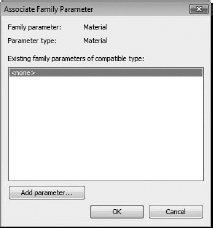
- Select the shelf and then click the button to the right of the Material row (Figure 15.67).
FIGURE 15.67 Selecting Material properties
- Click the Add Parameter button in the Associate Family Parameter dialog box (Figure 15.68).
FIGURE 15.68 Associate Family Parameter dialog box
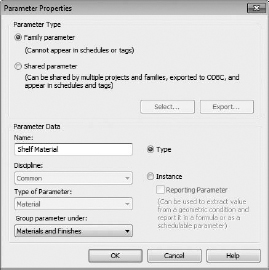
- Add the Material parameter, as shown in Figure 15.69. In this case we've named the parameter Shelf Material.
FIGURE 15.69 Adding the Material parameter to the shelf
Now you can open the Family Types dialog box and see that the material of the shelf geometry has been parameterized to associate with a material (Figure 15.70). Once this family is loaded into the project environment, you can change the material of a shelf as a type. You'll also be able to specify the bracket, as well as the spacing of the bracket.
FIGURE 15.70 Material parameter in the Family Types dialog box

Creating and Editing Type Catalogs
Let's consider all the possible permutations of this shelf. Imagine the following:
- 2 Materials (Wood and Glass)
- 2 Support Types (Support 1 and Support 2)
- 2 Support Inset Lengths (3″ and 6″ [8 cm and 16 cm])
- 3 Shelf Widths (2′, 4′, 6′ [60 cm, 1.2 m, 1.8 m])
- 3 Shelf Depths (8″, 12″, 16″ [20 cm, 30 cm, 40 cm])
How many type permutations might exist?
Easy! 2 × 2 × 2 × 3 × 3 = 72 types
That's a lot of types to build and load into a project, especially if you only want to use just a few of the types in your project. You have a couple of options:
- Some of the type parameters may work as instance parameters. That can reduce the number of types significantly. For example, if the material parameters became instance parameters, you could reduce the number of types by half. But still, that's far too many types.
- You can create a type catalog. Using this approach, you can store all the types in a text file that allows you to be selective about which iterations are loaded into the project. So instead of dozens and dozens of different types, you can just load the ones that you want. This will keep your file much lighter. Also, if you need to create additional types, it's a simple matter of adding the values to the type catalog.
Type catalogs can be intimidating at first because small errors will cause either the type catalog or the corresponding family to fail, so just go slow and test frequently. You don't want to test the catalog at the end of your process and be faced with untangling spaghetti.
We'll start simple. First, keep in mind that the type catalog needs to be in the same location as the family that it references, and it should have the same name. So in this case the family is called Parametric Shelf.rfa, so the type catalog will be called Parametric Shelf.txt. In addition, spelling counts, and parameter names are case sensitive as well, just as when you're working in the Family Editor.
Parameter values can be expressed as length, area, volume, angle, force, linear force, and “other.” For this example, you'll be using length (for lengths) and other (for Family Types). You'll use decimals when appropriate. Although you could create this catalog in Excel and export it as a comma-delimited text file, we'll walk you through creating the type catalog as a text file (which is a little bit harder, but we'll explain a lot in the process).
- Create a text document in the same location as your Parametric Shelf family. Do so by right-clicking your desktop and selecting New
 Text Document from the context menu (Figure 15.71).
FIGURE 15.71 Creating a text document

- Rename the file to match your shelf family, and then open it (Figure 15.72).
- Begin by adding the type names that match the family types. You've already created one type (Figure 15.73). Don't worry about matching all the values—you can change them in the type catalog. Just get the names correct for now.
This is the header text that you'll need in your type catalog. Note the comma at the beginning of the header line (by default this is the type name). Also note that there is no comma at the end.
FIGURE 15.72 Opening the type catalog
FIGURE 15.73 Family types to be matched

- Let's start simple and test by specifying only the shelf material in the type catalog:
,Shelf Material##other##
Type 1,Wood
Type 2,Glass
- After you save the text file and family, you should test the type catalog. Open a new project, and start to load the family into this empty project file. You should get the type catalog shown in Figure 15.74. If you don't see this extra dialog box, make sure to check the filenames of your family and text file. They have to be identical.
- Now let's start to add the other header values and types in the type catalog. Be sure to save and test frequently:
,Shelf Material##other##,Shelf Width##length##feet,Shelf Depth##length##feet,
Support Inset##length##feet,Minimum Bracket Space##length##feet,Support Type##other##
Type 1,Wood,4,1,0.5,2,Support 1
Type 2,Glass,6,1,0.5,2,Support 1

Figure 15.74 shows the result when you attempt to load the family into the project.
FIGURE 15.74 Completed type catalog
Now that you've created the type catalog in a text editor, you'll want to consider editing (or even creating) it in Excel. The important thing is that you'll need to import and export the catalog in a specific way.
- Be sure you import the type catalog file as comma delimited. Open Excel and then select File Open. Browse to your text file and open it. Select Delimited in the first dialog box and you'll see your type catalog as shown in Figure 15.75.
FIGURE 15.75 Type catalog opened in Excel

- Select Comma as the delimiter in the second dialog box (Figure 15.76).
FIGURE 15.76 Select Comma as the delimiter.

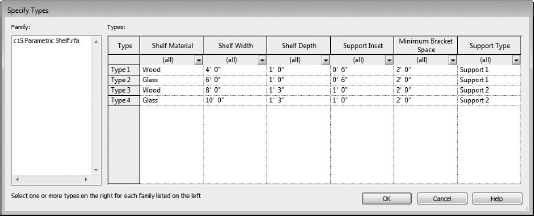
- Now that you have your open catalog, you can fit the columns to the proper width and begin to add additional types. We've also added two additional types in this example (Figure 15.77).
- It's important to save the file with the appropriate settings. Select File Save As and select Comma Separated Values (.csv), and you can save yourself an extra step by changing the file suffix to .txt. You may want to save the file under a different filename so you don't overwrite your original file until you've tested it (Figure 15.78).
FIGURE 15.78 Saving the type catalog from Excel

- Finally, be sure to test all the types in your type catalog in an empty project. You can do so by attempting to load all the types. You'll be given a warning if one of the types cannot be loaded.
From left to right, Figure 15.79 shows Type 1 through Type 4, respectively. If you want to download the Shelf family and type catalog, look in the Chapter 15 folder on the book's web page for the files c15 Parametric Shelf.rfa and c15 Parametric Shelf.txt.
FIGURE 15.79 Completed family types